by Herb Adler 5243 3409
Remember the last episode I found black gunk in the cylinders?
Well, to quote the Queen of Hearts
“Off with it's head”
Remove all the paraphernalia around the head. Like
manifolds, rocker cover, temp sender and so on. Start
loosening the head studs. Well three of the nuts, on the
external studs, were frozen on their stud, which came out
instead. Never mind, a spanner and the vice will remove
them.
The internal ones were easy, being oiled. Also removed
the rocker shaft.
Now, to lift the head. OK where's the nut or bolt I missed?
Triple checked everything but nothing left to hold the head
down. Maybe it's the gasket being stuck. Try levering the
head up. Managed to get a small crack between the head
and block. Even with cold chisels inserted as wedges and
a 3 foot bar the head stubbornly refused to come off. I
was about ready to get the oxy torch and cut the damn
thing up. After many hours of trying many methods of
lifting the head I gave up and went and watched tele.
The next day I scratched my head, (easy to do, not much
hair), and decided to remove the studs and see what that
did. Using two nuts tightened against each other I easily
removed the external studs (those still remaining).
However, the internal studs were extremely hard to turn.
Bugger, must be rust binding them. Anyway persevere and
eventually got them unscrewed so that the head would
come off, though the studs were still firmly imbedded in
the head.
When I got the head to the bench I quickly found the
problem.
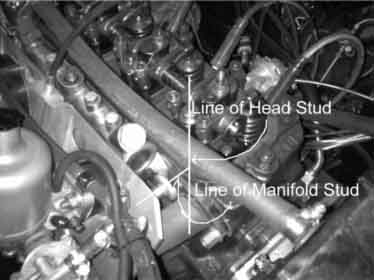
Sometime in the past someone had replaced the manifold
studs with threaded rod. Not an unreasonable fix for
mangled studs. However,,,,, on the B heads the stud hole
is drilled and tapped all the way though, into the hole for
the head stud. The damned threaded rods were acting as
grub screws on the studs! See picture.

Head and manifold stud lines, intersecting
Sooo, remove these threaded rods and loctite them into
position so that they don't protrude into the head stud hole
and this problem is solved.
Now back to the reason for removing the head, the black
gunk.
As it turned out only the front two cylinders were affected,
caused by half the innards of the PCV valve missing. Full
vacuum sucking oil from the crankcase, hence the black
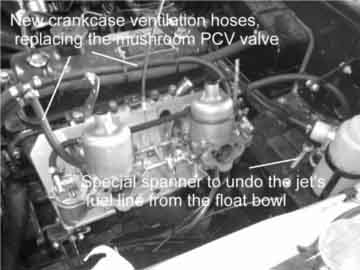
sludge. Replaced the PCV valve with two rubber hoses to
the constant depression ports on the carbys, between the
piston and the butterfly disk.

All the cylinders and combustion chambers were easy to
clean with just a rag.
During this I found that the pistons were new, with 060
stamped on the crown, which, I presume, means 60 thou
oversize. There also seems to be an insert around the
exhaust valves, which I presume means that it has been
modified for unleaded fuel. So the engine has been done
up.
Anyway put it all back together, reset the tappets, again.
and fire up. Starts no worries, but still has the shakes at
1500 rpm. Rear plugs black. Clean them and go through
the whole carby setup once more. Get to the point where
the front plugs have a reasonable colour, but the back
ones are still black. Adjust the mixture nut , equally on
both, until the engine has a slight increase in speed then
dies. Classic correct mixture symptom. Back plugs still
black, engine still shakes. Decided to check the valve
timing, maybe that is out causing the shaking and black
plugs.
CHECK VALVE TIMING
Drain the cooling system again, remove radiator and then the timing cover. Dimples on crank and camshaft sprockets line up correctly. Maybe a “hot” cam. Check the valve opening and closing angles. According to my eye gauge they were pretty spot on. So not the cam or valve timing.
Replace everything, reset the timing and start. Same story with the shakes.
CHECK IGNITION TIMING
OK, what next? Let's check the ignition timing, again. Out
with the timing light, start engine, crawl under the front of
the car, and point the strobe at the crankshaft pulley. At
about 800rpm the ignition timing was jumping about from
zero degrees to fifteen degrees advance.. Should be 10
degrees. Another head scratch. Where can the “slop”
be? Distributor drive from the cam? No that's OK. Timing
chain or tensioner? Another bugger, as this requires the
removal of the timing cover, radiator etc, as for checking
the valve timing. Why didn't I think to check this when I had
the cover off previously? Old age, I guess.
Anyway, after removing everything again, I found that the
chain had about 1 mm sideways slop. I thought that this
was pretty good. Now the tensioner. A bit tight getting the
piston out, so maybe this is the cause. Dismantle and
clean and oil. Works smoothly. Ah ha! Reassemble
everything. (Anyone noticed that the second time you do
something it goes much quicker?)
Now start the engine and lo and behold… the shakes are
still there.
So it has nothing to do with the distributor drive. Maybe
because it is running rough the instantaneous revs are up
and down causing the centrifugal advance to jump all over
the place.
Don Campbell was kind enough to come and have a look. The only thing he found was that the distributor rotor seemed to be between plug contacts and hence randomly firing the wrong plug.
ABANDONMENT
For the silly season at least.
Now that Chrissy and all that is behind me, have another head scratch.
DISTRIBUTOR
Decided that I would stick the old distributor back in to see what it does. Swear, swear curse. With the old distributor the engine runs quite well, though a bit rough, probably due to mistuning. But no shakes.
Why would a new 123 GB4 distributor cause the shakes?? The distributor setup wrong? I'm sure that I followed the instructions perfectly. Oh well, go and check the distributor curves against the B curves. After staring at both curves for ages I decided that the 123 needed to be installed 10 deg further advanced, as is the original one.
This conclusion comes from staring at curves, reading the installation instructions and looking at the curves again.
Basically the instructions say to set the alignment mark to
Top Dead Centre. I had set the notch in the pulley to TDC.
However, now I thought “what if they mean the TDC mark
is the notch and the alignment mark is the 10 deg advance
mark”? ( After all it is a foreign made product and maybe
their English leaves a bit to be desired.) This would shift
the curve to be nearer the B's curve at 2000 rpm.
Run out and whip the 123 back in, set-up to the 10 deg
mark and fire up. Seems to run much better, no shakes.
Halleluiah, finally got it. Now I posted the info about the
instructions on a couple of forums ( fora? ) and was
promptly shot down. Yes the 123 must be setup with the
notch to the TDC mark. The other way would give 40 deg
centrifugal advance max and could blow a piston.
The next thing to try is a more advanced curve, B looks good.
Love these cliff hangers, don't you?
