


The MGB seat rails are made of a combination of wooden rails and two aluminum spacers directly under the four bolts (two per side) which hold the seats to the floor. The basic set up for bolting the seats in is thus:
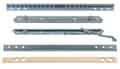
There are two "L" shaped steel tracks with a curved over lip at the top of the upper arm of the L. These are the seat adjustment rails (Seat Slide set in the Moss Catalog). These adjustment rails have an upper section that is bolted directly to the base of the seat frame. This is the part with the adjustment locking arm, located to the front of the seat, which is used to allow the seat to be moved forwards and rearwards. The lower section, which has a series of square notches towards the front end for locking into by the release tab of the upper seat adjustment rail, is bolted to the floor of the car. Both the seats and the adjustment rails are "handed"--there is one for the right side and one for the left side and they are not interchangeable.
The seat-mounted rails are handed to the sides of the car so the adjuster (BHH687 RH seat and BHH688 LH seat) is always to the outside, but the same inside seat rail (BHH719) used on both seats. The floor-mounted rails were originally handed to the seats i.e. there is a left and a right on each seat, but that pair (BHH741 and BHH742) were the same on both seats. Originally each floor runner only had adjustment slots at the front but currently available stock seems to have them at both ends which means they can be mounted on either side of the car and either side of the seat. There is a 'stop block' (AHH8893 and lock nut) fitted to the rear of the outer floor runner on each side of both my cars, although the Parts Catalogue indicates they are for North America only and Barrie Egerton said that they are only applicable to reclining seats.
The lower adjustment rail is bolted to the floor using two 1/4"-28 TPI bolts on each side.. Depending on the year of the car, and whether the bolts are original or not, they vary from 1" to 1 1/4" in length. These bolts pass through the aluminum spacers and, hence, into the floor of the car where they are engaged by captive nuts (nuts welded or otherwise secured to the frame of the car to hold them in place). These aluminum spacers (about 1/4" thick and 3/4" in diameter) are sitting in two holes in a wooden spacer strip (Moss "packing strip") which is a strip of wood 1/4" thick, 1 1/8" wide and 20 5/8" long. It has four holes bored through it, the innermost two of which are used for mounting the MGB seats.
These packing strips and their associated spacers are a problem. The wood tends to attract and hold moisture. This is especially true when rain or other liquid spills get onto the floor of the passenger cabin. This retained moisture in turn, promotes rusting of both the floor and the seat adjustment rails. Under certain conditions (constant humidity and not allowed to dry out), the packing strips can rot and come apart. To do away with these problems, I decided to make up some packing strips out of aluminum bar stock. It is relatively easy and can be done with simple hand tools.
First remove the seat from one side of the car. Slide the seat fully backwards and use a 7/16" box end wrench to remove the two front bolts holding the lower seat adjustment rail to the floor. Then, slide the seat fully forward and use either a wrench or socket to remove the rear two bolts. Carefully lift the seat from the vehicle. The lower adjustment rail which does not have the adjustment locking tab will tend to drop off as you move the seat. Remove it when you can by sliding out the rear of the upper rail. Then remove the other lower adjustment rail by releasing the locking tab (adjustment handle) and sliding the lower adjustment rail to the rear. Examine these rails for rusting. If rusted, clean them with either some form of media blasting, naval jelly or wire brush. Prime and paint them. (Priming helps the paint to stick better.) Set aside to dry.
Then remove the old packing strips and aluminum spacers. Use a 1/4"-28 Unified National Fine (UNF or NF) taper tap to clean up the holes for the hold down bolts. Clean up the bolts as necessary. They can be replaced if too rusty by using standard 1/4"-28 hex head bolts, 1" long. If you can find stainless steel bolts, they probably would be the best, reducing the likelihood of the bolt and captive nut rusting together.
After tapping the holes, lay down the new packing strips, re-assemble the lower adjustment rails to the upper adjustment rails (use a little grease to lubricate the mechanism) set the seat back into the car and bolt down. Then, check to see that the seats move forwards and backwards easily. If they did so when you removed them, they should do so now.
MAKING REPLACEMENT PACKING STRIPS OUT OF ALUMINUM BAR STOCK
You can purchase aluminum bar stock from several sources, including many hardware stores. You want a piece 1/4" thick, 1" wide and at least 20 5/8" long. This bar stock is most commonly found (in hardware stores) in lengths 4' long. One of these strips will serve to make two packing strips. Or, you can choose to purchase your aluminum strips from a metal retailer and have them cut to exact length, saving you from having to do this. Metal retail outlets are listed in the yellow pages under several headings including machine shop supplies.
First, assuming you have a four foot length of bar stock, measure 20 5/8" from each end and make a small mark using a Sharpie, magic marker, etc. Use a machinists square, tri square, etc. to draw a line across the bar exactly 20 5/8" from each end. Cut on the lines. Then, use the uncut end (the end that was cut at the factory) as your reference point for all future work. Measure from the end 2 3/8" and make a cross mark, then measure from the same end 18" and make a cross mark. The end you are measuring from is now the front end of the packing strip. Then, use your square to mark a thin line all the way across the strips at these points. Then, use a set of dial calipers to measure .400" in from one side of the strip and make another mark on top of the cross marks. If you only have a normal rule or tape measure to work with, measure in 3/8" (.375") and this will be close enough. (Note: The original wooden strips seem to have two holes at one end as the mounting points can differ, some need 17" for the second measurement and not 18". Check against the old packing strip, or if that is too badly rotted use the runner itself or floor tapping dimensions themselves.)
At the intersection of the two marks is where you will drill your two holes. Use a center punch to make a mark for the drill bit to start into or, better yet, use a center drill. Drill two holes of about 9/32" or 5/16". These slightly larger holes will allow some slight adjustment of the packing strip when being bolted in. Then, lay the strip into the, car and make sure the holes align properly. If you have done your work carefully, they should. If not, use a round file (chain saw file works well) to enlarge the holes so that they mate properly with the holes in the floor. The end that you originally measured from goes towards the front. The holes are off center in relationship to the centerline of the long axis of the packing strip. Put the short side to the inside of the seat and the slightly longer side outwards. This is easily seen by holding the packing strip against the lower adjustment rail. In the proper position the rail and packing strip will fit perfectly, while in the wrong position, they will overhang each other.
The new packing strips may be painted or left raw. I painted mine black using Rustoleum and allowed them to dry before assembly and installation. All of this work can be done with hand tools. It will result in a packing strip that is stronger and longer lasting than the factory wooden strip. It will also allow you to examine the condition of the seat adjustment rails and repair or replace them as necessary.
This article is copyright 1999 by Les Bengtson and may be reproduced for personal use as long as the copyright and authorship is acknowledged. Please direct any questions to: ragnar@aztec.asu.edu. Happy MGing.