
Clearance to wings
Alignment to wings
Originally chrome-plated surround with 36 individual stainless steel vertical slats, the slats changing in late 64 to one-piece pressed in anodised aluminium with 39 vertical bars (the two outer ones invisible behind the surround). A central vertical bar carried the MG octagon in red and silver against a black shield.
In 1970 the whole grille changed to a recessed or 'fish-mouth' grille with 37 vertical bars all in black, the MG octagon in the centre in silver and red. A thin stainless steel moulding was attached grille itself, and another to the opening down the sides of the wings and underneath, and across the leading edge of the bonnet. Not liked, it only lasted until 1973, many have been changed to the earlier slatted grille sometimes leaving the strip on the bonnet (the other parts of the surround could be removed with no remedial work needed). However there has been something of a renaissance of this type due to their rarity.
In 1964 for the remainder of chrome-bumper production there was a return to a version of the original grille but with two honeycomb panels replacing the slats. Originally these panels were 'handed' as the diagonals in one direction were raised, angled one way on the left-hand panel and the other way on the right-hand. Repos have both panels the same when it was realised either panel would fit either side! A number of these have been replaced with slatted grilles as well.
Alignment to the bonnet:
Two more with the same mod and the same poor alignment, this one with the trim strip: (This and the remaining photos from MG Experience)
This without:
The owner of this car (alloy bonnet) then went to a lot of trouble to cut slots in the leading edge:
To increase the curvature and rivet a reinforcing strip behind the flange to correct the problem:


Complaints on the MGOC forum of replacement grilles being too wide for the gap between the wings. The problem seems to be the 'U'-channel that forms the grill surround has not been fully formed, the outer flange sticks sticks out at an angle instead of pointing straight back so fouling the wings. Ventilation pipe crimps were used here to force the flange to 'lie down' at the corners: (John Keane)

Bee's has the 'U' fully-formed with the flange at right-angles to the front face and parallel with the sides of the aperture giving a clearance to the wing, even at the top corners. This also shows the honeycomb with the raised diagonals going from upper left to lower right:

Incidentally 30 years ago Bee's was as shiny as John's!
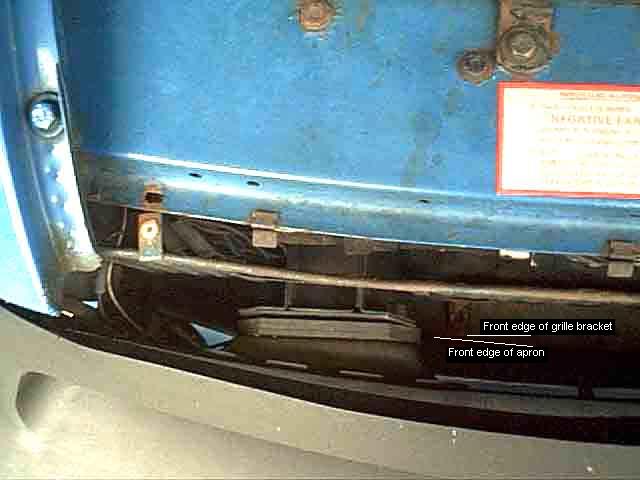 First remove the two large screws from the bottom brackets and the three small screws going through the slam-panel to the plastic sockets in the top brackets
then slide the whole grille forwards, keeping it vertical, just enough for the top brackets to clear the front edge of the slam-panel.
First remove the two large screws from the bottom brackets and the three small screws going through the slam-panel to the plastic sockets in the top brackets
then slide the whole grille forwards, keeping it vertical, just enough for the top brackets to clear the front edge of the slam-panel.
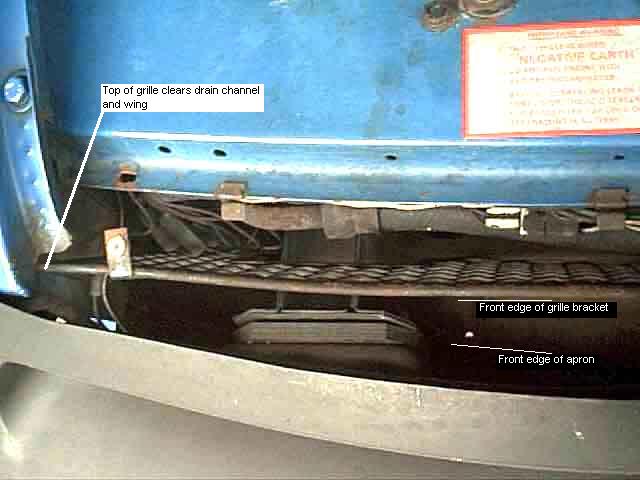 Next tilt the grille by pushing its bottom edge back as far as it will go, this should allow you to tilt it even more by bringing the top edge further forward to clear the end of the wing drain channels and the very front edge of the wings themselves.
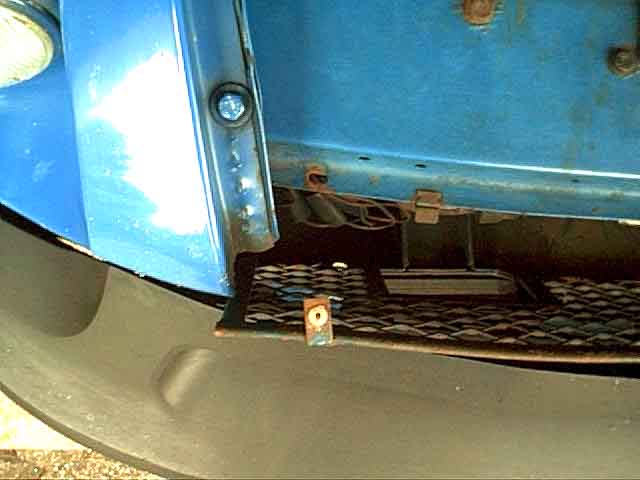 Now you should be able to lift the whole grille up, keeping it square and tilted, with the outer edges of the grill passing through the small gap between the back of the bumper and the front face of the wing. If your gap between bumper and wing is too small to allow this, slacken the nuts securing the bumper to the chassis legs which should allow it to angle forwards increasing the gap.
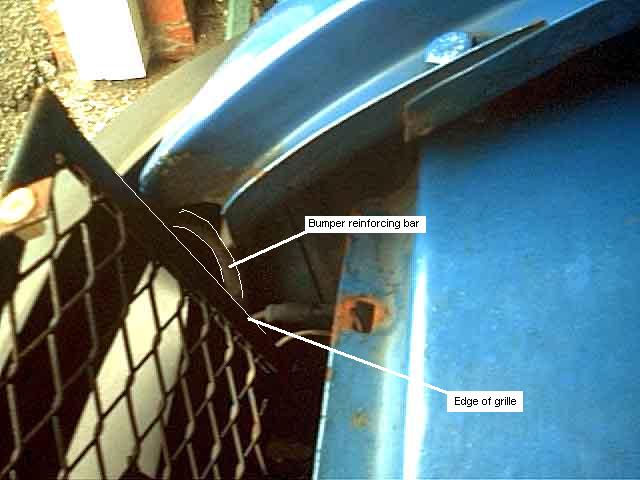 This image shows the vertical edges of the grille and the reinforcing bar for the upper part of the rubber bumper. This bar sits in a channel across the top edge of the bumper, then bends back for a short distance and then downwards. There should be about 1" clearance between the edges of the grille and these bars i.e. they should not interfere with removal at all.