About 150 miles into a 520 miler for the Pendine Run I became aware the clutch pedal was occasionally lighter than normal, and I was getting baulking and grinding in reverse. As it was intermittent I reckoned it was the main seal occasionally leaking back, i.e. no fluid loss, and a check showed the level was normal. We completed the trip with no further drama, but I protected the clutch as much as I could by only changing gear when I had to, and if I had to come to a stop I only depressed the clutch pedal and engaged a gear when I was ready to move off.
On return home I investigated repair kits and replacements. The original style metal reservoir type are available again after plastic reservoirs having been the only type available for some years, but as previous master replacements had shown the bores with no visible scoring or corrosion, I decided to try a kit. That took quite a bit of sorting out as there are two types of internals, originally with different external markings, but the later internals are supplied as a kit for the earlier masters. This makes it effectively a conversion kit, but it isn't described as such, and means the original seals are no longer suitable. So with a car of unknown history you have to take out the piston to see what type of seals you have. Various suppliers reference this but I don't think they explain it clearly enough, and note that the ring-type seal repair kit GRK3004 contains the brake master restrictor valve as the kit is common to both brake and clutch but the restrictor must not be fitted to the clutch.
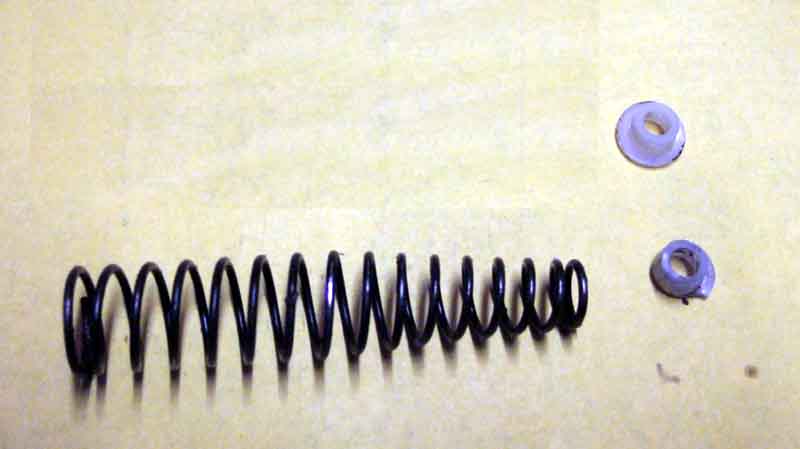
Despite being a 1973 model Bee's master does not have the later markings, and even though the clutch master hadn't been tampered with in my ownership of 26 years (and I suspect it was original to the car) I drained the system by opening the bleed nipple and pumping with the pedal and removed the piston and seals before ordering spares so I could check the bore. A long screwdriver is needed to get at the one cover fixing screw tucked down beside the inner wing, but a driver that takes hex bits with a couple of adapters and a 1/4" drive extension reached that OK, the others are easier. Cover twists out across the front of the masters towards the engine, with just the water bottle removed from its cradle to give a bit of slack on the tubing which normally sits over the flange of the cover. Split-pin and clevis pin removed, dust-cover pulled forwards, circlip pliers and a wiggle and pull removes the push-rod. The internal return spring pushes the end of the piston with the secondary seal out, pulled that the rest of the way out with my fingers, leaving the primary seal etc. still in the bore. Extra-long nosed pliers (from my BT days) tip the seal over so it can be gripped and pulled out. Peering into the bore I can see the plastic 'spreader' that sits between the end of the return spring and the fluid face of the seal has half a flange broken away so it had been at an angle on the spring and setting the seal at an angle. I can also see a broken piece of the spreader sitting in the bore. The seal itself it quite distorted, so must have been like that for a considerable time, amazing it kept going as long as it has. Fish the bit out and the spring with the remains of the spreader.
The broken seal spreader that came out (bottom) and a good one from an old cylinder (top):
The distorted seal. The vertical line runs through the centre of the pip that is at the bottom of the cup and sits in the hole in the spreader. That should be central, but is clearly displaced to the right because of the broken spreader.
Wrap some hand-wipe cloth round a chop-stick (!) and use that to wipe round the bore, which looks perfect. Because Bee's biting point has been rather low for as long I can remember, and I did modify the push-rod some years ago to give more 'throw' (which only improved things slightly), I decided to order both kits - the original at £4 and the conversion kit at £11. New spreaders not available, but having kept the guts of Bee's brake master and both masters off Vee changed some years ago, and out of those three two had the old-style seals with the same spreaders, so I had two spares!
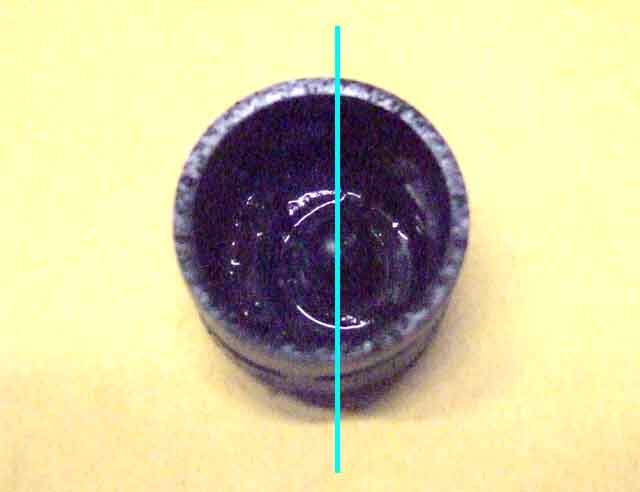
Shiny bore full length and all the way round:
Parts arrived from Moss next morning, and with the low biting point in mind and wondering if I would be able to improve it, I compared the lengths of the five pistons I now had - three previous replacements one with ring seals and the other two with cup, Bee's clutch with cup seal, and the new conversion kit with ring seal. They vary in length quite a bit, except that the new conversion piston is the exactly the same length as the previous replacement that has a ring seal, and Bee's piston is exactly the same as one of the old cup seal pistons. The remaining cup seal piston is slightly longer, and is my first though to fit, but when I check the diameter it is fractionally smaller than Bee's. That must be from the V8 clutch, which has a slightly smaller bore than the 4-cylinder, so not a good idea to use. All the secondary seals are ring-type, but do vary in size.
Unlike the 4-cylinder the V8 clutch master did not change at any time, so it would be reasonable to expect that to have the cup seal as V8 production started before the 4-cylinder seal changed. Why the V8 didn't change in 1973 as Clausager estimates for the 4-cylinder is a bit of a mystery as the V8 still had a couple of years of production left. Maybe the change occurred after the end of V8 production. The other oddity is that of the other two previously removed pistons one is a cup seal the same length as Bee's, and the other is a ring seal the same length as the new conversion piston. One must have come from Vee's brake master, and the other from Bee's brake master, but (purely from an interest point of view) which came from which car? If the cup seal came from Bee, making both pistons and seals identical, then Vee must have had a ring-seal piston in the brake with a cup-type in the clutch. The Parts Catalogue has the same info about a change in brake master to one with two concentric rings as for the clutch, but is similarly vague about the date. And both Vee's brake and clutch masters only have one concentric ring, not two, Bee's having none. The brake master was always the same for the V8 and the equivalent era 4-cylinder. The implication is that one of the brake masters had already been modified with a conversion kit, but before my time. This is all rather by-the-by, and really only leaves me with two options - the new original cup-type seal with Bee's piston, or the new conversion kit, and I go for the former.
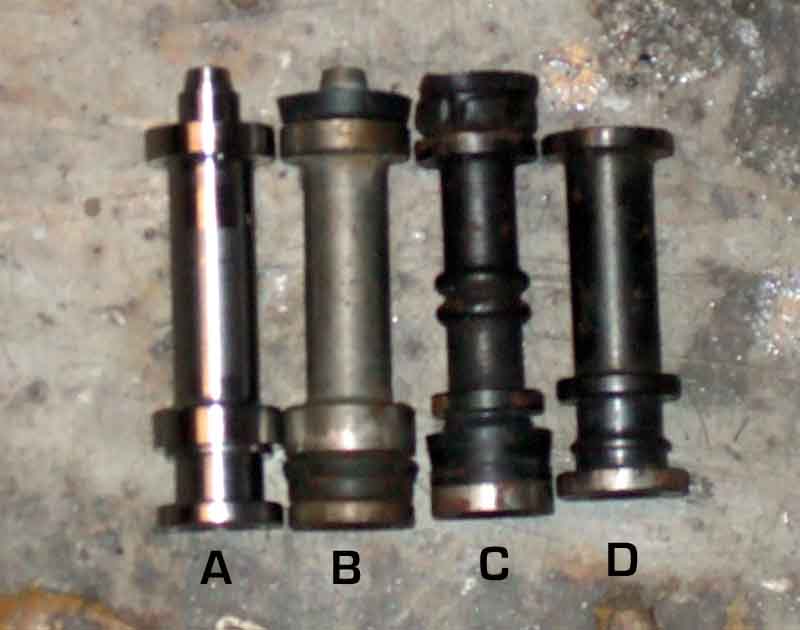
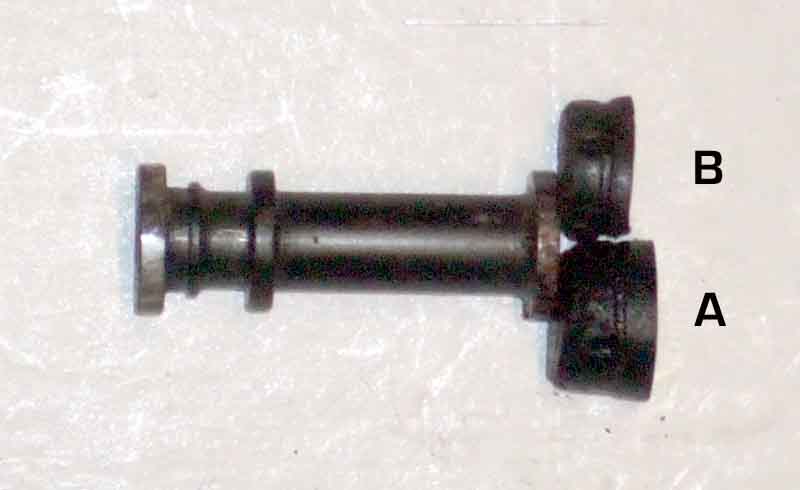
A selection of pistons and seals: A is the new piston from the conversion kit; B an identical item from a previously changed cylinder; C is from the V8 clutch; D is probably from the roadster brake master and identical to the one from the clutch master:
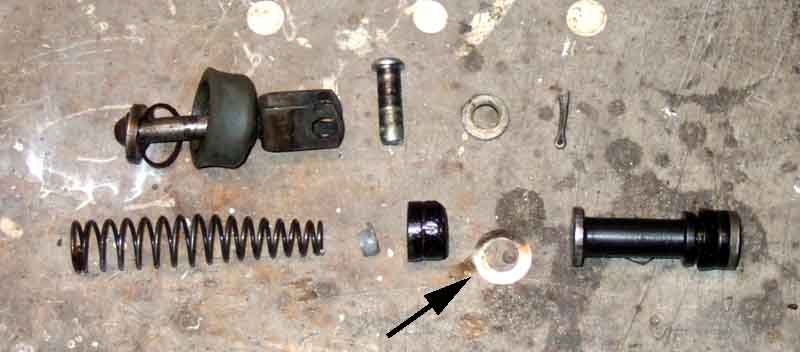
The shim (arrowed) that fits between the seal and the piston, on both cup and ring-type seals.
The cup-type seal removed from Bee's clutch (A) significantly longer than a similar seal from another cylinder (B). If the replacement seal is like B, that would explain why the biting point is now lower.
I coat the new secondary (ring-type) seal and the push-rod end of the piston with brake fluid, and ease the seal on easy enough. However there is a thin flange that projects forwards of the main part of the seal and sits flush against the piston body, that flange is partly tucked under the rest of the seal, and needs careful easing forwards with a small blunt screwdriver. After that one of my 'old' seal spreaders is fitted to Bee's spring and inserted into the bore, and the new main seal coated with fluid and manually pushed in. There is a curved thin steel shim that sits between the face of the piston and the back of the seal, which may push the seal away from the piston to open up the three holes in the face of the piston, which are perhaps there to aid fluid flow when bleeding. Insert the shim and the piston, and refit the pushrod with its thick integral washer and circlip. Note! If you are fitting a new dust cover to the push-rod do so from the piston end before refitting to the master cylinder, the sharp edges and large size of the clevis pin fork can rip the seal.
For filling and bleeding I decide to try yet another variant of the reverse system I have used with complete success on Vee and a pals car. I connect a tube between the caliper and clutch nipples as before when I used the brake pedal and master to fill an empty clutch system, but this time I connected the Gunson's EeziBleed to the brake master. The same low pressure of about 15psi on the front off-side wheel I had removed to give me better access to the clutch slave, opened the clutch bleed nipple, then the brake, and fluid from the caliper fills the tube and starts going into the clutch system. Peer into the clutch master until I see fluid rising, then close the brake nipple. Test the clutch ... and absolutely no back-pressure at all, and peering underneath only a trace of movement of the push-rod. I'm pretty gobsmacked, as this method of reverse filling had worked perfectly the previous twice I had used it.
I tried operating the pedal slowly, some gurgling, but no change. So I wedged the pedal fully down over lunch, then slowly released it, no change. Someone recently said they pumped the pedal like mad, which also made no difference, except to obviously aerate the fluid in the master and make it milky. Next I wedged the pedal down, then opened the slave nipple, and quite a bit of air came out. Did that several times till no more air. I can feel some pressure now, but only about 3/8" of push-rod movement and it grinds if I try to put it into reverse. More pumping, still no better. So now I put the Gunsons on the clutch master and bleed normally, and loads of air and milky fluid comes out again. More pressure, but it still feels soft at the top and its still grinding. So I leave it wedged down overnight, hoping that the air bubbles coalesce, and can be pulled back into the master when I release it in the morning. That makes the feel much better, it now engages reverse without grinding, although the biting point is very low at probably not much more than 1/4" off the floor.
Although the hydraulic system automatically compensates for all the expected wear at the clutch end i.e. in the release bearing (of which mine is a ball bearing anyway) and push-rod/clevis pin/release arm, I do wonder whether wear in the release arm pivot has allowed the arm to move outwards, so increasing the ratio of the arm, which would need more movement of the slave push-rod to get the correct movement of the release bearing. So I ease the push-rod into the slave a little to take the pressure off the release arm, and test for any wear in and out or up and down, but there is none.
I then start pondering all sorts of ways to get more throw on the pedal. Removing the (pretty thin) carpet from under the pedal makes no difference. So I modify one of my old push-rods to move the clevis pin hole as far as way from the master as possible. This moves the clutch pedal pad up from the brake pedal so does give more throw, but I'm surprised to find there is little change to the biting point. My dander is up now, so I also modify the pedal. I notice that the hole in the clutch pedal is about 1/8" lower than in the brake, so giving it a higher ratio. So as well as moving the clevis pin hole closer to the master, I also move it upwards, to lower the ratio and get more travel that way. I end up with the clutch foot-pad almost an inch higher than the brake, but still no damned improvement in the biting point! But when I check, I find that when the pedal when fully depressed it's about 1/2" off the carpet - because the clevis pin bracket on the push-rod is now pressed hard up against the dust-cover on the cylinder. The clutch is also very stiff, which surprises me as I wouldn't have thought changing the ratio would have affected it that much, but I discover that because I have moved the clevis pin upwards, the push-rod is now angled upwards instead of horizontal, and as the push rod moves in to the cylinder it also moves upwards, and is binding on its spacer behind the circlip in the cylinder. I then realise that the reason the clevis pin is that 1/8" lower on the clutch pedal, is because the clutch master is 1/8" lower in the mounting frame than the brake master is. This must have been done deliberately to get the right amount of movement of the slave push-rod, taking into account the relative dimensions of slave and master bore, without making the pedal pressure too high on the one hand (high ratio) or the pedal movement too long on the other (low ratio).
So that means I have to move the hole back down on the pedal to correct the angle of the push-rod, as well as move it away from the master a bit as there is no point in having the pedal pad so high that the master stops it way before it reaches the floor. But why is my biting point still so low? I take some comparative measurements with the V8, and whilst the V8 has more free play in the clevis pin linkage, it obviously starts to build pressure earlier than Bee. I then look again at the seal I removed from Bee, in conjunction with the older piston and seal, and realise that the seal I have just taken out is a good 1.8" deeper than an older cup seal. I didn't note the depth of the new seal that is now fitted, but if it is shorter than the one I have taken out then the seal will have to move further before it closes off the bypass port from the reservoir, which it has to do before it starts building pressure.
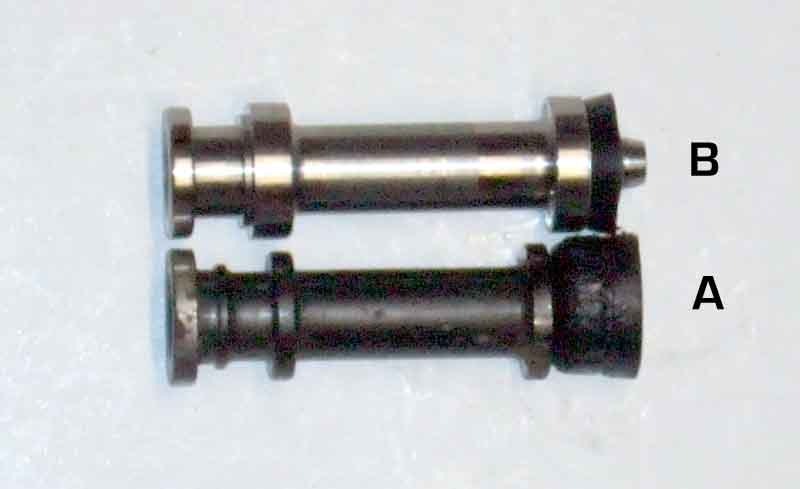
Piston and cup-type seal from Bee's clutch (A) significantly longer than the piston and ring-type seal of the conversion kit.
I could take the piston and seals out again, and perhaps fit the conversion kit, but that is also about 1/8" shorter than a piston with the original seal so isn't going to be any better. And after the problems with bleeding I'm not keen on having to go through it all over again. If I could put a spacer between the push-rod and the piston, then with the pedal fully released the piston would already be part operated, and if I could arrange for that position to be just short of closing the bypass port I would have maximum travel to pressurise the fluid.
There is a ball in the end of the push-rod that sits in a recess on the piston, presumably to avoid sideways forces on the piston as the angle of the push-rod changes slightly through its travel. I could wrap a spacer around the ball, but if that went behind the ball it would prevent the push-rod going fully back - reducing effective travel - as the back of the ball sits in a recess in the large washer. I could build up the ball with weld, but it would need to be carefully shaped back to a ball again, I don't have a Dremel, and I can't spin the push-rod so as to make sure it was circular. Which leaves a spacer disc of some kind that sits between the two halves.
But first I really need to find how far the piston needs to travel before it closes off the bypass hole. If my washer is too thick fluid expansion from heat won't be able to escape into the reservoir as it should, and I won't be able to bleed conventionally. By laying a ruler on top of the clevis pin bracket of the push-rod, and butted up against the open end of the cylinder, I see that the back of the bracket is 4.9mm (from memory) from the cylinder. Then I cut a fine wedge from a piece if hard board and fit it between the front of the pedal and the back of the hole in the bulkhead shelf that it passes through, so I can hold the pedal and hence the piston at various positions into the cylinder. Fully released I can push the slave push-rod and piston into the cylinder easily, and it moves out easily from the effects of its internal spring. 2mm of movement of the piston is the same, but 3mm makes it much harder to push in, and slower to come back out, so at 3mm the seal has partially closed off the bypass port. I settle for a 2mm spacer to allow for piston expansion when that gets hot, and find a washer that is slightly smaller than the cylinder bore, with a small hole in the middle, and a couple of mm thick. Clamping that in a vice between one of the old pistons and push-rods forms it nicely into a shape to fit between ball and socket. A trial fit in the cylinder does raise the biting point a little, not as much as I was hoping, but it seems to be the best I can get. It's effectively loose in the cylinder, so could get dislodged, but I realise that by putting a blob of weld in the hole in the middle of the washer onto the ball of the push-rod, and carefully filing smooth, overcomes the problem of getting the right shape as well as retaining it.
With that fitted the pedal feels much better, very little play at the pedal clevis, and it firms up sooner than before, but although the biting point has improved it is still lower than prior to the seal change. Maybe some air still in the system? I try wedging the pedal partially operated so it just closes the bypass hole, then using a big screwdriver in the release arm hole try to lever it forwards and push the piston into the cylinder but it doesn't budge. So I try another tip which is to push the slave push-rod and piston fully into the cylinder (pedal released now) and tie it there, initially as another way of seeing if there is air in the system, but also prior to another attempt at conventional bleeding. The pedal gets hard very quickly, no sponginess and I can see the release arm trying to move against the restraint of a cable-tie, so very unlikely to be significant air still in there. I reconnect the Gunson's to the clutch master again, open the bleed nipple and maybe a little does come out. Close and try twice more, maybe a couple of tiny bubbles. Once more and nothing. Once more for luck ... and disaster - the Gunson's bottle has emptied and pushed all the fluid out of the reservoir! If it hadn't been for that once more for luck I'd have got away with it. I'm running low on fresh fluid but put what I have in the Gunsons and fill and bleed again, the air bubbles are only reducing slowly, so it's down to Halfords for more supplies, and several more goes - keeping a close eye on the bottle! - before it's bubble free.
Try the clutch in reverse and really it's no better than its best previously. Wedging the pedal fully down and using dial calipers to measure the travel of the push-rod at 0.44", which I would have expected to be enough, especially as some have claimed theirs is only 3/8" (0.375") and fine. However with all the work I have done to increase the throw I would have expected it to be more than 'normal', which does indicate there is still a problem with the master ... or maybe the slave .. or maybe the bleeding. So it's still a mystery. Maybe it's something to do with the release bearing, but unless it is reducing in length as the clutch is disengaged, and I can't really see that happening. Maybe the friction plate is slightly warped, which means the pressure plate has to move further to completely release it. Possible, but I'm never one for engaging the clutch at high revs for a quick getaway, preferring to get it all in as soon as possible at little more than idle then using the torque to accelerate. That's something that will have to wait until the engine comes out, and would still happen even I had more slave piston travel than 'normal'. I could try the conversion kit, but going by the length of the piston from socket to seal lip that will be no better. It could be something to do with wear by the bypass hole meaning the seal has to move further to fully close it off, which would be corrected by a replacement master. For the time being I'm going to run with it, and see if I can live with it or not.
July 2016: Eventually I'm forced by release bearing problems to pull the engine and change the clutch, and after that I find the biting point uncomfortably high, even though the slave push-rod travel is fractionally less than before. I found that because of an alignment issue the release bearing is offset to the cover-plate by a significant amount, which basically means it has been pressing on one side harder than the other, which probably meant that the pressure plate wasn't moving away from the flywheel as much one side as the other, hence had to move further overall (lowering the biting point) to fully release the friction plate. So with the new clutch fitted I have to undo all the work I did to improve the biting point!