


Roadster Screen
GT Screens
Screen Washers
Dating the glass
Sealants: Always uses non-setting where it specifies 'rubber gaskets' or similar, not the adhesive types that are used on modern cars and state 'curing' or 'structural bonding'. My painter gave me some Indasa Windscreen Sealant but when I tried to get more I drew a blank. Painter said to try Tiger Seal or 'PU Panel Bond Sealer' but browsing those they seem to be hardening adhesives and my painter confirms that. So Google 'non-setting windscreen sealant' and get loads of fora suggesting 3M 08509. Browsing that the 3M site confirms it is non-setting, and I find an eBay page offering 'last one remaining' for È2 whereas most vendors are asking È20 or so. Order that, confirmed, then get an email from the vendor saying it is an eBay error, they couldn't even post it out for that, so I get a refund. More Googling before I order the È20 stuff and I find some Wayside Screen Seal non-drying for È6.50 plus È2.49 P&P.
Glass Variation
Frame Positioning
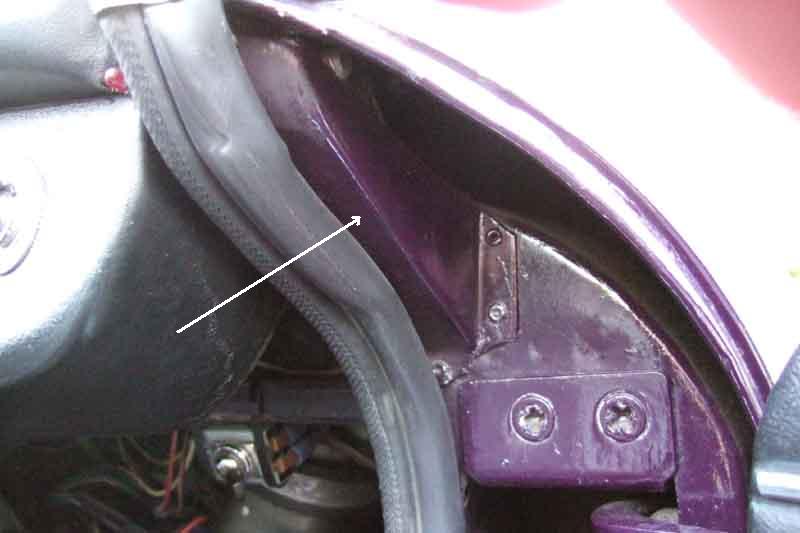
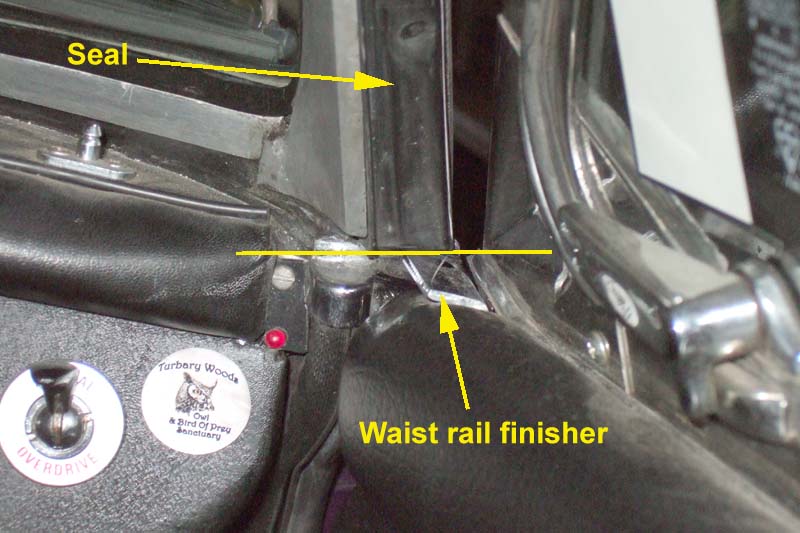
Body Seal
Frame Replacement
Header-rail Seal
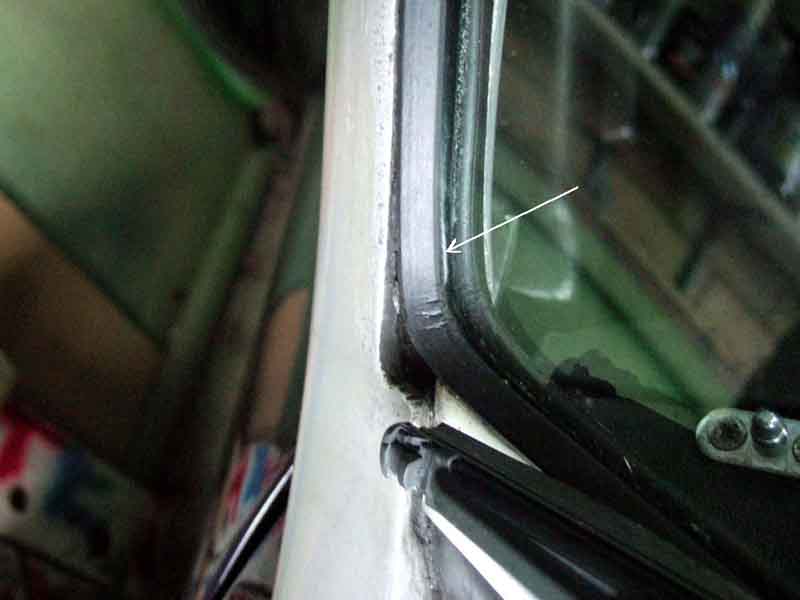
Quarter-light Seals
Parts Changes
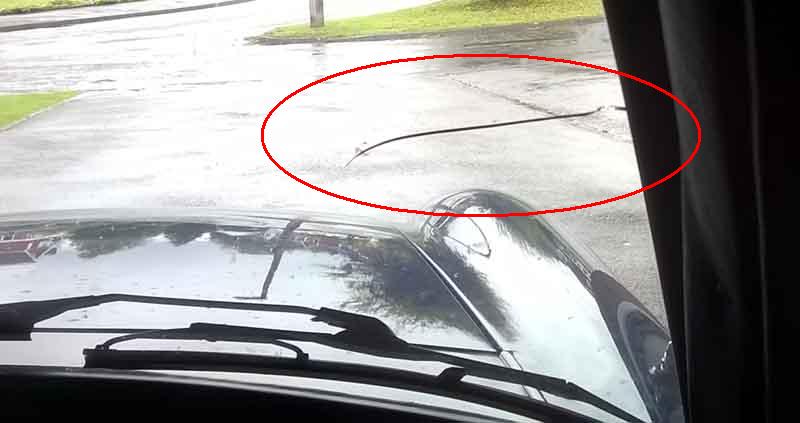
Glass Replacement: Whilst travelling to the 2004 Lincolnshire Wander mine developed a crack running down from the top edge right in front of the driver as a result of a stone chip. As this is an MOT failure item I had to deal with it, although fortunately the next MOT was many months away, giving me plenty of time.
Although covered by insurance without affecting No Claims bonus my first thought was to repair it myself for two reasons: One was simply for the interest and experience, but the other was the thought of some spotty youth from a windscreen replacement company making a bodge of my pride and joy given the special nature of the roadster screen, particularly removing the frame from the body and replacing it. However the benefit of having it done professionally is that any mistake on their part, including cracking from unequal stresses shortly after fitting, would be their responsibility to resolve. Spoke to Roger Parker at the MGOC who said often they won't remove and refit the screen, but require the removed screen to be delivered to their premises. That would get rid of one of my concerns (damaging the paintwork during removal or replacement) but still leaves me with the problem that if the screen cracks after refitting it is open to argument as to whether it was incorrect fitting of the glass to the frame that was the problem or incorrect fitting of the screen to the car. Seems to me that the only choices are doing it all myself, or letting them do it all, the half-way house being the worst of both worlds. I spoke to the company that would do the job and was satisfied with their knowledge of all the steps and pitfalls of doing an MGB roadster screen, including removing the screen from the car, so opted to let them do the whole job.
Nevertheless I wanted to do any preparatory work myself so set about seeing just what was involved in removing the screen with the minimum of other dismantling. I had removed the screen back in 1990 preparatory to a full rebuild, but as part of that I had removed all trim and the dashboard which makes the job considerably easier. I didn't want to have to remove the dashboard again unless I really had to. Consulted Lyndsay Porters (Guide to Purchase and DIY Restoration of the MGB' (republished as 'The MGB Restoration Manual') which says it is possible but is a right fiddle. Porter covers the whole job in considerable detail with many photos, so I'll just limit these notes to anything extra I can add.
- First I removed the side trim panels in the footwells, and this gave clear sight of the two bolts each side. The lower of these is easily accessible, but the upper one is tucked right up and immediately behind the dash.
- I found I could just get a 3/8" drive ratchet and 9/16" socket on to the bolt on the passenger side. However I had to use the very narrow gap between the lower edge of the dash and the reinforcing bar going across the cockpit and even with a very fine ratchet I could only move the bolt just one click at a time, which was going to take ages. So I opted to remove the glovebox, which didn't take many minutes, and go in through there. I completely removed the door and fibre-board 'box' although just removing the screws holding the box to the dash plus another securing it to the reinforcing bar behind the dash and pushing the box back would probably have been enough.
- On the drivers side I couldn't get the socket and ratchet on the top bolt with or without a wobble-extension because of the overdrive switch. Removing this and the fuel gauge, again only a few minutes work, allowed me to go in through the fuel gauge hole. Be careful rapping the handle of the ratchet on the edge of the holes doesn't chip the wrinkle-finish paint, either wrap the handle in tape or cover the edge of the hole.
- Between the two bolts each side there is Pozidrive screw. This holds in a packing piece, and should be left in-situ when removing the screen as if removed it may allow the packing piece, through which the securing bolts pass, to slip out of position. However it is advisable to slacken these, particularly to allow fine adjustment of the position of the screen on refitting.
- It is usually said (including in Porter) that the two bolts holding the centre of the lower frame rail to the dash top cannot be fully removed until the side bolts have been removed and the screen partly lifted up. Likewise and much more important to remember, these bolts must be started and partly screwed in before the screen is lowered into its final position. Forgetting this and lowering the screen right down, then having to lift it up again, may result in an imperfect seal between the rubber seal on the bottom of the frame and the body. Whilst for removal this was certainly true in my case, the bolts were much longer than they needed to be and it is the excessive length that contributes to this 'feature'.
So far so good, but then when I rang the fitters to arrange a date they said they had the screen but were unhappy with the seals and asked me to order them, which I did. By the time they had arrived I had tried loosening the screws in the top of the screen frame and found four I could not shift. Rang the fitters again to arrange a date, and they said they would order a set of screws.
Screen Removal: When the day came I rang beforehand and was told they had the screws so took the car round. Fortunately they were happy to let me hang around and assist in getting the screen out. One of the two centre-bolts was cross-threaded and stuck, turning the 'captive' nut in its cage. So we removed the centre bar, then pulling up on the frame left the bottom bracket attached to the dash top, having pulled the rivets out that were securing it to the bottom frame member.
While they were dismantling the frame I pondered what to do about this nut. Cutting the head off would still leave the thread stuck in the captive nut, although possibly that could be drilled and tapped, if the cage would hold the nut tight enough. Then one of the fitters came up with a stout slotted metal strip that just wedged under the bolt head, and the friction that created between the top of the nut and the bottom of the dash-top, together with the cage, was just enough to allow us to remove the bolt, which was a bit of luck. The end of the bolt was a bit chewed where it had been cross-threaded, but as I wanted to shorten them anyway I cut it off, ground a point back on (the point is needed to centralise the captive but loose nut under the bolt so the threads can start), and cleaned up the threads with a hacksaw blade. Shortened and pointed the other bolt to match and confirmed that both would screw into both nuts. The cross-threaded nut was a bit stiff, but with a bit of grease and working the bolt back and fore and gradually in like a tap (should have brought my taps from home) got it to the point where I could screw them in with my fingers.
Update October 2010:
 David Council wrote to the MGs email group saying it looked like one of his uprights bolts was going to shear, and did anyone have any suggestions. The problem is that the bolt goes through a plain hole in the thick spacer first and if it shears with the stub still in that hole you can't get the screen out, as the thick spacer and the frame leg can't be removed as one. However there is a cover panel secured by rivets that can be seen at the top of the A-post with the door open, and with that removed you can get at the back side of the threads, to apply releasing fluid or perhaps heat and avoid shearing the bolt. However his workshop sheared the bolt! It was the passenger side so removal of the glovebox allowed him to get a drill on it (the drivers side would probably mean removal of the dashboard), but he got nowhere. So he removed that cover panel, and was able to wedge the thick spacer and the frame leg apart just enough to get a small hacksaw blade in and cut through the stub of the bolt and remove the screen. Ordinarily you would then have the problem of removing the stub from the threaded frame leg, but in David's case he was replacing the screen anyway so that wasn't an issue, he just has to replace the bolt. Opinions vary on this - SH506101 (3/8" x 1 1/4" coarse thread) or SH506091 (3/8" x 1 1/8" coarse thread), available from the usual suspects. The longer bolt may allow you to grind a point on the end to aid location, but check it is long enough i.e. doesn't reduce the number of threads engaged with the frame leg first!
Frame dismantling: They managed to remove one side piece and the top piece from the frame which was enough to get the old glass and rubber seal out only snapping one frame screw in the process although we discovered one was missing from the bottom anyway. I said "Never mind we can replace that" then they admitted they hadn't got the screws. I was not best pleased (and by then suspected they hadn't obtained the seals either) but by now there was nothing I could do about it. Still we could move one from the top to the bottom then I could replace the two (one missing and one sheared) at the top with the screen back on the car at a later date.
Reassembly: I watched while they prepared the new glass and rubber seal, and we were all puzzled as to why the cut-outs in the seal for the frame screws seemed to be more on the sides of the screen than the top and bottom, when there should have been an equal amount either side of the corner. Then I held a frame side piece up to the side of the glass ... and discovered the glass was 2" too deep! They turned over the glass and looked at the label ... and it was for a GT! I was even more displeased. They started ringing round and said they couldn't get another one until 4pm, so there was nothing more for me to do but go home. The fitting place is buried in the depths of an industrial estate and despite them saying Bee would be in the building which would be locked and alarmed and her keys in the safe, I had nightmare visions of some scrotes choosing that night to either break in or fire-bomb the place.
Next morning I went back to find the proper screen had arrived, and they were fighting with the new frame to body seal. These are a nightmare, both getting them into the bottom rail as the new rubber tends to be sticky, and the lip of the seal which rests on the body panel at the base of the screen is turned right back on itself, making it extremely difficult to get it to lie in the correct place when refitting to the car. But that was nothing compared to the struggle getting the new glass and its new seal into the frame, and the frame reassembled.
Because one corner was still screwed together the glass could only be put into those two pieces slightly offset, then slid into position. Despite most of a container of washing-up liquid (and the prospect of the thing flying across the workshop as it slid out of peoples fingers) it just wasn't going. Top Tip: The washing-up liquid was actually drying on the rubber too quickly to be of much use. So I nipped home and got my tub of smooth Swarfega (they only had the gritty kind) and suddenly things started going together. Relatively. The new frame seal seemed to be a couple of millimetres less deep (into the frame) than the old seal, and the new glass was also a slightly different shape at the bottom corners. It was not looking good for a tidy and secure finished job.
Getting the frame back together was a real struggle. Again the problem was the non-dismantled corner, trying to get the glass into this corner and then adding the top and other side was pushing the frame into a parallelogram, where the two top (and bottom) corners had unequal angles to each other. The glass also seemed to be going further into one side frame than the other, barely being in the seal on the 'loose' side. We had several goes positioning the glass in the bottom rail slightly to one side or the other before we got it more or less equally into the two side frames. They tried a rope-cramp round the ends of the screen which pulled the sides together but still left it canted over. Then I suggested looping the rope diagonally round the screen so as to pull the two 'long' corners together. Bingo! We could now get a 'square' frame, but still not pull the sides together close enough to get the screw in. From that point it was just a matter of getting 'muscles' Scott to pull the sides together as hard as he could, whilst the main fitter kept the tension on the rope, and I got the screws in. That alone was about three hours effort from three people.
Glass Variation: Updated April 2019:
 The Parts Catalogues only give one glass (AHH8227) and glazing seal (AHH7172) throughout production, but Clausager indicates the glass and glazing seal may have changed in 1977 for thinner glass. Moss Europe (and some others) indicate that the glass changed for the 1972 year, and specifically states that 'early' glass (AHH8227) will not fit 'later' frames, which need HZA5415. They also state "Original style corners" are the common rounded corners, while "modified style" has slightly recessed corners to minimise breakage. Brown & Gammons (and others) does not make that distinction and only refers to OE, Repro, tinted and clear. But all are variations of HZA5415 so the implication from both Moss and B&G is that later glass will fit earlier frames. The only reference to 1972 that Clausager makes is that tinted glass became available on non-North American GTs. Moss and B&G only list one glazing seal for all years. All potentially confusing, and when you factor in refurbished screens complete which may have been fitted at some point, of unknown parentage, buying replacement glass could become a real nightmare - unless you specify HZA5415, which hopefully will fit any frame.
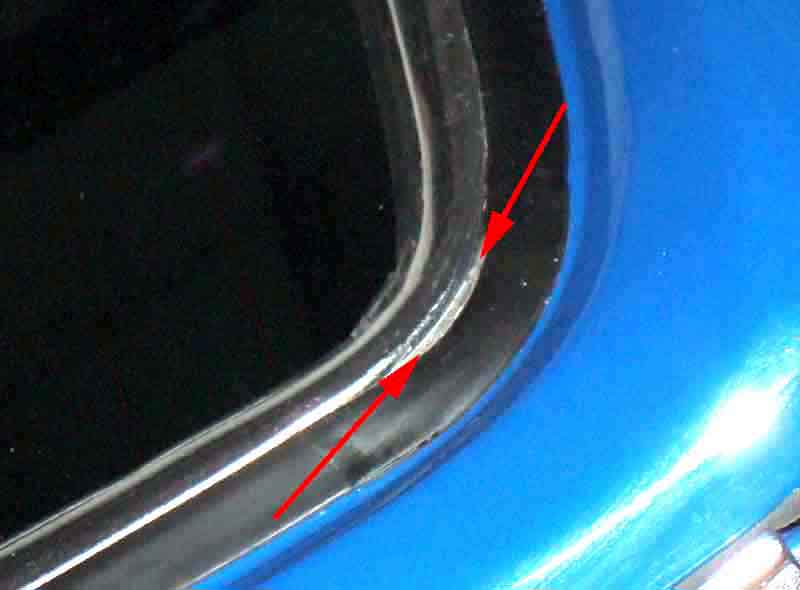
Current-stock glass to fit later screens like my 1973 does seem to be different shape in the lower corners from the original glass, said to accommodate differences in the frame uprights. There are four different uprights for RHD cars (three for other markets) listed prior to 1977. For 1977 and later uprights are not separately listed, only complete frames and top and bottom rails. There are three different complete frames listed for RHD cars prior to 1977 (two for other markets) and only one frame for all markets for 1977 and later. The effect of the later glass with the cut-outs in the lower corners is that the edge of the glass can be seen from outside, as shown in these pictures of my roadster - firstly just by looking through the glass, and secondly by pulling the seal back, the edge of the glass is arrowed in both cases. I was concerned that with so little overlap between rubber seal and glass it might leak, but hasn't in over 10 years.
July 2019:
 Cropped up again on one of the fora, and this time I've tried to find examples of the different uprights. None of the various types are available from the usual suspects for a direct comparison, which makes it a bit difficult. So I browsed pictures of late-model (post 76 going by the registrations) MGBs and did find a couple with quite good pictures of the screens, which do appear to be different at the bottom of the uprights. Then did more Googling for frames for sale, and found one with same difference ... if you see what I mean. The ad for this didn't specify the year it came off, but the pictures definitely show the same difference, as in the attached. If the channel is similarly narrower it means that if you have the later frame - which could be on an earlier car - you must get the correct glass. Of course, it's possible that only the later glass is currently available, which is why I have it in Bee.
 
|
New body seals are a nightmare. When supplied the lip that rests on the panel at the base of the screen has to project forwards and upwards from the rest of the seal, but as supplied this lip is tucked right under the seal, you can see the 'as supplied' and 'fitted' profiles on the left. When fitting the screen to the body this lip has to be pulled out from under the frame, and sealant applied, at some point. You would need a couple of dozen pairs of hands, which there isn't room for round the car, or maybe half-a-dozen octopi. By contrast an old seal sticks out at the correct angle and even though it isn't delivering much downward pressure, unlike a new seal initially, with sealant it still doesn't leak. Unless the old seal is damaged I would recommend reusing it, as I had done when removing the screen for painting some years ago. That was a single-handed job to remove and refit and the bolt holes all came to hand easily. I suggested to the fitters that they reuse the old seal, which would have saved them the struggle of pulling out the old and fitting the new, but they insisted on using the new. |
Porter seems to indicate not fitting the seal until the frame has been reassembled, but then that means either levering it all in to the channel with a suitable implement (which John Twist shows here), or trying to slide-feed it in through one of the screw holes in the bottom channel, which involves an angle and sharp corners. The former is very long-winded and the latter very difficult with both new and old rubbers. We opted to slide it into the bottom rail with the frame dismantled as that makes it a straight pull even so it is hard enough. Top Tip: Pulling the rubber in tends to stretch it, meaning it may shrink a bit over time. As there is not much overlap by the side rail 'feet' over the ends of the body seal make sure you keep pulling and pushing the seal in towards the centre from both ends before offering up the side rails and cutting the ends (of a new seal) to suit. Even then, cut them a bit long, when you screw the frame together it will tend to compress the seal slightly, making it even less likely to shrink enough to expose the ends. Then the glass and glazing seal is fitted (join in the centre of the top), the ends of the body seal pulled out of the channel to expose the screw holes, the side rails fitted, and the ends of the seal pressed back into the channel with a blunt screwdriver - angle the seal so that one side of the 'T' lies in the channel, then push the other side into the channel. This should lock both sides of the 'T' in the channel. Give it a bit of a tug to make sure.
Reinstallation: After a short break the bottom bracket was pop-riveted back onto the bottom rail, and I refitted the centre bar, leaving it loose at this stage. It had been a bit pitted so overnight I had taken it home and cleaned it up with fine wet and dry and wire-wool and clear-coated it. It is critical to ensure the packing pieces and shims in the body sockets are selected to ensure there is no side to side movement of the frame legs in the sockets. If there is, then when you tighten the bolts it will tend to bend the legs in towards each other which can crack the glass. This is particularly important when replacing the whole frame, rather than just the glass. The shims go on the 'inside' and the packing pieces on the 'outside', i.e. the bolts go through the body panel, then the shims (qty. to suit), the packing pieces and into the frame legs.
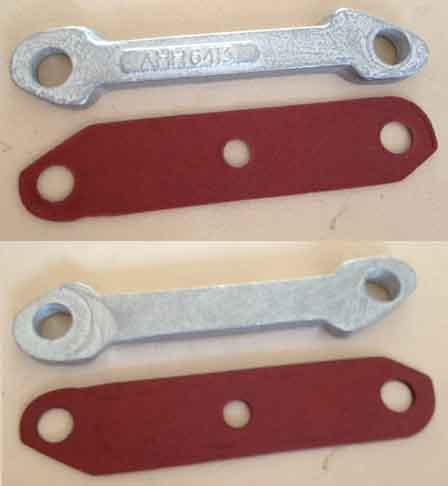 It should also be noted that whilst new packing pieces and shims are available from the usual suspects, they have been manufactured incorrectly. The part number is embossed in raised lettering on one side, on a further raised plinth. This must be ground off before fitting or again it can bend the legs, or come loose over time as the lettering is squashed down. They are also missing the central tapped hole for the securing screw. When this was queried with the supplier they said they had a note in their system saying the lettering must be ground off (but didn't mention it on purchase), and that their drawing showed the central hole, but they "didn't know why it wasn't there". Another suppliers photo shows exactly the same part, so it is not isolated to one supplier, as they probably all use the same manufacturer. Another feature of the shims is their ability to centralise the screen across the car, in relation to the quarter-lights, as part of preventing splits in the door skins, aka 'The Crack of Doom'. However this does require the quarter-lights (and hence doors) to be fitted.
Because the lip of the new bottom seal is so tightly curled under the fitter decided he would add the sealant when the screen was partly on the body, rather than apply it to the seal off the body then have the very sticky job of trying to pull the seal into position which would probably remove quite a bit of the sealant in the process. Initially he thought that he would be able to do this from the back, but there was simply not enough room with the screen pushed down far enough for the lip of the seal to be in position. Put sealant under the base of the side rail 'feet', slip on the feet seals, and put more sealant under these in the grooves.
 Note that when fitted the body seal lies on top of the feet seals leaving a small triangular gap as the seal makes the transition from the foot seal to the body. This should automatically ooze sealant, and hence be filled with it, as the screen is bolted into position. At least that was how mine was originally, but after the second screen replacement I discovered the body seal appears to have been trimmed round the foot seal so there is no triangular gap. We slotted the screen into the body, pushed it down all bar about 1/2", pulled the tucked-under seal out with a hook, then he got the nozzle of his sealant gun under the seal lifting it up, pulling the gun along sideways, all the while holding the gun clear of the paintwork. He had taped cloths round the body of the gun so it wouldn't scratch the paint if it came into contact, but I don't think it did anyway. An alternative suggestion has since been to use many strips of duct tape to pull the lip of the seal back, being stuck onto the glass, at the expense of having to clean goo off seal and glass.
We then pushed the frame right down, causing loads of sealant to ooze out as expected (and some out the back onto the dash top). I checked the position of the holes in the frame legs through the holes in the body but they were miles out. It took quite a bit of downwards and fore and aft pressure from the two fitters just to get the bottom two holes visible, and I got the bolts in. Another breather.
However the upper holes are much more difficult to see with the dashboard in-situ, especially on the drivers side, and just manual pushing and pulling wasn't going to get them lined up. Fortunately just a few weeks earlier I had seen pictures where someone had used a G-clamp to press the frame down far enough and mentioned this to the fitter. They have a similar clamp to hold the modern bonded glass systems in position while it sets, and this was enough to get the passenger side top bolt in position. On the drivers side we had to resort to that clamp plus 'muscles' Scott, but eventually we were there. With slack bolts to allow final positioning I wasn't very happy with the side-to-side alignment with the doors as it seemed to be much closer to one 1/4-light than the other whereas before it had been almost equal to both. The 1/4-lights themselves are adjustable in the door frame so I resigned myself to some final fettling at home, but by the time I had got the fore-and-aft position to my liking, and the four bolts tightened, the 1/4-light gaps miraculously fell into position. We took a step back and looked at the glazing seal, to find that too and the glass had seated properly and evenly all the way round, much better than we had expected.
Whilst the fitters cleaned off the excess sealant I tackled the two centre bolts. As I mentioned before one of the reasons that people say that these bolts have to be completely removed last and partially fitted first is that they are too long and also need to be at right-angles to the dash-top to start to screw in. The captive nuts are loose in their cages and can be angled, slid fore and aft, and raised or lowered so that if the bolt is short enough it will screw in at an angle to the dash top with the screen fully in position, and once it has started and gone in far enough it straightens up to lie vertical to the dash top for final tightening. I removed the two fresh-air vents (although I could actually feel the cages and nuts from through the glove-box hole) and screwed a 7/16" bolt in from the bottom a couple of turns, which allowed me to angle, slide and lift the nut into the correct position. However whilst I found I could get an 'ordinary' bolt in, I couldn't get either of the proper chrome-plated bolts in either side. It took me a while to realise the point I had reground onto the end of the bolts after shortening them was fouling the end of the bolt I had screwed up from underneath before any of its threads could engage. The point is there to push the captive (but loose) nut into position so the threads can start, without this or any other way of positioning the nut it would be pure hit and miss. Because I was positioning the nut with another bolt from underneath I didn't need that so ground most of the point off, and bingo got both bolts in. However I think I cut the bolts a bit too short as I couldn't get them in with both the chrome plain washer and the split lock-washer fitted, so omitted the lock-washer. But I had always felt the lock washer looked 'clumsy' so was happy to leave it out. Time will tell if it shakes loose in which case I shall try Loctite or something. I tightened the centre bar not going mad, just enough to make it 'ping' when plucked. It only occurred to me then that the function of this bar is probably to stop the header rail tending to pull the top frame rail up off the glass when the top is fastened down, there is considerable upwards pressure on this from Bernoulli Effect at speed.
Finishing-off: After final positioning of the screen and tightening down the centre bolts there was a bit more excess sealant to clean off, then putting back the fresh-air vents, glovebox, fuel gauge, overdrive switch and trim panels. I can't emphasise strongly enough how important it is to get the alignment of the screen to the 1/4-lights correct. Get too tight an engagement between the two and you will almost certainly get the 'Crack of Doom' in your doorskins. Too loose an engagement and they will leak, but that is minor in comparison.
Lastly the windscreen stickers went back on. I had managed to recover all but three. One of the missing being a small paper sticker from the one and only 'MG World' show at the NEC (the second year it was 'MG and Triumph World' and then it died altogether) from the very early days of my ownership, so early I didn't record the date, and the sticker itself had faded to nothing. The other two were from Gaydon, the first being from the inaugural Arden Heritage run to Gaydon the day after its opening in, May 1993, the other from a run from Gaydon to Donington to celebrate the Centenary of the motor car in September 1996. Both these were fluorescent paper and stuck to the outside of the screen, and not only had they faded to white but the rain and washing had removed all the paper and just left a disc of adhesive! But I'm sorry to lose them just the same.
Frame positioning: This involves primarily door positioning, then screen positioning for fore and aft and tilt relative to the quarter-light, and finally quarter-light positioning to the screen upright seal.
Frame replacement: Kevin Barrel wrote to the Yahoo MGB list with a problem he was having fitting a replacement frame that already had the glass installed. He said:
"Why didn't Frame 2-with glass fit in the car? The bottom rail and it's mounting looked to be the culprit. There looked to be a difference with the amount of bow between the two extrusions and the location of mounting holes in the rail and the L brackets. The dimensions and geometry of all the bits doesn't have to vary much before the error accumulation bites you in the butt. I suspect F2 had it's glass replaced sometime during it's life and they couldn't get it into the car and if it was, they cut the XXXX out of the car to make it fit."
Quarter-light seals: I had taken the opportunity when buying the screen seals to get new 1/4-light seals for the side rails of the screen as I felt these had been cut a little too short in the past, and a new header rail seal as it had been damaged by the Navigator's clip and that was where water usually came in. The old side rubbers pulled straight out of their channels, which were in fair condition, and with a bit of tweaking of the channels and using a pair of long-nosed pliers to pull them down into position rather than pushing, the new ones went in without any lubrication.
This is how the Parts Catalogues imply they were originally fitted, but suppliers now show a 'support' BHH2670 in addition to the 'retainer' (channel) AHH6409 and seal 27H4300. This needs you to fit the seal to the retainer and drill holes through both before fitting it to the car, then slide the support into the seal, then screw through all three into the screen upright. Moss US describes how to do this, but they say the drilled hole in the rubber 'heals up' and you will need a bigger drill to leave a visible hole, then use screws instead of rivets as originally. I just can't see the point of going to all that trouble as my new ones have shown no tendency to move in 30 years.
 It was then a matter of cutting the bottom angles bit-by-bit so that they lie flat and filled the gaps when the doors are fully shut, and the tops to match the header rail when fastened. Note that some distortion of the rubber from the chrome piece on the leading edge of the door capping rail occurs during closing, but everything drops neatly into place when fully closed. However the new rubbers are fatter than the old ones which have been compressed over many years, vibration and heat/cold cycles, and the surface is not so hard, shiny and slippery as the old rubbers. These combine to prevent the 1/4-light frames from dropping into their natural position and are pressing them outwards. My concern is that this could be yet another factor in the 'Crack of Doom'. A thin smear of Swarfega acts as a lubricant allowing the frame to take up its natural position but dries out after a couple of days. I'll see how things go over the next few weeks but may have to reposition the screen forwards a little to relieve the pressure (I did). With the old rubbers the frames only just touched them, which actually allowed a little rain past them if running in rain with the hood down. But with the hood up and the Bernouli Effect on the hood pulling the screen frame back, the seals were pressed onto the frames and didn't leak. Design or serendipity, I wonder?
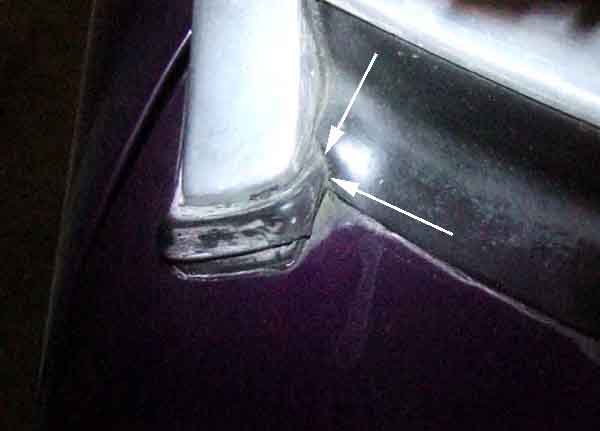
Update October 2004: Torrential rain and a howling gale on the way back from the MGOC Autumn Gold run (ditto while on the Lincolnshire Wander in 2005). Absolutely nothing came past the header rail seal or the glazing seal between glass and frame, the only disappointment is that a trickle seems to be coming past the square seal between the bottom of the frame side-members and the body each side. Shouldn't be too difficult to fix by lifting the frame a bit and applying more sealant, probably my fault for not putting enough on.
Update May 2006: Having heard that new bottom seals retain their tight curve for some years I decided not to remove the screen, but instead just slackened everything off and managed to slide the whole screen forwards a fraction so that the 1/4-light frames weren't so tight a fit to the screen frame side seals. Had three days of rain on the Dales Trail later in the month, but despite that only a little came in between the bottom corners of the screen frame and the body. What was a bummer was finding the new screen cracked in the bottom left-hand corner after we had got home. We did hear a sharp impact just after running into some infernal top-dressing over the Pennines even though we had already dropped back from the car in front, but I can't believe we spent the rest of the weekend and Monday in the car and didn't notice it. I consoled myself with the fact it could only travel a few inches before it reached the side of the glass from the bottom, but then a few hours later I noticed a second crack coming off the first at a right angle and this time heading right up and across in front of the Navigator! I can't face changing it again just yet, I'll wait and see if it becomes an MOT failure. Subsequently it did get worse, with first one then a second subsidiary crack coming off the main crack at right-angles across the navigators view hence a potential MOT failure. I can't say the fitters were pleased to see me again. The process was very much as before, although I'd say the re-installation at least (I wasn't there for the reassembly) did go easier, and I was able to get the correct clearance to the 1/4-light frames right first time. One slight concern is that the bottom rail seems to be higher on the uprights than before, as if the glass were not quite to deep as it should be. This left gaps in the corners between the bottom rail and uprights particularly on the drivers side. Putting Comma StopLeak screen sealer in at the front came out the back indicating a major leak source. I pressed the black sealant into the gap, then used StopLeak, which no longer came through. In overnight rain on the Memorial Run in September none dripped through on the drivers side, although some did on the passenger side, so I did the same thing there although the gap was smaller and the StopLeak didn't run through to the inside. Since then rain has to be heavy and persistent for any to come through at all, and drips 'harmlessly' down the door cards and not on the occupants.
2016: That just left two sources round the passenger's drop-glass - one at the top and one at the rear vertical edge being blown despite internal air pressure from the fresh-air vents being open or heater set to Interior or Demist, which gets onto the Navigator's shoulder. This one was solved by carefully shaping a length of clothes-hanger wire that slots up inside the double skin of the hood material and hooks over the hood frame at the bottom, which presses the rear vertical edge of the hood firmly against the glass. The one at the top, even though there is only a very small gap between the glass and the flap that hangs down inside, remains for the time being and is subject to further pondering.
Parts Changes: March 2014 The Leyland Parts Catalogue indicates the screen assembly changed in December 72, but also indicates the two types are compatible. However the top rail changed in September 69 when the rear-view mirror moved from the vertical bar to the top mounting, so they certainly weren't identical. It changed again for rubber bumper roadsters, and in September 76 i.e. four types for the UK plus two different types for North America and Sweden. However Clausager also has a change to North American windscreen assemblies in Feb 69, saying change points for non-North American cars is not known. As far as I know all are interchangeable as far as installation of a complete assembly to the body goes, although the component parts i.e. top, bottom and side rails almost certainly will need to be compatible with each other. What will vary is the positioning of the interior mirror - originally on the centre bar, then as part of the centre-bar top mounting and the provision of sun-visors - with Mk2 cars for North America, Sweden a year later, but not until the 77 year for the UK. The MGOC and Moss web sites indicate these changes were in 1969 (for the 1970 model year) and 1974 (presumably 1974 1/2) respectively. The same body and screen upright seals were used throughout.
Again according to the Parts Catalogue part numbers there was only one glass throughout production, although Clausager mentions a change for the 77 year which may have been related to the use of thinner glass and compatible seal. There definitely are 'early' and 'late' glasses, the 'late' having cut-outs at the bottom corners, whether this is the change that Clausager refers to I don't know. These do fit the earlier frames, but some say early glass may not fit the later frames. MGOC and Moss have clear and tinted glasses available but tinted aren't indicated in the Parts Catalogue. MGOC talks about 'up to 1969', '1970 to 1975', and '1976 on' for glasses but doesn't explain the differences. Moss talks about 'up to 72' and '72 and later' glass, the difference being the cut-outs. However whilst this ties up with one of the frame changes in the Parts Catalogue, my 73 roadster didn't originally have the cut-outs in the glass, and the Moss glass change doesn't tie in with their frame changes.
I wrote the above in response to a question from John Wynne Davies, and subsequently he happened to mention that his screen has press-studs at the base of the screen uprights and asked what they were for - which is the tonneau cover.
GT Screens replacement - DIY experience
HRW
June 2024: Geoff's MGB came without front screen trim and he wanted to do something about it. Forewarned from me about how tricky they are to fit he experimented with a stick-on bright strip on the straight bits with the MGB corners. Not happy with that he bought a set of trims (from MGBHive who I refuse to use as I have had poor products and service from them), and just about managed to fit the ºprights by pushing them in (which can be done with 'old' rubber and lubrication), which was where I came in. As soon as I started trying to fit them it seemed like they were too wide, with one side in the slot in the surround (which was plenty deep enough) my ball-end tool was just too fat to fit in the other side to lift the lip over while I pushed (or pulled) on the handle. Being 'old' rubber so stiff and slippy rather than sticky, and cleaning out the slots and lubricating with Swarfega Original, I was just able to push half the shorter top strip in. Which left the rest of the strip to do! Even having got that far the ball-end tool just would not move so I had resort to my previous method of using long-nose pliers. Even that didn't work like it had on my trim where once I had got the right angle I could push the pliers along doing several inches in one sweep as the other edge kept coming out. So Geoff had to follow on immediately behind me, pushing on the edge that I'd just got in with a wide flat-blade screwdriver to keep the other side in its slot. Even then the pliers didn't run along, I had to use them as a lever to lift the lip over bit by bit. Eventually - probably 3 hours - we had the top strip in! But not without some damage to the lip in a couple of places. Not only was that enough for the afternoon - I was physically exhausted and had to sit down, but I couldn't see how we were going to get the longer bottom strip in that way so we pondered options:
- Leave it as it is i.e. top strip but no bottom strip
- Pull it all out and leave it as it came to him
- Go back to the stick-on plastic trim for just the bottom
- Or cut it into three sections, each of which we should be able to push into position one at a time and hang the joins!
We opted for No.4 and Geoff cut it into three. Got the middle bit in OK as that is fairly straight, but gave up with the ends as they wouldn't stay in and seemed to be the wrong shape, and used the stick-on. That was OK except that at the outer ends it didn't want to stay stuck down butting-up to the corner pieces, so he bought some joiner pieces that are used on the rear trim and we covered the join between the corners and the stick-on pretty-well. That left the joins to the centre section and the stick-on, and two more joiner pieces went in over those with a bit of a struggle. Never again!
February 2021: Someone on the MGOS forum asked if he could have a roadster screen in his GT as it is smaller. Well, yes, but there would be a 3" gap at the top (or the bottom) if that were the case! Even if it fitted otherwise. Nothing like that, but he says his fitters 'noticed' that the new one was smaller than the old, laid one over the top of the other and it was, but he didn't know by how much. He says he has poked under seals (locking and trim-strips in-situ) and not found the edges of the glass, which means it can't be that much smaller, which begs the question of how a professional fitter would even notice, less alone lay one over the other to compare them. So that's something else to check for when I (imminently, now the weather is getting better) change Vee's glass. But with the trim and filler strips removed so I can expose the edges, and I'll be taking measurements at various places to compare before removing the old glass - just in case!
Originally front screen glass was AHH8228 (clear) or BHH308 (tinted - V8 and options, other markets and models). Glazing seal AHH7404, filler strip AHH7815, bright trim AHH7426 (top), AHH7425 (bottom), AHH7439 (right), AHH7440 (left), AHH7423 (top corners) and AHH7424 (bottom corners). Apart from the glass and left and right finishers at the time of writing suppliers are listing those numbers. For the finishers whereas right and left pieces were shown separately today all bar Leacy show AHH7439 for both sides, and when I came to refit mine they had not been marked but showed no apparent difference. Glass is a bit more complicated.
The original part numbers are listed by many suppliers at around È70, however Moss has an 'OE' clear version priced at È236 and heated clear at È269. For tinted they have basic at È84, OE at È426, and BHH308TT tint plus shade band at È68 (oddly cheaper than single tint), and the type that has always been fitted to Vee. Leacy list basic tinted at È78, tinted and heated at È279, and tinted with top tint at È65 (again cheaper than single tint). Rimmers have basic tinted and what is described as 'clear with top tint BHH308TT' which has to be incorrect, and although MS&C list BHH308TT 'Top Tint' one would have to confirm that it is tinted with top tint, and not clear with a shade band. The other suppliers do not seem to offer tinted with shade band or 'top tint', and only 'tinted' is mentioned in the original sales and parts catalogues, nothing about a shade band. Replying to an enquiry as to what was originally fitted to the V8 I mentioned Vee had always had the shade band and someone responded that he found it 'distracting'. Someone else said it wasn't distracting be he was aware of it, at 5' 10". I've been 5' 11 3/4" for quite a long time and it's nowhere near my eye-line. However I've never replaced the seat foams, and in a GT with new foams my head was brushing the Webasto and the steering wheel was brushing my thighs - most uncomfortable. The relationship of leg length to upper body length for any given height is also a personal factor, and if one's eye line is near the start of the tint I can imagine it being very near the screen frame in a roadster.
September 2019:
 Vee's screen cracks again. Just started my return from Devon and more coastal path when I come up behind a huge wagon with a very tall flat back which went much lower to the ground than normal. I was almost immediately aware that the low-pressure area behind the wagon was 'vacuuming' up dirt and stones from the road surface, which of course I was driving into. Immediately after a roundabout so only low speed, and I dropped back several hundred yards straight away and stayed there until we reached an overtaking lane. Get home with no further ado, but a couple of days later get in the car to find a crack several inches long on my side - bloody annoying! This will be the fourth replacement, and having fitted them myself after the repaint I'd rather do that again than have the aggro of leaving it in Birmingham for at least half a day while I hang around killing time, which has been the case previously. It depends on the relative costs of the insurance excess and buying a screen - the former being È75, and on that basis the glass is actually slightly cheaper. But shipping complicates matters, most suppliers saying 'collection only'. Moss quotes P&P at an additional È35 plus VAT, and Brown & Gammons saying special packaging and a carriage quote is needed but not specifying it up front. My nearest supplier (Leacy) listing it at È65 and the cheapest but out of stock, the nearest showing a price is MS&C in Stourport some 30 miles away ... but they don't have it in stock and were quite arsey when I enquired about it. Rimmers showing a future availability date. Other possibilities are local repair companies doing supply only (no). No rush ...
September 2020: Still waiting. Something made me look into Pilkingtons to find they are a presence only a few miles away, and they sent me a price list. Hope you are sitting down ... for Vee i.e. green tint plus green shade band it would be È290 - excluding VAT! Full price list as follows:
| Eurocode | Description | Price |
| 2230ABZBL - Bronze with a blue top tint | MG B, C, GT 65-81 | È306.40 |
| 2230ACL - Clear | MG B, C, GT 65-81 | È324.79 |
| 2230ACLBL - Clear with a blue top tint | MG B, C, GT 65-81 | È289.59 |
| 2230ACLGN - Clear with a green top tint | MG B, C, GT 65-81 | È285.15 |
| 2230AGN - Green | MG B, C, GT 65-81 | È276.28 |
| 2230AGNBL - Green with a blue top tint | MG B, C, GT 65-81 | È285.87 |
| 2230AGNGN - Green with a green top tint | MG B, C, GT 65-81 | È290.10 |
| HT0256 GNH - Green and heated | MG B, C, GT 65-81 | È501.33 |
November 2020: Rimmers have pushed their date forwards a couple of times now, but I try Googling BHH308TT again and as well as the usual places a new one pops up - Ivor M Davis with a 'Contact us' button under the description, so that is what I do, asking if they have one available. They reply saying they deal with the trade only, but not whether they have one or not. So I write back asking if they perhaps would deal with Leacy's, and again asking if they have one. They write back saying yes they will deal with Leacy ... but still not saying if they have one! So I ring Leacy and ask if they would be able to supply one that way and Sally says she will check the situation and call me back. Which she does, saying that they still cannot get any from their usual supplier, but Ivor Davis does have the one and they can get that, albeit at double the price shown on their own web page i.e. the last one they had in stock. But as that's still half the price of Pilkingtons I go for it. Means waiting until the end of the month, but it's been cracked for over a year now so no problem. I just hope I'm doing the right thing, maybe it would have been better to go the insurance route and I probably would another time.
GT Screen replacement - Pro advice: Had my GT front screen replaced due to stone damage and the fitter expressed relief that the rubber and trim were OK as it was much easier to work with than new rubbers. A couple of months later I had to go back as a result of someone trying to break in, and he groaned when he saw the mangled rubber and trim. The new rubber has a smaller recess for the trim than the old so it is more difficult to get the trim to stay in, and the rubber is very soft and sticky which means that every millimetre has to be lifted over the trim. On the old harder, slippier rubber it is possible to slide the trim in for quite a way before having to resort to lifting it. It took him three times longer with the new rubber, very little of which was taken up by removing the old rubber and fitting the new to the body. Many years later I had the 'opportunity' to fit them myself as part of Vee's restoration.
From the fitter:
Remove the rubber beading that is concealed by the trim strips. Press the top of the windscreen out from the inside using hand pressure. Lift out the old glass. Leave the rubber in the car, remove all dirt and old sealant.
When fitting the new glass get one bottom corner in firmly, then work your way along the bottom and part way up the sides lifting the rubber so that it rests on the edge of the glass, not overlapping yet. Only when you have done the bottom and part of the sides should you use hand pressure on the face of the glass to press it into the groove.
Now do the same with the top half, and when the rubber is resting on the edge of the glass all the way round, use hand-pressure again to press it into place.
Inject sealant under the edge of the rubber. If fitting glass to an undisturbed rubber then you only need to put sealant between glass and rubber on the outer face. If fitting new rubber as well, or if the old rubber was removed and being refitted, you will need to put it on both the glass and painted metal edges of the outer face.
Then fit the rubber beading (this was the only bit where he used a specialist tool, but it isn't essential).
Now to refit the trim. With all the trim, fit the paint side into the rubber first and use an implement to lift the rubber lip over the trim strip. That way if the implement slips, it goes onto the glass not the paint.
Fit the corner pieces first, then the sides, bottom and top.
When fitting the sides, top and bottom, look at the twist (if refitting old trim) and start with whichever end allows you to fit the paint side under the rubber lip first so you have to press the glass side down against the twist.
Took him one hour to replace the glass using the old rubber and trim, about three hours the second time with new rubber.
GT Screens DIY Replacement
January 2021: A thread on GT screens on the MGOC forum asked if the corners had to be ground. I'd not heard that before but I know roadster screens did get cut-outs at the corners, and the screen uprights changed which could mean that an early glass would not fit a later frame, but hadn't come across that problem with GTs in the three that Vee has needed previously. An on-line video was mentioned, then subsequently someone else thought it was by John Twist, so I Googled and eventually found it but it's Moss Motors. Two things though - the first is that the glass they are trying to fit has marks round the edge that look like it has already been installed somewhere, and although it does seem to be too wide at the bottom of the left-hand upright (at least), he seems to be belt-sanding the top edge. I'd have no faith in his assistant either. But having bought yet another screen for Vee and waiting for Covid and weather to allow replacement with a pal I'm now extremely nervous!
March 2021: Building up to replace Vee's screen (again ...) I took off the trim and locking strip to see if I could measure the existing glass and compare the new, so try and gauge if I was likely to get the problem below, in which case I'd have to think again! Tricky with multiple curves and sloping sides, but I selected two points near the bottom of the uprights just before it started curving round to the lower edge, and allowed the tape measure to take its own route across the glass - 1260mm. Unpacked the new glass which has been kept in a bedroom since November for safe keeping ... and it seems to be the same - whew!
May 2022: David Brown writes on the MGOC forum that Moss apparently retooled the upper corners and shows them fitting the trim as it should. He doesn't say when he bought it, mine were from Brown & Gammons five years ago.
As before daubed Swarfega Original in the slot and started with one bottom corner and part-way up the side, in tandem with working along the bottom. More palm-thumping on the other lower corner pushed the glass across until we could get that corner in, using the plastic spreaders. DON'T use metal tools against the edge of the glass or it could chip which will be a weak spot and start a crack in the future. Worked up the second side, then got both top corners part-way in i.e. with the rubber sitting on the edge of the glass, and started working towards the middle, pushing the rubber up from inside to lie on the edge of the glass with a plastic trim tool with a rounded end. That was getting harder and harder to make progress and we ground to a halt with more than half left to do, so had a rethink. We let the top corners come out away from the seal as that was pressing the glass against the face of the seal, making things harder and harder as we worked towards the middle. The next thought was to uses a thin-ish, broad, non-metal object to push the rubber up from inside instead of the plastic trim tool as that was only getting us 1/4" at a time when it worked at all. I keep all sorts of off-cuts 'just in case' and had some pieces of hardboard about 2" x 3" and the shorter end proved ideal, lifting the seal up to sit on the edge of the glass. We fully expected it to keep breaking but it didn't, a plastic piece of similar size and thickness would be preferable. The crucial thing is to work outwards from the middle to the corners, then in the corners we used the plastic scrapers to lift the seal onto the edge of the glass at the side and top ... and it was in! About an hour and a half, and most of the half hour would have been saved had we adopted the 'hardboard and middle out' technique straight away.
I hadn't been planning to fit the locking strip right away as that's something I could do by myself, but pal said go for it so more Swarfega in that slot and the loop-tool ran the strip in easy as pie. I could see it was stretching a bit as it was going in and tried to push it back periodically, so wasn't surprised to see about 3" surplus at the end. Even if it shrinks back over time it'll be under the trim so no big deal. By now what had been the occasional spit of rain for about half an hour was getting worse, so we stopped there and pal went home.
After lunch the sun came out and became a beautiful spring afternoon, so couldn't stop myself starting the trim.
August 2017: A lot longer to get the front in than the rear. Thick cloth sheets laid across the bonnet and the panel at the base of the screen to protect them, with the ends trapped in the doors to hold it in position. Started with one bottom corner, and nothing else is anywhere near. But by persevering up one side and across the bottom, using plastic levers this time, we can start working across the top. Because the bottom isn't fully in the lip is miles away from the edge of the glass, but with pal variously pushing the lip up from inside the car and me levering from outside, we work along towards the final side. By now the seal there has detached itself from the body. It did that before, and we decided to remove the partly fitted glass and start again, but having done three sides we weren't going to do that again so struggled refitting the seal with the glass in the way. And by variously pushing the glass across to the already fitted side, pushing the seal from the inside, and more levering, it finally went in. Again with the glass in, and before the locking-strip, inject non-setting sealant under the seal on the glass side and the paint side by running the nozzle along lifting the seal up as it goes.
Front Glass
Rear Glass
Trim
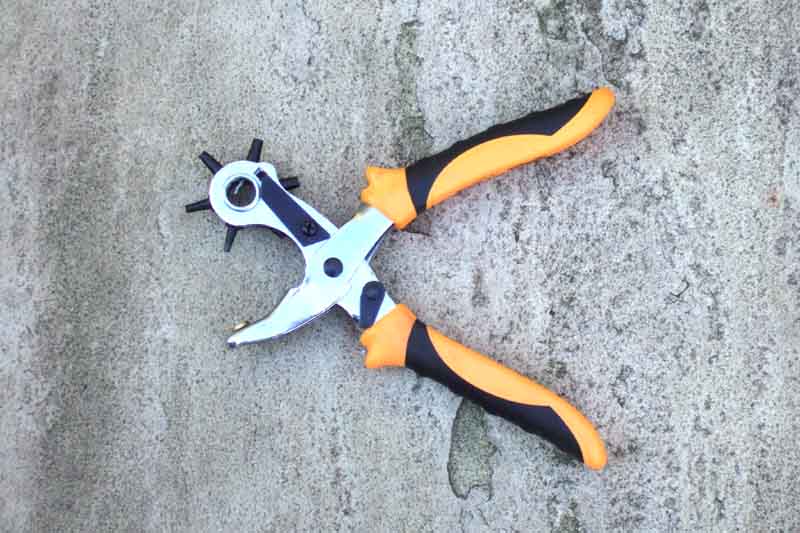 An extra on the rear seals was to punch holes for the HRW wires, using a hole punch tool. With the original HRW the wires are glued up the edges of the glass and a few inches along the top each side, and the glass has been cut back to accommodate the wire when the glass is fitted. They exit the seal through holes near the hinges. Check the top edge of the glass and measure the distance between the ends of this cut back area, i.e. where the glass has gone back to full height again. Mark that distance in the middle of your seal, and punch the holes slightly further apart than that, so the wires come off the glass and go through the seal while they are still in the cut-back area of the glass. Think carefully where the holes need to go - i.e. from the bottom of the slot the glass fits into, through to the inside!
March 2021:
 Much easier than last time, I'd got some additional tools and we worked out some different techniques. As before dust sheets laid across the bonnet with the ends tucked into the closed doors, wipers removed. The first time I'd taken a screen out so a bit of trepidation there. The trim and locking strip removed for reuse in about 10 minutes. I wanted to reuse the rubber and also measure the glass width to compare the sizes of old and new following a YouTube video showing some are too big! Peeling the edges of the seal back to get a tape measure to the edges of the glass was a bit harder than I expected, but using some plastic body filler spreaders pushed in past the edges held the seal back just fine. When it came to removing the old glass we used the same technique to wedge the side and top back close to one top corner, then thumping with the palm of the hand on the back of that corner, it started to come out very easily. Worked our way across the top and down the side, another crack appeared from the existing one which was hardly surprising, and it was out in 10 minutes. Carefully cleaned out the small amounts of sealant I'd used last time as I didn't want that packing into the bottom of the slot as the new glass was inserted.
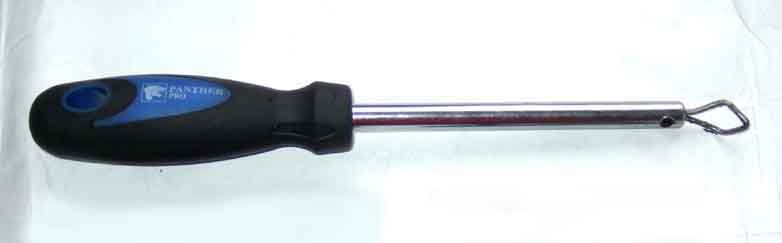 The front locking strip is the original, it's hard and crusty, and has a slightly different profile to the new, all of which make it much harder to get started, it keeps lying on its side in the main slot instead of its side flanges going into the side slots. Pal has brought along the purpose-made tool (pictured) with a wire loop which is a bit too small for the strip which was why we hadn't used it previously. But opening it out a bit, and with plenty of Swarfega, it suddenly starts going in easily, as usual the proper tool making life easier. You can get three different sizes of this tool from some suppliers, but the only difference seems to be in the width of the loop, and there is no sizing info so you don't know which one to get! A pro would have all three, but for occasional use like this you can get away with just one, either squeezing it smaller or levering it wider as we did. When replacing the cracked front screen I bought a kit where the locking-strip tool has a roller and is a single size, which worked well.
 The plastic levers used for the glass were too thick, as were the peg halves. So it was a case of seeing what we could find in the tool-box, and towards the end I had been getting better results using a pair of long-nose pliers. So next day I had another go on my own, as well as having another look at a YouTube of fitting a front screen we had found the previous day. Jumping in stages through the prep and the seal, glass and locking-strip fitting at one point the fitter mentioned that sharp edges can cut the seal, but you can sand them down with emery. And sure enough the edges of the old trim I was refitting were sharp, serrated where they had been levered under the lip before, and with some crusty corrosion. However when viewing the video again I realised he was taking about the glass, and not the trim, so I was lucky to spot it. But some fine wet and dry smoothed it off considerably, after that it went in quite much easier - with the correct technique, of which more later. No discussion on that or another useless video of fitting trim to a rear screen of what tool is best, but from freeze-framing the first it looked like it was round bar with the business end curved over, and a ball-shaped end. Googling "windscreen fitting tools" came up with this at È12.99, although they also have a longer version which is almost half the price! However I think the shorter the better being easier to manipulate. There are similar hooked tools with a sharp end, which might help getting the ball-end tool started, but would cause more damage if they slipped. But back to the long-nose pliers, at the ideal angle instead of having to lever the lip out a couple of mm at a time, I found I could push them along and ease the lip out and over in one smooth movement, several inches at a time, and ended up doing the second rear section, and the front second side and top and bottom, in not much more than a couple of hours. Care is definitely needed with pointed tools, at one point my pliers slipped and stabbed into the base of my thumb. Initially it looked like a couple of stitches might be needed, but plasters sufficed (with a thick glove for the rest!), and at least it avoided what could have been significant damage to paint. Bodies heal by themselves, paint doesn't! With both halves of the rear trim in place the ends were overlapping, which would affect how the finisher would sit, but by wedging a paint-scraper between the two ends, and levering, the two halves ended up end to end, and the finishers went in just fine.
We really struggled fitting just one half of the rear trim - especially going round the upper corner as it is a tight turn, and it took an hour. fitting the second half in it looked like the ends would be overlapping with no space for the filler piece, and they needed tapping 'deeper' into the seal up the sides of the glass.
 Because the rear seal has to be squashed up to get it onto the hatch flange, it is pressed into the top corners very tightly, so much so that it describes a tighter radius than the trim, and you end up with a gap between the outer edge of the trim and the lip on the seal. Someone on one of the fora recently mentioned a problem in this area, I couldn't imagine what he meant, and no one else responded, so - apologising for the potential insult - I wondered whether he had the trim upside down! But now I can see what he probably meant. It can be reduced by pushing the seal towards the trim to reduce the gap once the trim is fully fitted, but doesn't completely eliminate it, and it just moves back again. December 2019: Johnj on the MGOC forum found the same thing, and it occurred to me that perhaps a fillet could be inserted in the body channel in the glazing seal to push the seal out a bit, although that might need the trim and locking-strip to be removed. In the event John said that he was able to lift the edge of the glazing seal with the trim still fitted and insert about an inch of surplus locking-strip, which has taken up almost all of the gap.
May 2022: David Brown writes on the MGOC forum that Moss apparently retooled the upper corners and shows it fitting the trim as it should. He doesn't say when he bought it, mine were from Brown & Gammons five years ago.
After that, and one side piece at the front (the corners fitted first are easy), we had been going at it a good five hours so called it a day. We couldn't really see how we were going to cope with the long strips at the front, and wondered whether I would have to resort to taking it to a fitter, which can't be done until after the MOT. Particularly the long front sections didn't want to lie flat against the seal, but I found it very easy to carefully work along them bending a bit at a time until they did lie flat, although the top one still needs a couple of strips of masking tape to hold them against the seal until you can get a few inches in. Also when starting the very end tends to pop back out, but keeping an eye on it and going back to it, once 2 or 3 inches are in it should stay put.
With the lower strip at the front as I got to the end I realised it was almost 1/2" too long - where has that come from? By pushing the bottom corners round a bit, and pushing the strip along to one end as far as it would go reduced it a little, but didn't eliminate it - it's like it is the opposite effect to the upper corners at the rear and the front seal could do with being a couple of inches longer. I suppose I could have stretched it, but was concerned that it would simply shrink back and pop the trim out. In the end I could see no option but to cut a little off the end while 90% fitted, with a thick protecting pad under the trim and above the body, seal and glass, then file the edges smooth.
For the repeat performance at the front it was sunny and warm which isn't ideal for the Swarfega lubrication as it dries out pretty quickly, so I only applied it section by section. Corners first, went in easily. I'd bought the ball-end tool specifically for this job, and it really does make things easy. Next the sides, slotted the end in at an angle a few inches up from the bottom and pushed it down to give me a start. Then slotted the paint side in, and worked the ball-end tool into the seal slot. This is easiest done about an inch away from where the trim is yet to go in, working down to that point, then swinging the tool round 180 degrees and pushing it back the other way to start feeding the trim in. Keep pressure on where it's just been slotted in, push the tool up, and Bob's your Mother's Brother. For the last bit over the ends of the corner trim I used the plastic spreaders again. Top strip next, slot one end in and push to the corner piece as before. Twist gently to take out any cork-screwing so that it lies close to the final position, then as before, pushing across from the first side, then moving round to the other side and pulling the tool to finish off. Not quite central, so before fitting the last couple of inches I used a block of wood and a mallet to tap it across bit by bit into position. The bottom strip was a bit trickier as there was more of a twist and also a lateral displacement which meant it moved away from the seal as it went across the screen, but the same process had the same result. I was wondering about the length as last time I had to cut a small amount off the end as it overlapped the corner piece, but it was fine so I think that confirms it was down to the different seal used that time as this time the seal is the same.