


Securing the batteries
Battery Voltage
Slow Cranking
Earth_Straps
What Polarity is my Car!?
Decals
Which Terminal is Which?
Twin-6v Link Cable
Cable Size and Current-carrying Capacity
Battery Cover
Replacement Batteries
Battery Drain January 2014
Cut-off Switch
Battery Types - Lead Acid, Gel, Advanced Glass Mat etc.
Do I need plastic battery bins?
Fused Battery Terminal January 2014
Battery Chargers
Jump-Starting
Lucas Battery Catalogue
 It is absolutely vital that batteries are securely clamped into their cradles. Many who switch to a single 12v, or fit battery boxes, seem to leave the batteries unsecured. Although it is an MOT requirement to have a secured battery the tester is not allowed to 'dismantle' any part of the car so unless he looks up into the cradle and prods the battery to see if it moves they are unlikely to spot an unsecured one. Roger Parker formerly of the West Midland Police motorway patrol unit has seen the effects of an unsecured battery and recounts the following:
|
The (car) was totally destroyed following an accident on my section of the motorway. Unfortunately the driver died in horrifying circumstances which I believe to have been avoidable. I can now relate the circumstances as the inquest has recently been closed as I feel there are important lessons to be noted.
What happened was the car was travelling along the M6 at about 4am when, for reasons unknown, the vehicle left the road on the nearside and took out a traffic sign. The impact caused very severe damage to the underside of the car as the concrete base to the sign was at cross-member height. This impact also took out the fuel pipes. Now as we all know the electric fuel pump keeps on pumping until the electricity supply is cut. With the electrical circuits still open after the crash this is exactly what happened consequently soaking the underside of the car, which after the crash had come to rest on its offside. The driver had suffered serious but not fatal injuries - MGBs are strong cars - but however he was trapped by one leg. When a passing motorist stopped shortly after the accident, he saw the driver was trapped and able to talk to him as he was conscious. At this time poor maintenance in the battery compartment then contributed to subsequent events. The battery was not of the correct size and was only resting on the battery tray - it was not secured. In the extreme circumstances of the heavy impact, the battery was able to move and short out on the metal body of the car because of the lack of secure fixings. Now remember the petrol pump was still running and pumping fuel out of the fractured fuel lines and tragically the arcing between the battery and metal body ignited the petrol vapour. Now I do not have to go into the details but suffice to say the death of a conscious person by burning is one of the worst fates you could imagine and I have had the unfortunate experience of witnessing three such deaths in my service. The moral is clear - secure your batteries properly (gravity is not enough!) and if possible fit an inertia switch as found on the current MG Efi models which would cut the power off from the fuel pump in events of a violent nature. Together these precautions would have prevented the death of this driver. Enough said. Incidentally the fire was so intense that most metal items in the area of the seat of the fire actually melted - including a whole spare wheel. |
- MGB batteries were always held down with a strip of angled metal as a retaining bar along one edge of the battery (plastic packing strip to clamp deleted in December 1977), and two hooked rods down from that to holes in the cradle, secured with double-nuts (GHF200) above the retaining bar. The batteries sit on rubber buffer strips (AHH6351) along the front and rear angles of the cradle base.
- CB cars have the retaining bar (AHH6353), with a strip of plastic packing (AHH5169) underneath, along the rear edges of the batteries. The rods (AHH6750) run down and forwards with hooks going through holes in the sides of the cradle. Care needs to be taken with the positioning of the retaining bars and battery connectors as with posts in diagonally opposite corners one of them on each battery will always be very close to the retaining bar. No problem with the earth terminal, but the other three are all 'live'. Originally there was an option of a larger battery that required a rectangular frame (AHH7109 - NLA) to sit on top of the battery and be clamped down by the rods.
- RB cars have the retaining bar (34G2065) and packing (37H3743) running fore and aft along one long side of the battery. 12v batteries have the terminals along one long side, and are normally positioned to put the -ve terminal towards the rear of the car. This means the terminals can be nearer the tunnel (Type 072) or nearer the off-side of the car (Type 075) depending on which type of battery you get, and the norm is to have the posts nearer the tunnel. The retaining bar goes on the opposite long side of the battery to the posts, i.e. normally towards the off-side of the car. The rods (BHH1586) run down almost vertically to one pair of two sets of holes in the angled flanges that form the base of the cradle. In theory the rods could be angled across the short sides of the battery to the other pair of holes, but they would need to be longer, and the ends of the retaining bar would also need to be at an angle to the rest of it, as they are on CB retainers, but RB retainers are the same shape all along. Physical battery size can impact on the security of the retainer unless the rods are angled.
- The physical size of both 12v batteries and 6v batteries can vary, and with the smaller ones you should make sure that the base is fully supported by the front and rear angles of the cradle base. My latest set of 6v are slightly smaller than those I've had before and I've had to add a strip of metal to the rear angle of the base to support the battery properly. With 12v batteries and the rods going straight down there is the additional problem that on a smaller battery they will be angled away from the battery when in the holes, which will pull the retaining bar off the battery. I've had to add some packing between the other side of the battery and the side of the cradle to move the battery further across. Yet another problem is where the battery is shorter top to bottom than the rods can accommodate, and you run out of threads. Many years ago I had to bend new 6v rods into an S-shape to take up excess length, and put thicker packing on top of the 12v battery. The latest 6v batteries are even shorter but I have dies now so have been able to cut more thread.
- Fitting the retainers can be a fiddle. I put the rods in the retaining bars with one nut started, then fit the assembly over the battery. By twiddling the upper end of the rods you can turn the hooks towards the holes and hook them through. The trick is to have the nuts on far enough so that the hook only just goes through, then tighten that a few more turns so it can't come out, while you fit the other rod in the same way. Slide the plastic packing under at that point, before tightening the first nuts and adding the second nuts, tightening the two against each either to lock them without applying too much pressure to the case. The irony is that this process is much easier with smaller batteries than larger as you can get your fingers down the sides more easily!
When doing any work involving any battery terminal, or the battery cable at the starter solenoid, or any 'always live' wiring such as brown wires, always remove the earth/ground cable from its battery post first and replace it last. This is regardless of whether the car is negative earth/ground or positive earth/ground, twin 6v batteries or single 12v. Many sources of automotive information say to always remove the negative connection first before the positive, but they are only thinking of 'modern' cars, not classics. I repeat, always remove the earth connection first and replace it last, regardless of polarity, and that applies to all cars i.e. moderns as well as classics. The reason for this is that if your spanner should happen to touch the body whilst it is also touching the earth/ground post of the battery nothing will happen. Once the earth/ground connection is removed it is now safe to undo the 12v (aka 'hot' or 'live') connection, because if your spanner should happen to touch the body while it is on the 12v post still nothing will happen because the earth/ground connection has already been removed. If you remove the 12v connection first and the spanner touches the body whilst doing so, you will generate a large spark which can ignite any battery gases that may be present, or maybe even cause the battery to explode in your face! So it's always earth cable off first, and back on last, regardless of polarity.
Car batteries contain a large amount of energy and can discharge it very rapidly under the wrong conditions, generating large sparks, toxic fumes, even exploding and showering corrosive liquid around. Not all batteries have polarity markings, on classic cars battery cables are not usually colour-coded for polarity, and the battery terminals and connectors do not usually have insulating covers. Great care must be taken to ensure the 'live' or 12 volt terminal does not accidentally contact the car body or a large spark can be generated which can ignite battery gases, and tools or other metal parts can become welded and glow red-hot.
Many MGBs and other classics of the era have two 6 volt batteries instead of a single 12 volt battery, and the two 6 volt batteries are connected together with a link cable. Both ends of this link cable must be considered as being 'live', as well as the 12 volt terminal, and need the same care to prevent accidental contact with the car body.
Another warning is never to run the engine without a battery connected, especially on alternator equipped cars. Although the alternator has a voltage regulator it actually generates pulses of AC which are then rectified to DC before being regulated, and will output pulses of high voltage if a battery is not connected. The battery acts as a very powerful smoothing device which prevent the high-voltage pulses reaching other circuits on the car. Without a battery the high-voltage pulses can blow bulbs and damage electronic circuits.
 Chrome bumper MGBs (and others of the era) originally had two 6 volt batteries connected in series with a link cable so as to deliver 12 volts. This link cable must be supported by a clip under the battery shelf above the tunnel or it will rub on the prop-shaft.
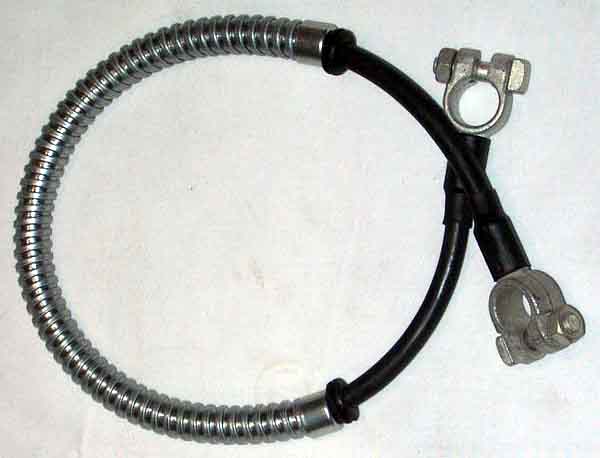
 Here to indicate polarity to others I've wrapped a strip of insulation - a spiral cut off a red battery cable - around the main cable that feeds power to all the circuits on the car, as well as round the positive end of the link cable. Also shown is an armoured link cable available from various sources such as Motaclan/Leacy. This cable goes over the prop-shaft and it is essential that it is clipped to the back of the heel-board as high as possible. The armouring prevents the cable chafing in the clip, if this cable shorts out even though only one battery will be affected fire can still destroy the car.
My roadster came with a single 12v which needed replacing in 1994, but it was too big to lift out through the hole in the shelf. Looking underneath I noticed that the carrier had been modified to take the bigger battery, and I wondered if they had welded it up after getting it in from underneath! But then I had a brain-wave and found that if I turned it over to lie on its end (it was sealed) I could just get it out from the top. It had just been loose in the cradle, so along with the new 6v batteries and interconnecting cable I got two clamp kits. It was apparent that originally the interconnecting cable went through some flexible armoured tubing, but with the clamps already crimped onto the end of my new interconnecting cable there was no way I was going to reuse that. It was rotten anyway so I pulled it out and just put the cable through on its own, installed the earth clamp in the other box, installed the batteries and clamps, checked the volt-drops, and away we went. Not too long afterwards I had occasion to remove the interconnecting cable, can't remember why, and saw with horror that it had been hanging down and rubbing on the propshaft! It had marked the insulation but fortunately not rubbed through. So I installed my own tube to support it up out of the way. That was better than before but the tube still showed signs of rubbing of rubbing so when I had to replace the link cable because of corrosion and got an armoured one I reused the original clip, read on.
Added April 2009
 When I fitted the battery cut-off switch to Bee last year I found a mass of corrosion around one of the terminals on the right-hand battery, where the link cable attached, and the fluid level in the cell closest to it was well down. I cleaned it all off (it made a terrible mess of the drive and is only now starting to fade 12 months on) and found it had eaten away quite a bit of the clamp, so bought a new one, this time of the correct armoured type (BHA4348 currently at Moss Europe and Sussex Classic Car). These are supported by a clip at the top of the heel-board directly under the battery shelf between the two batteries. I found this clip is held by a bolt that goes into a welded nut in a box-section I didn't even know was there. Quite a bit of surface rust up there, and restricted space between the battery boxes and above the prop-shaft, but the bolt came out very easily. Almost certainly the first time it had done so since being fitted at Abingdon, so I treated it with due respect! The new cable went in quite easily with the clip and bolt, but when I went to attach it to the battery posts I found it was shorter than the old one, and would only just reach its post by lying tightly across the other clamp - not a good idea. I tried turning the battery round 180 degrees but then the main battery cable was nowhere near its post. Turned round just 90 degrees both clamps fitted, but one of them was very close to the clamping strip, which in any case was hard up against the cover over the refilling ports, again unsatisfactory. Fortunately because I had fitted the cut-off switch in the main battery cable I was able to remove the short length between the switch and the 12v post, remove the lug and connector, and transfer them over to a suitably longer length cut from the old link cable which would reach its post with the battery rotated 180 degrees.
I've seen a couple of comments from people who have flattened the battery, then charged it up in reverse, which seems a really iffy process to me, if not downright dangerous if someone else should go by any + and - markings for reconnection, boosting or even charging. Also some sources stating that +ve and -ve plates are made of slightly different materials which aid battery performance, which would work against you if the polarity is reversed.
Battery Cover December 2014
From 1st July 2018 it has become illegal to supply sulphuric acid to members of the public without the appropriate EPP licence. So whereas mail-order supplied a dry-charged battery and a set of acid packs, in future and depending on the retailer, either only the dry-charged battery will be supplied and you will have to find a supplier of acid locally and get them filled there, or collect wet-filled batteries over the counter. July 2019: At least, that's what advice at the time seemed to say, but wet-filled batteries seem to be available for delivery by courier from some sources now (see below) including the MGOC.
December 2021: Quite the opposite in Vee with her battery having lasted 17 years. But winter weather has meant little running and she has needed the lithium battery pack a couple of times, so so treat her to a new one.
June 2019: Another sudden failure Bee, and it's a case of "déjà-vu all over again"!
October 2014: Sudden failure of one of Bee's batteries and subsequent replacement of both.
Twin 6 volts in chrome bumper cars, single 12v in rubber bumper. Some years ago two 6v were only slightly more than a 12v for a rubber bumper, but now a single 6v is nearly as expensive as a 12v. Nevertheless I intend to stay with 6v. It is frequently said that modern batteries benefit from more recent technical advances but why shouldn't that also apply to 6v as well as 12v? And at least one company offers 59Ah, 73Ah and 88Ah versions in the same package size. Certainly mine last well enough averaging 10 years for each set, and that with very little use for several months over winter with no recharging. The single 12v in the V8 doesn't last any longer much less in fact since I stopped the daily drive to work (after the 2nd battery failed in as little as 18 months I fitted a battery cut-off switch and it has been fine ever since). If you do opt to replace the twin 6v with a single 12v then you have the potential to move the fuel pump into a far more accessible position as Peter Mayo did.
The Workshop Manual quotes the original battery capacity as 51 Ampere-hours at the 10-hour rate or 58 Ampere-hours at the 20-hour rate. These days automotive batteries are also often quoted in 'Cold Cranking Amps' (CCA equivalent to SAE) or 'Cranking Amps' (CA) as starting an alternator equipped car is its main use and not a continuous discharge over a period (unless you regularly park with lights on). Can also be SAE, IEC, EN and DIN and this chart converts between them. However for a dynamo equipped car Ampere-hours is more of an issue as at idle or low revs, especially with lights, wipers etc. on, the dynamo won't be charging and you will be discharging the battery, theoretically an issue if you drive in heavy stop-start traffic. CCA represents cranking at 0 degrees F/-18C, for warmer climates CA is more applicable as it represents cranking at 32F/0C. Divide CCA by 0.8 to get CA. One source (unverified) quotes that 6v batteries for the MGB should be 66Ah and 360 CCA. If you regularly start the engine in temps below freezing you may need 360CCA. If normally started above freezing you only need 360CA i.e. a 288CCA (or the next one up) battery. There is little benefit going for a battery with a higher CCA or CA than this unless you have a high-compression (i.e. higher than even the factory high-compression) engine, although the higher the capacity the longer (in years) they are likely be usable. Incidentally this also indicates that modern 6v batteries have benefited from modern technology increasing performance in the same package size, and not as some aver. For complete originality I think the original 'tar top' batteries with exposed links can still be obtained, although two sets I have had have cracked round the posts and suddenly failed some time later. They are also available in a more modern construction with internal links and a single fill cap. Exhaust heat has been mentioned as a factor against staying with twin 6v, and as both my sudden failures of tar-top have been on that side maybe that is indeed a factor.
6v batteries for chrome bumper: December 2022:
Several places are doing 77 and 80Ah 600CCA i.e. significantly more powerful than the originals at about �65 each i.e. �130 for two, some including delivery, delivered filled, with variously 1, 2 and 3 year guarantees.
MGOC have D004W 80Ah 600CCA at �75/�145, concealed links, single fill channel, wet, 2yr guarantee.
Brown & Gammons have dry and wet, standard and heavy duty, at prices from �92 to �118 all 'collection only', capacities not listed.
Motaclan/Leacy show two types GBY3031D dry i.e. no acid at �103 and GBY3031W at �98 wet collection only, capacities not listed.
Moss Europe list a 57Ah at �115 and a 63Ah 'heavy duty' at �126, both dry, acid to be sourced yourself. Wet versions of both (although the cheaper one is shown as 56Ah) at the same prices for collection only.
Alpha Batteries are showing a pair of 421 80Ah at �160 including delivery, wet, concealed links and single-fill, 2 year warranty.
Tayna Batteries has Exide 421 80Ah 600CCA at �126 each including delivery, wet, concealed links and single-fill.
Halfords don't list a battery for a chrome bumper MGB.
421 seems to be the designation used by a lot of suppliers, quite a few possible suppliers in this Google search.
12v batteries for rubber bumper: December 2021
Note that the original batteries have the terminals on one of the long sides, not diagonally as on the 6v, so terminal layout is important. As originally installed the terminals were closest to the tunnel, with the positive post closer to the front of the car. The generic UK (at least) designation for this battery is 072. 075 would appear to fit but have the terminals the other way round i.e. positive towards the rear of the car when they are closest to the tunnel. If the wrong type of battery is used the original way round, or the right type but the wrong way round, you will destroy the alternator and damage wiring.
MGOC do not appear to be listing any 12v batteries.
Motaclan/Leacy are showing GBY072W as wet for collection only, �92 inc VAT, no spec.
Moss Europe show a dry at �153 for delivery (obtain acid locally) or wet also �153 collection only, 450CCA 60Ah. They also have a heavy duty 550CCA 70AH at �136 (cheaper!) which is also wet for collection only. However all three pictures have labels showing '70Ah 570 Amps'.
Halfords list HB072 with a 3 year guarantee at �101, 68Ah, 550CCA, sized at 261mm long by 175mm wide by 220mm high, and Yuasa HSB072 Silver with a 5 year guarantee at �124, 75Ah, 640CCA, sized at 269mm long by 174mm wide by 223mm high (this will be a struggle to fit).
18th December 2021: Vee's battery has needed the lithium jump pack a couple of times while not being used as much in the poor weather. Cranked measuring the voltage on the battery terminals and initially it was 9v (ideally 10v), faded quite rapidly with more cranking checking the voltage on the clamps and the body earth, dropping to 6v with the meter back on the terminals. So time to replace, but fitted in 2004 so not a bad life at 17+ years! Halfords still showing �99 for their HB072, Euro Car Parts showing Lion 031 600CCA 70Ah 266mm long 222mm high 172mm wide 3 year guarantee at �74 which is a 45% Christmas bonus off the normal price of �135. Note Euro almost always have some kind of discount but it varies over time, for example a couple of weeks later it was down to 40%.
Listed for the RB I noticed it was classed as '031' and not '072' and it's 5mm longer than the Halfords 072. This battery table lists all the UK battery types and 031 and 072 are extracted below:
| Battery Code | Amp - Hour | Volt (V) | CCA | Length (MM) | Width (MM) | Height (MM) | Weight (KG) | Terminal |
| 031 | 70 | 12 | 570 | 258 | 173 | 225 | 19 | T1 |
| 072 | 70 | 12 | 570 | 265 | 175 | 205 | 20 | T1 |
However that shows 031 as 7mm shorter than 072 and 20mm higher, and neither the Halfords nor the Lion meet those specs exactly except for the voltage and the Lion Ah! But given the listed size of the Halfords HCB072 a couple of years ago (but no longer listed, 269 x 174 x 225mm) which is even bigger it shouldn't be a problem.
 But it's a whopper compared to the one that was in before which was 230mm long, this is 255mm long so I wouldn't like to have to do the Yuasa HSB072! It only just fitted through the hole, with the cables pushed down out of the way and teased up afterwards, and I had to move the clamp struts from the middle holes to the end holes. That has put the front strut under the lip of the shelf and it was a fiddle fitting the nuts, and the +ve clamp is partially covered as well as limiting how it can be orientated to tighten the nut (clamps are tapered to match the posts so should not be turned over even if they are the moulded-on type without screws). But I get it all in and do voltage tests that gives 12.8v open-circuit, and without charging since receipt cranking a cold V8 (with the fuel pump and ignition disabled) gives 11.6v on the battery posts and 10.6v between the solenoid and engine earth which is very good, and it's really whizzing round. Fuel pump and ignition connected it starts almost instantly, but then it had been sucking some fuel in during the battery tests even though the choke was fully home. This is sealed but the old battery has cell caps and there is more than 2" of headroom above the separators, so a 'small' battery in a biggish case, but still rated at 590CCA so basically the same (originally) as this 600CCA
Due to the cramped installation the 12v cable is resting against the clamp plate which means it could eventually short out. Black +ve cable from the factory, but as I have a cut-off switch on the heelboard I'm thinking of getting a red cable from there to the battery, longer to give more options for routing the cable, and a different moulded clamp that can be fitted either way up. I can't find any ready-mades like that, but Halfords have an adapter (HEF366) so their cable with eyelets both ends can be used. However their cables are 9" which isn't really as long as I need to make it worthwhile or 18" which is too long! Whether it came with the V8, the roadster or somewhere else I can't remember but I have an old red rubber boot to go over the cup-type connectors which I slid onto the 12v cable years ago to indicate to anyone else that it was +ve, and have slid that back down the cable a little to act as another thick layer of insulation. I was also a little concerned about the clamp plate sliding off the edge of the battery as the struts are going straight down, they aren't long enough to go diagonally, so have wedged a couple of bits of wood between the clamp plate and the side of the cradle to prevent that happening. All in all, as it's in and working well I leave it as it is. A side-benefit is that whereas the near-side HID wouldn't strike unless the engine was running and the alternator charging it does so with just a couple of flashes now.
But knowing what I know now I wouldn't go for either an 031 or an 072 again. Looking at that battery table and whittling it down to the same terminal type that are smaller than those but with a high CCA I get the following possibilities :
| Battery Code | Amp - Hour | Volt (V) | CCA | Length (MM) | Width (MM) | Height (MM) | Weight (KG) | Terminal |
| 027 | 60 | 12 | 540 | 243 | 175 | 190 | 16 | T1 |
| 027T | 62 | 12 | 550 | 243 | 175 | 190 | 16 | T1 |
| 075 | 60 | 12 | 550 | 243 | 175 | 175 | 16 | T1 |
| 075T | 60 | 12 | 590 | 243 | 175 | 175 | 16 | T1 |
The 075T is 590CCA which is actually higher than both the 031 and the 072, albeit at 60Ah, but unless you leave it with parking lights on that's not going to be an issue. Yuasa YBX5075 is an 075T at 640CCA which is even better, 4 or 5 year guarantee, several sources at around �74 so the same as mine but easier to fit. Ditto various 075s a bit cheaper but around 540CCA.However this type have the terminals the other way round and you would have to extend the +ve cable (significant job without a cut-off switch) and maybe the earth (easier) or position the battery with the posts away from the tunnel instead of beside it. On my second replacement under guarantee all those years ago - under protest saying "Don't come here again" I noticed immediately that he had given me one of these (I suspect deliberately so I would burn out my alternator ...), so I did have to install it the other way round. But that meant the clamp plate had to be nearest the tunnel, pushing the battery towards the outside of the car. There is a large gap that side so the battery was tilting, and I had to put a block of wood in there to keep it square in the cradle. As I've chosen to do that anyway with the 'correct' battery that's neither here nor there and fitting an 075/075T would have been much easier! Next time ...
12v for a chrome bumper? October 2020:
MGOC are showing a conversion kit including battery and clamps but WITHOUT acid for �120. 50Ah so quite a bit less capacity than the original 6v or RB 12v, and no cranking amps given.
 Bottom Gear Bob on the MGOC forum mentioned Halfords HB/HCB202 which is a direct replacement (including the clamp) for a 6v battery at 175mm x 175mm and 190mm high and around �80. Check the cranking capacity though as some are lower than the original 6v at 300 amps as opposed to 360 amps, and note the 550 and 570 amps quoted for an RB 12v and 600 amps for MGOC 6v. Ampere-hours tends to be about 20% lower with the HB202 but that's only an issue if you need to leave it parked with the lights on. April 2024: Now shown as 390 'starting power' which equates to 312 CCA, 42 Ah, LxDxH 175x185x190mm so 10mm wider, �85.96.
January 2022:
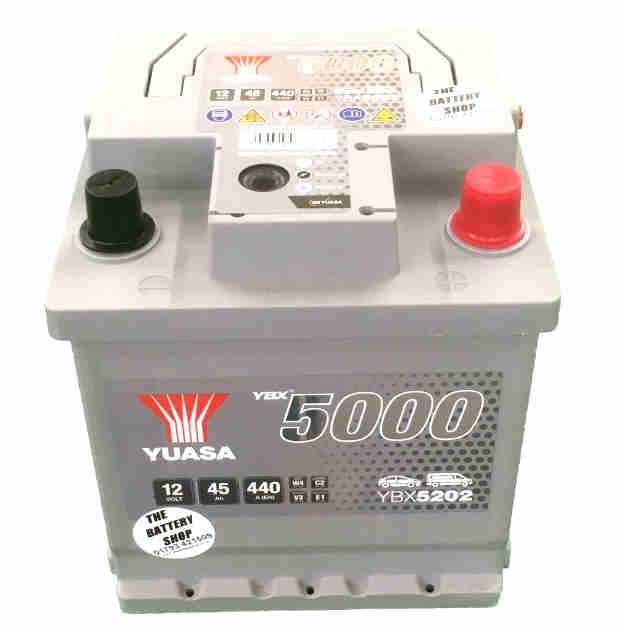 Another type 202 is this Yuasa YBX5202. 440 CCA (30% more capacity than the Halfords for the same size), 45Ah, 175mm x 175mm x 190mm high, which is pretty-much the same as an old 6v I have so the same clamp should fit. 5 year guarantee and under �50 so a lot cheaper than the Halfords above, less than half the price of the MGOC kit, and less even than a single 6v. Whilst not as powerful as current 6v it's about 30% more powerful than the original 6v, which were always 'adequate' when new, so it's something I'll be thinking about the next time I have to replace them. The posts are down one side instead of diagonal, so for safety with the clamp on the opposite side to the posts that would put the posts towards the front, and the +ve towards the tunnel. Make sure you get the connections the right way round.
May 2022: Another mentioned on the MGOC forum is the Varta C6 at 520CCA and 52Ah, 207 x 175 x 175, �62. So more powerful, and although the same width and depth as the other two (17mm taller) which have said to be a direct fit apparently this one needs a bit trimmed off the case to fit. Could cause a problem with any guarantee claim.
April 2024: Euro Car Parts Bosch 202 4 Year Guarantee Amp Hours: 44Ah, 420 CCA, L 175mm W 175mm H 190mm, �81.59, posts the same as the Halfords and Yuasa YBX5202.
May 2024:
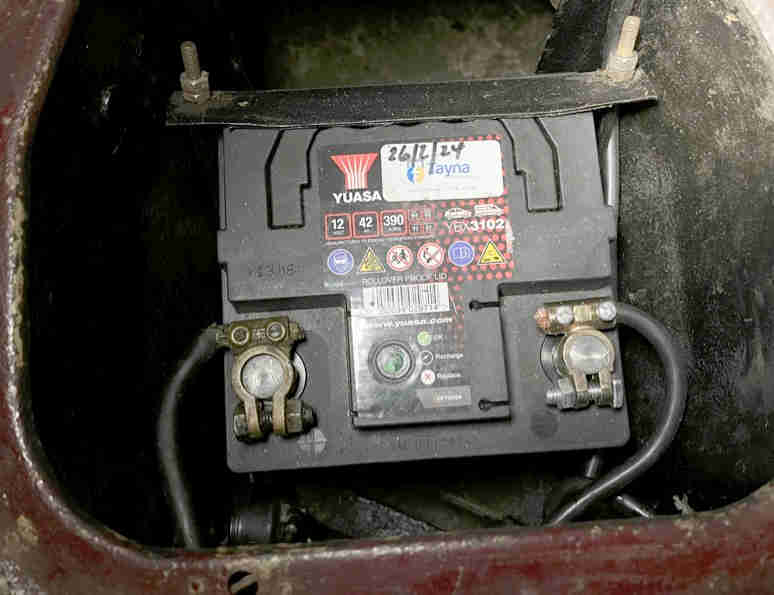 Yuasa YBX3102 same size and capacity as the Halfords and Yuasa YBX5202 but with the posts the other way round. This may be a factor in the length of the 12v cable.
Americans often quote 'group 26' as a suitable 12v battery for a chrome bumper MGB and this site quotes the dimensions of that as 208mm long by 175mm wide by 197mm high. The Performance Batteries site lists no less than 14 batteries that might squeeze in, but the most powerful is only 52Ah which is quite a bit less than the original 6v, albeit it at up to 520CCA (624CA). The dearest of these is �62 inc VAT. Some batteries come with one or two lips on the bottom edge for clamp brackets on modern cars, which can make the difference between fitting and not fitting. I've seen it suggested that these can be cut off, which may well work, but remember you have probably nullified the guarantee by doing so.
Note that 12v batteries have the posts down one long side and can have the polarity either way round. The convention for rubber bumper cars was to have the posts adjacent to the tunnel and the +ve towards the front of the car when installed. Whatever battery you fit you need to check carefully - REVERSE CONNECTION WILL DESTROY AN ALTERNATOR AND BURN WIRING.
About the only good technical reason for converting from twin to single concerns access to the fuel pump by fitting it in the near-side which would mean extending the 12v cable. Peter Mayo said that when fitting a geared starter it needed a longer 12v cable from the battery, so at the same time he moved his 12v battery to the near-side and made the cable long enough to reach that. He went even further by moving the pump up into the off-side box making access to it even easier. Make sure you use the link cable bracket at the top of the prop-shaft tunnel to hold the cable up out of the way, and always fit a clamp to hold it down.
I've seen one person doing this had cut the lid in half, which on the face of it might seem to make sense making it like the RB cover, and only having to remove half to either inspect the battery or access the storage bin, but it left one half of the cover with only two fasteners on one end.
And finally... The batteries, particularly the single 12v in a rubber bumper, can be a tight squeeze through the hole. If your new battery doesn't come with a handle it is a good idea to put strong cord or webbing around the battery before you fit it, and leave it in-situ. The next time you come to remove the battery you will congratulate yourself on your foresight. There are 'battery lifters' available, some with eyelets that fit over the posts (don't worry, they are connected by webbing ...) that would work, but others that grip the short sides of the battery with a scissors clamp wouldn't work on an RB as one end of the standard battery is under the lip of the shelf.
Battery Drains January 2014
But back to drains when you don't have an alarm, which could be from many causes, and may even be from the battery itself. However that can be determined by disconnecting the battery earth strap after a decent run, leaving it until you would normally expect problems, then reconnecting the earth strap and trying to start the engine. If it still won't start, then it's the batteries (or maybe the connections ...) but if it starts just fine you have a drain.
To diagnose this it's best to use a voltmeter, but connect it like an ammeter - very confusing to the uninitiated! Disconnect the battery earth cable, and connect the voltmeter in its place. Why not use an ammeter? An ammeter gives a very low resistance path to current, so if you have a high drain a high current will flow. If more than the typical 10A max of a hobbyists meter it could damage the meter, but more importantly create a spark when it is connected and disconnected, which could ignite battery gases. Yes, I know that disconnecting the earth strap might also create a spark, but there is little you can do about that unless you have a cut-off switch, and just one spark is better than several. By contrast a voltmeter offers a very high resistance path, so negligible current will flow even if there is a very large drain, and no spark. For an early positive earth MGB the positive of the meter goes to the earth terminal of the battery, and the negative terminal goes to the car body. For later negative earth MGBs, and those early cars converted to negative earth, the meter is connected the other way round. Digital meters don't usually mind being connected round the wrong way, and will just show a minus sign in front of the reading. If there is any current drain at all, you will see a reading on the meter. There should not be any drain at all on a dynamo-equipped car, unless you have added a modern radio with stations stored in memory (and not all of those), a car-powered clock, or an alarm (in most cases but not all). With an alternator equipped car there will always be a very slight drain, which is from the reverse leakage current of the alternator diodes. This is in the order of micro-amps, and a battery should be able to support this for several months. If you use an analogue meter, the alternator drain may register anything up to 12v on the meter, and you can eliminate this as a cause by unplugging the wiring from the alternator, and an analogue meter should drop to zero. But a typical digital meter is very much more sensitive than a typical analogue meter, and will almost certainly register some voltage even with the alternator unplugged. As long as this is less than 12v then it is an insignificant insulation leakage that can be ignored, a little dampness or dirt across the solenoid or other 'always live' component can be enough to cause that.
But if registers 12v then it could be significant, and if you don't have an analogue meter to compare it with (which should show zero volts) you will need to switch your meter to current. If that shows something in the tenths of a milli-amp or higher then it really ought to be investigated, not so much that it will flatten the battery (although it will over several weeks) but in case it is from damaged insulation on something that might suddenly get worse and cause a catastrophic short-circuit.
You can use a test-lamp in place of the volt-meter, but as well as even a low-wattage bulb causing a spark on a high drain, a small but still significant drain may not be enough to make even a low-wattage test-lamp bulb glow. A high-wattage bulb should not be used while looking for a drain as it will generate a significant spark on connecting and reconnecting. However a high-wattage 12v bulb in place of the earth strap is very useful when testing a replacement wiring harness as it protects the harness from damage if there should happen to be a short-circuit on any of the unfused circuits, but will allow most circuits to function to some extent.
If you have a battery cut-off switch then you can do these tests without disconnecting the earth strap, which makes things easier as well as safer. Turn the switch off and remove any bypass fuse.
- If your cut-off switch is in the 12v cable going to the starter, then connect the meter between the 12v post of the battery and the brown at the fusebox, and continue as above.
- If your cut-off switch is in the earth lead from the battery going to the body, then connect the meter between the earth post of the battery and a good body earth elsewhere.
Battery Types Added December 2008:
Originally there were just lead-acid or 'flooded' types with screw caps on each cell or lids covering all cells. These need periodic checking and topping-up to replace the distilled water lost through gassing and evaporation, which occurs during cranking and charging i.e. normal use. These must be operated in a well-ventilated space and you should not make the last connection of first disconnection or a charger or jump-leads directly on a battery terminal as it can ignite the gasses. There are 'sealed' version of these which are nominally maintenance free i.e. you can't top them up, but they can still gas. You definitely should not operate these in the plastic so-called 'battery boxes'. Some modern cars have the batteries within the passenger compartment or boot and these should have a vent tube leading to the outside, which must always be connected to the battery, so it follows that batteries used in this situation must have the facility to connect the vent. These are often sold with a little red angled tube taped to the top of the battery.
There are so-called 'sealed' versions of flooded which no longer have a removable lid to check and top-up the electrolyte, but they still gas and again must be used with the same precautions in ventilation, charging or jump-starting, and if inside the car must be used with the vent connected.
'Calcium' variants of the above have a higher capacity for the same physical size, at about 12% more expensive than lead-acid. They are probably all 'sealed' but can still gas so the warnings above still apply.
More recently 'gel' batteries became available, in which the electrolyte is a jelly rather than a liquid. These cannot leak, even when the case is damaged. Under 'normal' use they do not gas, so are safe for use in enclosed spaces, which is why they are used as backup batteries in the event of mains failure for burglar alarm systems and the like. However they must be charged at a lower voltage/current than flooded types or voids can develop in the gel which reduces capacity, conventional automotive chargers will damage them unless they have a special 'low-rate' switch position. They also have higher internal resistance so are not as effective as conventional flooded cells when used as starter batteries, so are rarely used in automotive applications. In hot conditions they can still lose water (somehow), which can limit battery life to as little as 2 years. They can stand heavy discharge better than flooded, which is why they are often used in charge/discharge applications like golf carts.
Following gel batteries Advanced Glass Mat batteries were developed. These have liquid acid, which is kept in place by a fibreglass mat which acts like a sponge. They have a higher cranking capacity for a given physical size compared to flooded. However because they need a higher acid concentration than lead-acid they need to be charged at a higher voltage, which may have implications on MGBs with standard alternators and high electrical loads, and especially dynamos. The big draw-back is that they are 4 to 5 times more expensive than flooded types so are hardly a practical proposition in conventional automotive use.
Some gel and AGM batteries are described as 'Valve Regulated Lead Acid' (VRLA) types which means they have a valve to the outside that maintains a positive pressure inside the battery, which normally prevents any gas escape. However under very high charge rates gas pressure will build up to open the valve, so again these should really be used in well ventilated spaces. They are also more sensitive to high 'ripple' charging currents, which is another reason why conventional automotive chargers cannot be used. And if you take into account the very high and peaky voltage and current output that can be seen from an alternator when the battery is disconnected (never run an engine with the battery disconnected) it seems to me that these shouldn't be used in automotive applications either!
References:
Arizona Wind And Sun
Fused Battery Connector January 2014
Battery Chargers Updated November 2007
Update February 2014:
Another important thing to remember, from the Lucas Fault Diagnosis Service manual:
As to how to connect the charger it would be easy to get confused by the interconnecting cable and end up connecting a 12v charger across just one of the batteries, which wouldn't do it a lot of good, and it is a right faff getting the battery cover off anyway. If your car has a cigar lighter you can forget the batteries, just buy a cigar lighter plug and connect the wires from the charger to it - observing the correct polarity! The +ve wire from the charger must be connected to the +ve circuit in the car, and the -ve to the -ve. This applies to both +ve earth and -ve earth cars. The cigar lighter was an option from the beginning and standard from the 1973 model year, but was wired differently over the years, each needing a different approach as follows:
- Up to and including 1968 it was connected to the brown circuit at the ignition switch hence not fused inside the car. In these cases it would be advisable to add an in-line fuse at the lighter (or at the ignition switch if you can identify the correct wire). A standard 17amp continuous, 35amp blow will suffice.
- In UK 1969 and 1970 cars it was connected to the 'accessories' contact of the ignition switch. Not only was this unfused as on earlier cars, but also needs the ignition key to be in and turned before one can use it for charging. This is likely to be a problem so rewiring the cigar lighter to the purple circuit (fused, always on) as on later models might be the best option.
- In UK 1971 cars it is wired to the green/black circuit, and although this does have an in-line fuse it is still on the accessories circuit so needs the ignition key to be in and turned as above. Again rewiring to the purple circuit may be the best option.
- From 1972 (UK) and 1969 (North America) all cigar lighters were wired to the purple circuit which is fused in the main fusebox and doesn't need the ignition key.
There are two types of cigar lighter plug - fused and unfused. The fused type might seem the safest option but the current travels through a very fine spring to get to the fuse which makes the plug get quite warm during charging. A better option is the unfused type which has a higher current carrying capacity. With a fuse in the car and another in the charger you are quite safe using an unfused plug.
Another option is to use a different plug and socket with the socket in, say, the engine compartment connected to the purple fuse and earth and the plug on the charger wires, but still needs the bonnet to be opened and closed to connect and reconnect. One thing to be aware of is that cranking the engine whilst the charger is connected may blow the charger and/or cigar lighter fuse.
Modern cars with their continual small discharge from ECU and alarm systems can also suffer from battery degradation if not used on a near daily basis, and is why I've fitted a cut-off switch to my ZS as well as to both MGBs. Some years ago I read somewhere that Mercedes were having to select alternator regulators at the higher end of the output tolerance because of the number of complaints about failing batteries. Fast-forward to 2022 and I have bought a Mercedes A-class ... and am getting battery warnings! Looking into that I found a three-page thread on battery warnings on an A-class forum with many people having the same problem and difficulties in resolving it.
I'd take this further and say that if ever the battery becomes discharged enough to need a jump or a bump start, i.e. not fully discharged, an external charger capable of outputting more than the 14.3v to 14.7v of an alternator should be used to fully recharge the battery. It should be quite safe to recharge up to 15.5v with the battery still in the car as this voltage can be reached by dynamo systems under normal use. But a higher voltage boost charger should be used with the battery out of the car and in a well-ventilated space (see above). Again from the Lucas manual, external charger current should be limited to one tenth of the ampere hour capacity of the battery at either the 10 or 20 AH rate. For the original batteries this represents about 6 amps, but replacements from some sources can be 75AH and even 88AH (see above), giving charge current of 7.5 amps and 8.8 amps respectively.
I have battery cut-off switches on all three of my cars, but normally the ZS is only turned off in the summer as in the winter it gets used more. However for various reasons this winter it's only been doing a few miles a week, and I have noticed the cranking speed gradually getting lower. So I took the battery off the car and charged it on the bench using my high-output charger. Initially taking just under 6 amps and showing just over 13v, after several hours the current had dropped to about 4 amps and the voltage risen to 15.5v. Put it back on the car (and checked it would start) and left it over night with the cut-off switch not turned off. Next morning, i.e. with the overnight load of the alarm and ECUs, it was cranking much faster than it had previously. I'll have to start turning the switch off in winter as well now.
There are at least four different types of charger:
- Trickle chargers: These are traditional chargers that supply current to the battery continuously (not the same as 'constant current'). As long as they don't raise the battery voltage over 15v you should be OK to leave them on overnight as an exception, but not for long periods or regularly every night. This level of charging, even though it is the same as when the car is being driven, will cause the battery to 'gas' (incorrectly called 'boiling') to some degree which will cause the distilled water in the electrolyte to evaporate lowering the electrolyte level. Also while in a garage, or even out in the open unless there is free air circulation around the battery i.e. lid off and windows open, you will get a build-up of gas in the battery compartment which could cause an explosion and corrosion of metal parts. For chargers that raise the battery above 15v this evaporation will occur to a much higher degree and could even damage the battery i.e. warp the plates. For long-term battery maintenance e.g. when the car is not being used for some months get a 'conditioning' charger. These sense the battery condition and vary the rate of charge accordingly over time.
- Maintenance chargers: Modern chargers that are designed to be left connected for long periods, they monitor the battery voltage and increase and reduce the charge rate as required to keep it 'topped up' without overcharging. However there are a couple of caveats:
- They are designed to be left permanently connected, to keep the battery topped-up. I think that is fine for long lay-ups without using the car, but if you continue to use it when the car is being used on a regular basis you are never going to know when your batteries are on their last legs, or if the charging system is down on output. Go for an overnighter somewhere, without the optimiser, and it may not start next morning. So put it away whenever the car is being used more than, say once a month.
- Another caveat is how to use them. My son is in the market for a charger to keep the battery in his 'occasional use' classic BMW topped-up and looked at the Halfords Fully Automatic Charger. On the face of it this charger is intended for extended connection and has a 'maintenance' mode with reduced current, but if you read the Customer Q&A two posts state that the battery must be disconnected from the car for charging, also its maintenance charge level is 1.5A which is too much in my opinion. In fact if you look at the Q&A for all the Halfords chargers they say not to use them with the battery in-situ or connected to the car. Utterly pointless, for an intermittent-use classic car if you are going to disconnect them to charge them you might as well just disconnect them anyway, they will hold their charge for more than two months like that, remember when you buy them they have been sitting on a shelf at least that long.
- Battery reconditioners: As well as the 'maintenence' feature above these have a 'recovery' option that will restore capacity to fully flat batteries, remember that the on-board system will only restore about half the capacity (cranking power) to a flat battery. The CTEK MXS 5.0 is one such and Accumate Optimate 5 is another. Note that even with a battery that has only become partially discharged you may need to run the reconditioning program two or three times to fully restore capacity.
- Boost chargers: As above these are high-voltage chargers used to give a quick boost to a battery, they are not intended to be left connected, and you must be careful how you connect and disconnect them i.e. only turn on the power to them after you have connected them to the battery, and turn them off before you disconnect them.
Another question is 'Can I charge two batteries at the same time?'. Firstly if we are talking about twin-6v batteries in an MGB then the answer is that is how they should always be charged, and in series as described above. As far as charging two 12v batteries at the same time then it all depends on the charger:
Because of the alarm the switch I fitted to the V8 cut the power completely - for reasons I hope I won't have to explain, but getting fed up with (not 'of' ...) resetting the clock each time I connected an in-line fuse to the battery post (for the minimum length of unfused wire) and took that forward to the clock. You can get switches with bypass fuses (no good in my case ...) but if you forget to turn on the switch and crank it will blow. You can get manually resettable fuses which would need to be in an accessible place, and PTC automatically resetting types which resolve even that.
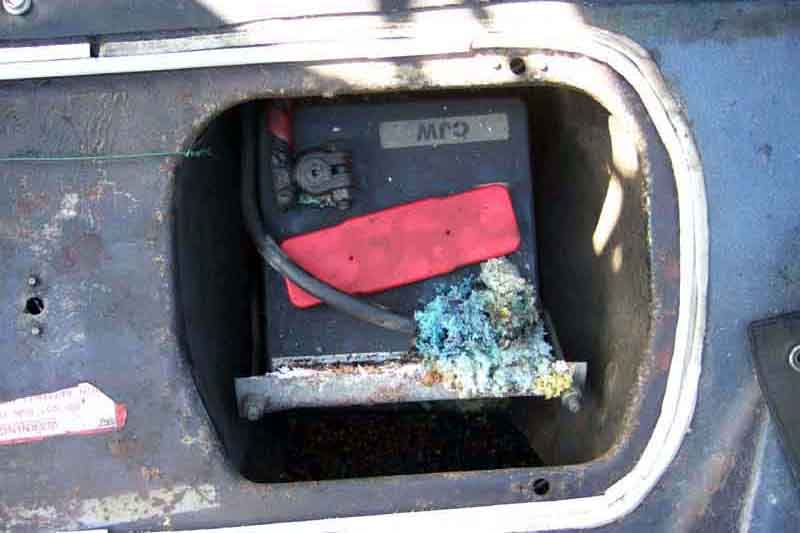
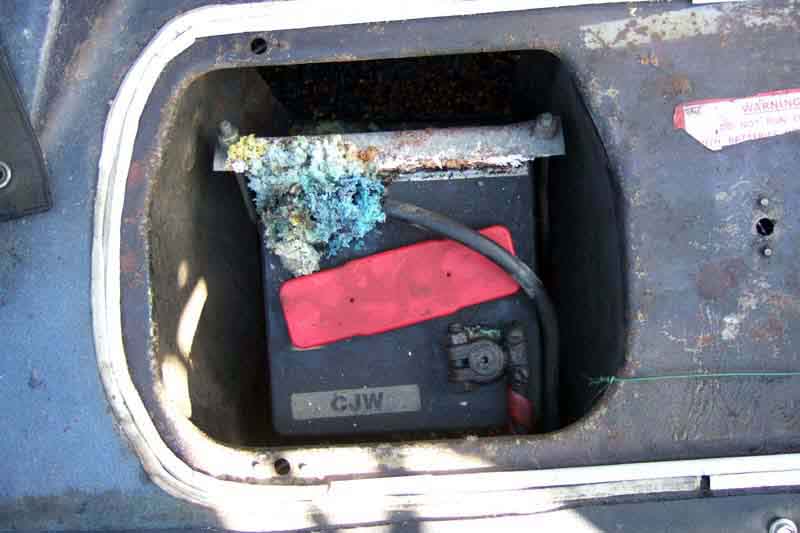 Got a shock when I removed the cover as one battery post and connector was completely obliterated by a 'growth'! A real surprise, because whilst I only check the batteries once a year these are now several years old and there hasn't been any sign of this in past years. Checked the electrolyte levels and the other battery only needed a drop in one cell, but this battery had all cells down and one needed quite a bit. I guess that even these are on the way out, even though they show no reduction in cranking power. As you can see these are 'modern' versions of the original tar-top batteries with separate cell filler caps. I bought a pair of tar-tops in 1994 (14 years ago) to replace an under-sized single 12v on the drivers side, and although I have mislaid the record of when I bought these it must be at least 7 years ago.
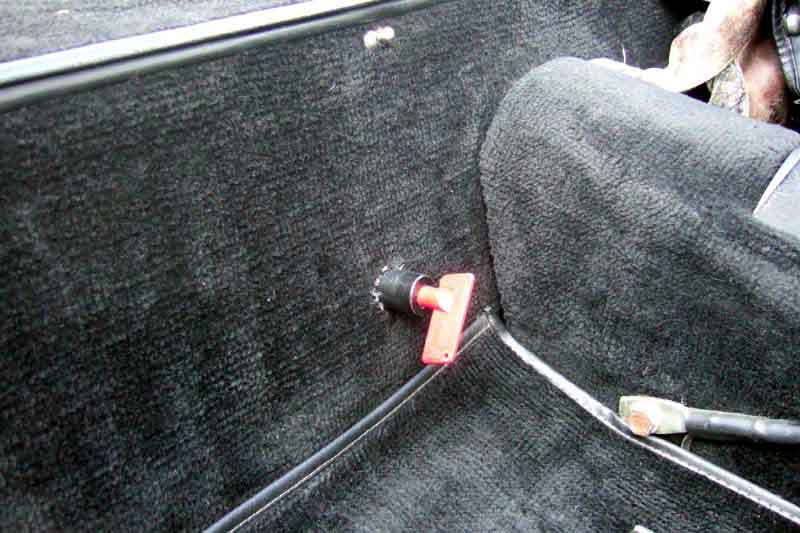
As on the V8 I installed the switch on the heel-board behind the drivers seat where I can reach it quickly in an emergency. The +ve lead passes right by here so that is the most convenient place to put it without buying new and extending the cable run. Some argue that it should be in the earth lead, but it makes no difference electrically and as far as cutting the power goes (but see below). One slight advantage of having it in the earth lead is that this is the lead that must be disconnected first (and reconnected last) when working on any of the battery connectors - twin 6v or single 12v. However unless all you are going to do is tighten one of the other posts, when you would need to remove the earth cable even though you may have a switch in the 12v cable, there is no advantage. If you are going to remove the battery you will have to disconnect the earth cable anyway, regardless of where any switch might be. As far as working on anything else goes i.e. the solenoid or anything with brown wires having the switch in either lead is equally safe, as its immobilisation function, and it's emergency disconnect function. The main advantage of being in the earth cable is that it avoids cutting the 12v cable and fitting two lugs. One slight disadvantage of having the switch in the earth cable but positioned on the (left-hand in this case) heelboard is that with single-12v battery cars you will need a longer cable to get from the battery to the switch, but the original cable could be used to get from the switch to earth. However the major disadvantage is that if you want to keep power to a clock and/or radio (but isolate power from everything else e.g. alarm) you would have to completely insulate said radio and clock from the car's body - which is not going to be easy - and run separate earth wires from the battery-side of the switch. In that event putting the switch in the 12v cable and running a fused bypass circuit to said clock/radio is the only way to go. Update January 2014: In a Bulletin Board discussion on this topic a pal mentioned another benefit, and this is if something goes wrong with your work, and it shorts to the body, then better the earth cable than the 12v cable. And a day later someone elsewhere posted that he had seen an unattended MGB burst into flames, over the back axle, so probably the battery cable shorted close to the battery. If that was the last few inches before the battery terminal, then a cut-off switch in the 12v cable at the heelboard would be no use, but one in the earth cable would be - if you could get to it. That person wondered if a battery terminal fuse might be even safer. But the biggest advantage of fitting it in the earth cable is that you just swing the existing earth cable round from the body to the switch, and provide a new one from the other side of the switch back to the body, instead of cutting the 12v cable. Much easier, and reversible should one wish. For twin-6v systems this means the switch is behind the passenger seat, but still easily accessible for the driver. End of update
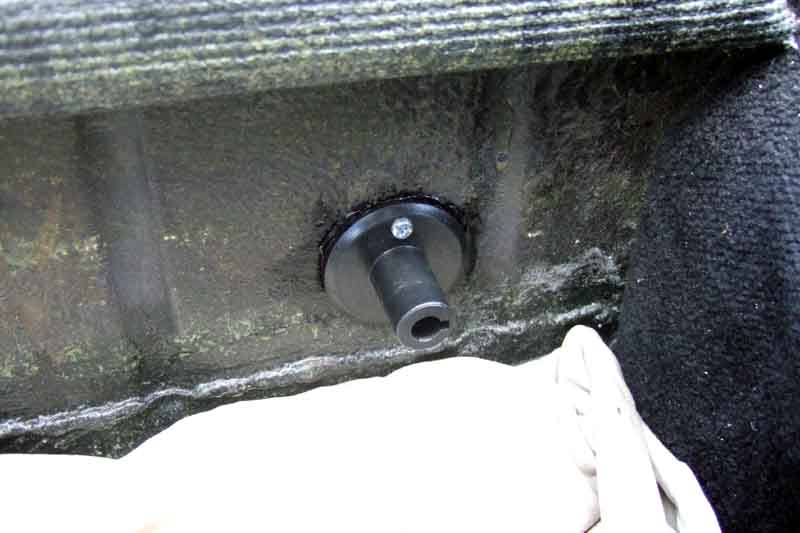 All pretty straight-forward, I made a cardboard template for the complex hole in the heelboard, and cut it out using a combination of drills, little grinding wheels and a metal cutter. However in hindsight although the switch is designed to be mounted on the front of a panel, it makes sense to mount it on the back as only a simple circular hole is required, and there is a lot overlap between switch and panel that can be filled with sealant to prevent any water ingress. Mounted on the front of the panel a long slot is required in addition to the hole, the ends of the slot are very near the edges of the switch, resulting in very little overlap and a greater chance of water ingress. I orientated the switch so that when the handle of the 'key' is more-or-less vertical the switch is on, and when it is horizontal it is off. As well as having a certain amount of logic in that the key handle points in the same direction as current flow down the cable when it is on, and across the cable when it is off, it also means the two connections on the back are equally accessible rather than having one on top and one underneath. This also means the cable coming up from below can be left a little longer which makes it easier to work on in-situ when stripping, tinning and soldering the terminal. Only when I could get the switch into the panel did I mark and drill the holes for the fixing screws. Before mounting the switch I laid the heel-board carpet back over the hole and made two cross-cuts where the barrel of the switch would be sticking out i.e. where the hole in the carpet would be required.
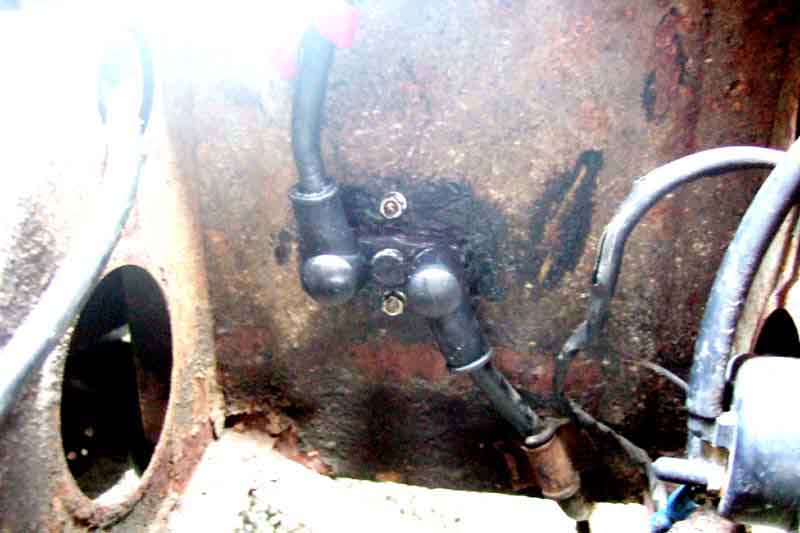 Cut, stripped, tinned and soldered the end of the cable leading to the starter in-situ. A bit cramped but easier than trying to remove the cable from the car or at least the rear brackets to be able to get the cable out the side, the last time I tried undoing any of those they all sheared. When I bought the switch and terminals at Stoneleigh last month the seller recommended some rubber 'boots' which were actually quite a bit larger than the terminals and would have been quite loose when fitted. He had some smaller one that I reckoned I could fit on, and indeed I was able to fit them after soldering the terminal to the cable, as I didn't want the heat from the blow-lamp to damage them by slipping them over the cable end first and they fit the terminals really snugly. Not only will they resist dislodging and possible shorting, but also water ingress and corrosion. I used a wet cloth wrapped round the cable insulation leaving just the bare end free, and arranged some pieces of metal around the battery compartment to protect the switch, fuel pump and wires etc. while I had the blow-lamp in there (my wife's cook's blowlamp!). By comparison the battery end was a doddle as it could be done off-car. Bolted to cables to the switch, daubing Vaseline around the connections before fitting the boots for protection against dampness and corrosion.
In hindsight it would have been easier to install it in the earth cable, as both ends could have been dealt with off-car. You would need at least one new earth cable, plus perhaps a longer replacement for the original. In that case CB cars with twin 6v batteries would have it on the left-hand heelboard, with RB and CB cars converted to single 12v on the right-hand side, being careful to avoid the 12v cable. In this latter case if you still have the armoured sheath between the battery boxes you could run the (longer) earth cable through it and have the switch on the left-hand side. But if not, and you consider running the cable through the holes and being unsupported between them, be aware that it can rub on the prop-shaft and wear the insulation away. Not a huge problem on the face of it as both are at earth potential anyway - except that if you then need to turn the switch off for any reason power may still be connected.
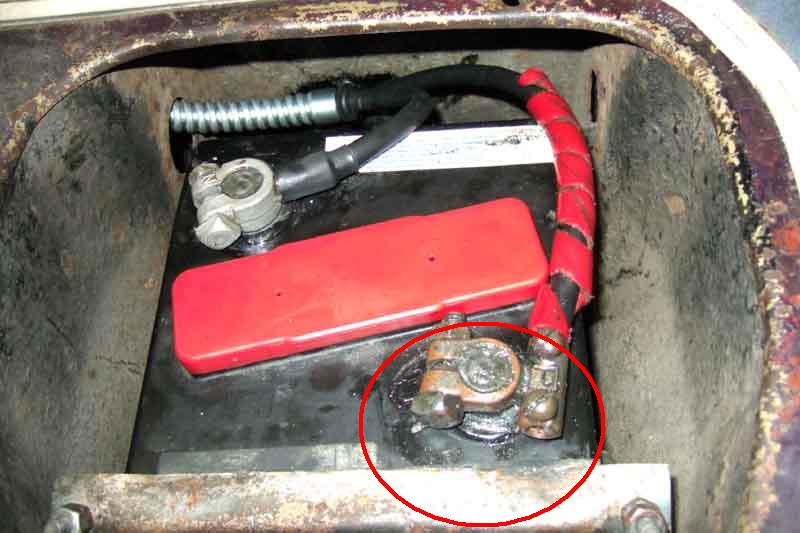
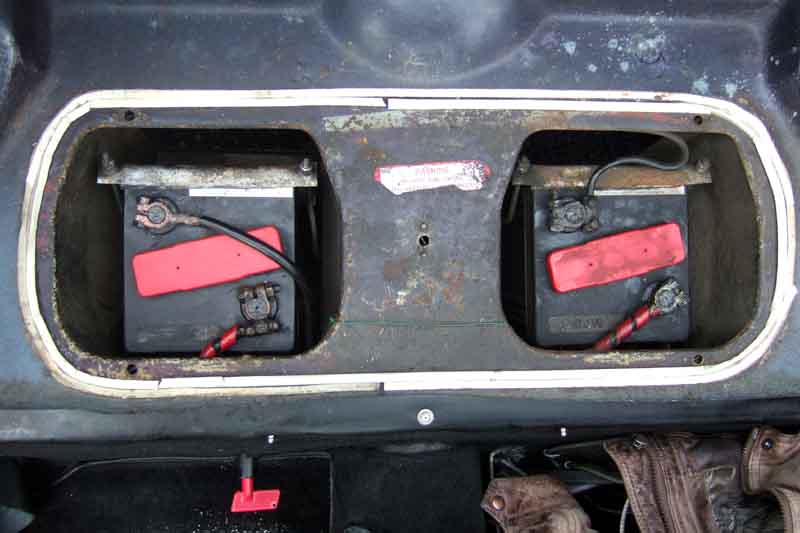 Cleaned the 'growth' off the batteries, connectors and clamping plate and reinstalled. I will replace the interconnecting cable in due course as its bolt and nut were badly corroded and parts of the connector have been eaten away, but it is OK for the time being. Liberally daubed the battery posts and connectors with Vaseline (before fitting) which really does help keep corrosion at bay (normally!).
 I've got into the habit of turning Vee's switch off every time I put her in the garage so shouldn't have much trouble getting to use Bee's. I just hope I never have to use it 'in anger', but I shall be ready. In fact it has become so much of a habit that a couple of times I have turned Vee's switch off before the engine, which is something you should never do. Even though the alternator has a voltage regulator it still needs the battery to be connected for it to work correctly, without a battery you can get very high voltages which can blow bulbs and possibly damage the alternator. I've been lucky, I've seen my coolant level warning (green glows all the time when the level is OK) get brighter and flicker when I've done this, but no lasting damage.
Update April 2009: Very glad I had done this, and put the switch in the 12v cable instead of the earth, as when I replaced the link cable the new one was too short to go between the posts in their existing positions. The only possible way to make it reach comfortably then meant the 12v cable was too short. By having the switch in the 12v cable it was a relatively easy matter to remove the short piece between 12v terminal and switch, turn that battery round, then make up a new, longer cable to go between the new position of the 12v post and the switch.