


Model Variations
Fixing bolts
Earth Straps
Rubber Bumper 'Coil Boost' System August 2014:
Batteries and Chargers
Mechanical Problems
Electrical Problems
"It Won't Start!"
Modern Starters - 'Geared' vs 'Hi-Torque'
Changing an inertia starter to a pre-engaged
Jump Starting
V8 Starter
Help! My starter is cranking all the time! On 76 and later models this can be caused by the 'brake test' diode having gone short-circuit. On all models it can also be caused by failure of the ignition switch, a sticking starter relay (1970-on), sticking solenoid, or chafed wiring.
Schematics Note: Automatic cars have the White/Red wired via the combined reverse light switch and automatic transmission safety switch on the gearbox. While the automatic gearbox was an option, all MK2 CB cars had a bullet connector in the white/red starter wire to the solenoid (68 and 69 models) or starter relay relay (70 and later) in the tail leading down to the starter.
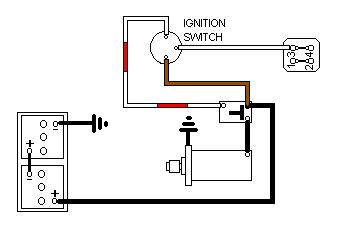
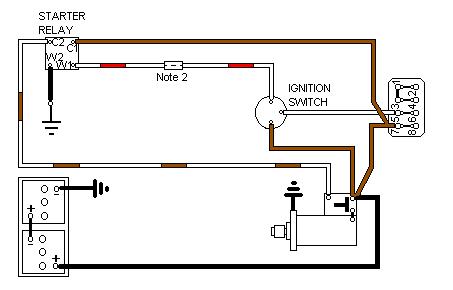
 An M418G inertia starter 13H4561 and a remote solenoid on the inner wing was fitted to MkI cars. MkII and later had a 2M100 pre-engaged starter with attached solenoid 13H6130. Originally the ignition switch operated the solenoid directly on both types, but probably because of the higher current requirement of the pre-engaged starter a starter relay was eventually (1970 models) fitted which has the effect of reducing the load on the switch and its connections. 18V engines had the later 2M100 starter 13H7844. The solenoid on this starter has a 'boost' contact for ballasted ignition systems to aid starting (it connects full battery voltage to the 6v coil) but this wasn't used on 4-cylinder CB cars, only RB. All V8s had the 2M100 starter with the coil boost system - albeit to a different part number BHA5223. V8s also have an additional connection under the right-hand toe-board where the battery cable joins a short tail from the starter.
December 2023:
 The inertia starter is significantly longer and heavier than the later pre-engaged starter, even more so than the modern replacements which are also 1/3rd the price of a rebuilt exchange original. Simon Sjenitzer needed to remove his and was having trouble getting it out, asked on the forum how it should be done but didn't get any useful response. The Workshop Manual makes no reference to it as they advise removing the engine and gearbox together. Haynes does cover removing engine only and says "... Undo the two bolts which hold the starter motor in place. It will not be possible to remove the starter until the engine has been drawn forwards a few inches my emphasis, unless the distributor is removed. They say 'all models', but show a circular gear lever gaiter so that must be a 4-synch with the pre-engaged starter, and I removed mine just by removing the distributor i.e. without pulling the engine forwards. Not having done an inertia starter (on an MGB, I have on a Mini) I did advise that once he did get it off to replace it with a modern - smaller and lighter - type even if there was nothing actually wrong with the starter. He had to puzzle it out for himself and came back with (paraphrased) the following:
The 1977 LHD Workshop Manual AKM3524 gives the 'lock torque' current (stalled?) as 463 amps, the current at 1000rpm (cranking?) as 300 amps, and the 'light running' (spinning not cranking?) as 40 amps.
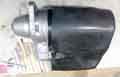 Clausager and the Parts Catalogue say that a rubber boot BHH790 was fitted over the 4-cylinder (but not V8) starter, solenoid and connections from chassis number 284721-on in May 72. It is no longer shown in the 77 and later catalogue, but some say their 77 and later models have it. It's said to be a right pain to remove and refit, my 73 hasn't had one in my 30-year ownership and hasn't suffered as a result.
Pre-engaged solenoid: August 2013
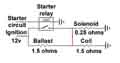
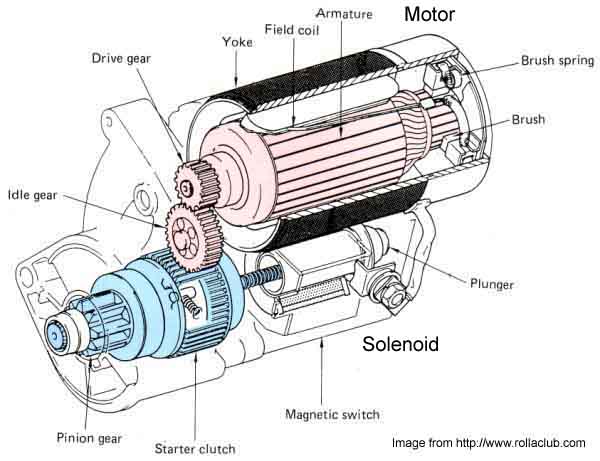
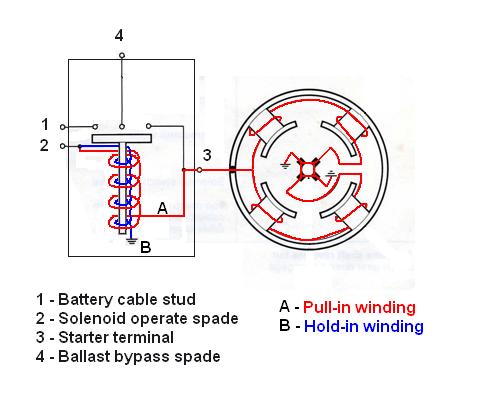 The Workshop Manual covering early models makes no mention of it, but the pre-engaged solenoid has two windings - a pull-in of 0.25 to 0.27 ohms as well as a hold-in of 0.76 to 0.8 ohms. Haynes lists both windings in the sectioned drawing of the pre-engaged M418G starter, but doesn't mention it for the later 2M100 for 18V engines, however it will be the same. This results in an initial current of about 30 amps when power is first applied to the solenoid, dropping to about 10 amps when it has operated. In fact it is closer to 8 amps once the cranking load has been applied to the battery, and its voltage falls to the normal cranking level of about 10v. Brian Shaw reported that the solenoid plunger didn't move when he applied 12v to the larger operate spade and earth to the starter body, even though he could see it was sparking, and he measured 11 amps on it. It was only when he connected 12v to the battery cable stud as well as the operate spade that the solenoid operated (and the motor spun). Bob Davis pointed out these two windings and posted a Bosch circuit diagram of a typical starter and ignition system, click the thumbnail for a simplified diagram of the solenoid and motor and an explanation how the system works. However that doesn't explain Brian Shaw's problem. Regardless of whether 12v is connected to the battery cable stud or not, current will still flow from the solenoid operate spade to the starter body through both hold-in winding and the pull-in winding and the motor - as long as the solenoid is connected to the motor. By not having 12v on the battery cable stud the opposite problem occurs, i.e. the pull-in current isn't reduced to the hold-in value when the solenoid operates, so it could overheat. Brian's problem is more an indication that insufficient current was flowing to pull the solenoid in. The solenoid only operating when 12v was applied to the battery cable stud as well is not logical as until the solenoid operates the battery cable stud isn't connected to anything.
Fixing bolts: August 2016
Earth Straps: January 2020
See below for how to check the condition of battery and earth connections. A bad engine/gearbox strap can result in smoking/damaged accelerator, heater and choke cables as well as slow cranking and difficult starting, and I have heard of one case where a braided clutch hose (why?) burst.
On Mk1 cars if you hear a 'click' when turning the key that is probably the solenoid on the inner wing operating, so if the motor doesn't turn either the solenoid is failing to extend power to the motor or the motor is not responding to it.
On Mk2 if you hear a 'clonk' when turning the key that is probably the solenoid on the starter you can hear, so if the motor doesn't turn either the solenoid is failing to extend power to the motor or the motor is not responding to it.
From 1970 if you only hear a 'click' that is probably the starter relay you can hear, so if you don't hear a 'clonk' or the motor either the relay is failing to extend power to the solenoid or the solenoid is failing to respond.
If you don't hear anything at all when you turn the key either the key switch is failing to extend power to the solenoid (up to 1970), or to the relay (1970 on), or the solenoid/relay is failing to respond.
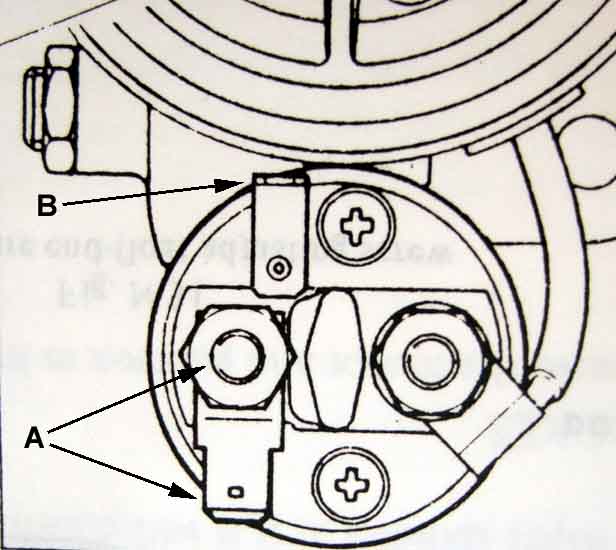
July 2024: Filled up a couple of days prior to a trip to Norfolk I went to start the engine and just got a 'clonk' - odd, but I'd already put it in gear and was starting to lift the clutch so it could have been something to do with that. 2nd turn was fine. Morning of the journey the same thing happened, but again the 2nd turn was fine - slightly concerning at the start of a 3-day 360 mile trip! Lunch stop was fine, as was starting the engine twice when we were there. Could be the solenoid failing to power the motor, or the motor not responding. Unlikely to be a dead segment on the motor as the armature would need to be turned to another segment before it would work. Could also be a bad connection feeding the solenoid, so far I hadn't looked at the ignition warning light to see if that went out, but having got the clonk and again when I released I doubt it is that. Could also be a bad engine earth strap, but that would make the accelerator, choke and heater cables smoke, and I should be able to use my lithium jump pack connected to the remote starter terminal on the inner wing and the engine block to get round that. Looking at pictures of Bee's solenoid and motor there is a bolted connection both sides of the solenoid, with the 2nd one being the connection to the motor, so if it is the solenoid contact I would be able to bridge the two to power the motor independently - once I had got the car high enough ... and safe enough! But if it is the motor itself then no chance. The hotel car park was down a slight slope and had a hardcore surface so bump-starting it there was out, as was pushing Bee out onto the road, she would have to be towed out. Start of the journey home the same thing happened, but fortunately again the 2nd try was fine, as was a restart at a filling station and our lunch stop then home with no further problems.
Pondering next day if I can connect two voltmeters one to the battery cable stud on the solenoid and the other to the link between the solenoid and the motor I should be able to see exactly where voltage is and isn't getting to. Jacked up with axle stands under the spring pans that's easy enough, but Sod's Law dictates that she fires up first time and seveeral times immediately after! Can't leave her like that as she is just forward enough to prevent the garage door closing, so really I need something a bit more 'permanent' that I can see in the cabin, like a bulb connected to the solenoid output, with the ignition warning light being used for the input. The wiring needs to be fairly robust to cope with engine movement, and connected firmly enough so it doesn't fall off, so I opt for length of twin-core sheathed mains cable with a through-hole terminal on the end as the connection between the solenoid and the motor is also a threaded stud and nut just like the input. I go to undo that nut ... and whilst not loose as such it needed very little pressure to start moving it, and many years ago I did have a bad connection develop where the battery cable attached to the solenoid input stud! In the normal run of events that nut shouldn't have been moved since the starter was built, and it is quite likely to be the original as it came with the car to me in 1990, so no complaints about quality of the starter as a whole!
For the bulb I root through the old harness I kept from a 1980 and find a holder one with a small bulb with long enough wiring tails both sides which is perfect. Connect the tail to my solenoid output wire which has been fed though the harness grommet, the earth goes to the fuel gauge clamp bracket under the knurled nut. Bulb taped to the top of the steering column just down from the cowl. Turn the key and it lights up and the starter turns the engine - several times, so worth the effort as it's may take a few start attempts over a week or more ... and I may have fixed it anyway by tightening that solenoid output nut more than it was before. Next morning still working, and again in the afternoon, plus twice next day and succeeding days, so watch this space ...
 Chrome bumper cars have the earth strap round the right-hand (as you look into the engine compartment from the front) engine mount with one end under an engine front-plate nut (one of two) and the other under a chassis bracket nut.
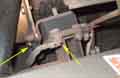
 Rubber bumper cars have it at the gearbox end as the engine mounting arrangement is completely different. One end under a bolt through the rubber mount plate into the gearbox casting, and the other end under the nut that secures the mount stud to the crossmember, and as such much less accessible.
Note that V8s have an additional connection under the right-hand toe-board where the battery cable attaches to a short tail coming from the motor.
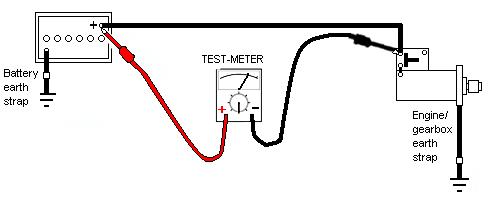 Ideally we want to test the 12v circuit between the battery post and the and the solenoid stud - meter positive on the 12v post and negative on the solenoid stud for negative earth cars, reverse for positive earth cars. Again these voltage measurements are taken while cranking, but instead of a meter with manual range selection being set to its 12v scale, it should be switched to a low voltage scale.
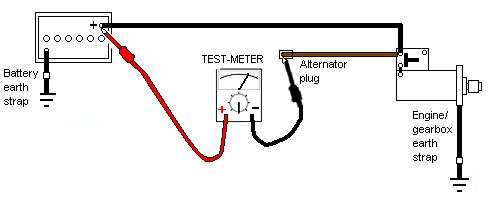 However the solenoid stud is not easy to get to, particularly on the V8 where it is covered with a heat-shield. But by unplugging the alternator plug and using the brown wire in that, you are effectively measuring the voltage at the solenoid stud. Except on the V8 - where the browns go to a battery cable stud under the toe-board, and a short length of battery cable goes from there to the starter. This will give the true voltage at the toe-board stud, which still leaves the potential (ho ho) for losses between there and the solenoid stud.
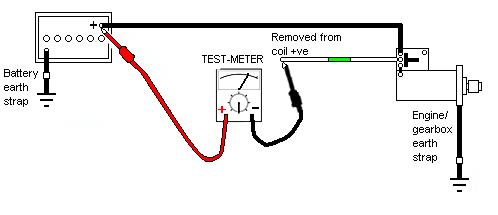 But! There is another dodge, and that is that when V8 and rubber-bumper 4-cylinder solenoids are operated and powering the starter, they are also connecting solenoid stud voltage to the ignition ballast bypass wire that goes up to the coil +ve. So removing this from the coil and connecting your meter to that tests the voltage inside the solenoid, and includes any voltage being lost in the battery stud half of the solenoid contact. There could be more voltage lost in the starter half of the solenoid contact, but unless you can get at the link that goes between the solenoid and the starter motor itself you won't be able to test that.
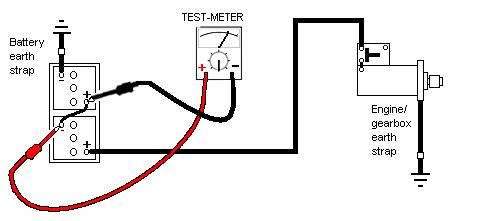 For twin 6v batteries also measure between the two link cable posts and add that to the losses measured in the 12v and earth circuits to get the total losses. Note that the meter polarity shown is correct for the negative earth system depicted.
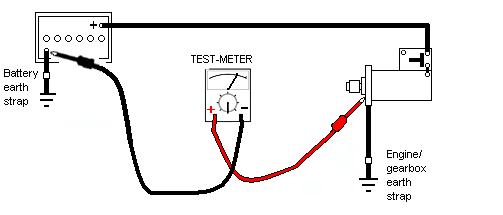 The earth circuit is tested with the positive probe on the starter body and the negative on the battery earth post (for negative earth cars, reverse for positive earth), and checks the engine/gearbox strap as well as the battery earth strap. You will obviously need a long wire for one of these connections on an MGB.
The individual readings will tell you which of the two (or three) parts of the circuit are giving you the greatest losses. An analogue voltmeter is preferable for these tests as a digital meter may give wildly fluctuating readings while cranking. Disconnect the coil to prevent the engine from starting.
In a perfect world you would see 0v while cranking on both tests. But even with cables and straps of this size and good connections there will be some resistance, and hence some volt drop, but ideally it should not exceed 0.5v in either path. With freshly cleaned connections you should be able to get it down to a couple of tenths of a volt in each direction. If you get significantly more than 0.5v you have one or more bad connections, and by using the same technique of looking for lost voltage at various connections in a circuit you will be able to determine those that are causing the biggest volt-drops. These can typically be the battery post connectors, with the older cup-style battery connectors in particular, the earth strap where it bolts to the battery box, and either end of the engine/gearbox earthing strap. In any of them you could also get bad connections where the cables and straps attach to their connectors. Incidentally make sure you do have an earthing strap either around the left-hand front engine mount (CB cars) or round the gearbox mounts (RB cars) or your starter current will be returning to earth via the heater and accelerator cables, heating them up and possibly damaging them in the process.
Also test the link cable between twin-6v batteries in the same way, i.e. between the two posts, and the cable from the remote solenoid on the inner wing and the starter motor for the earlier inertia starters. You can also test the remote solenoid by putting the meter between the two studs. However this will show 12v immediately, dropping to the 'lost' voltage in the contacts when you turn the key to crank. If your pre-engaged starter with the attached solenoid has an exposed link between the solenoid and the motor as some do, you can check that solenoid as well.
Rubber Bumper 'Coil Boost' System: August 2014
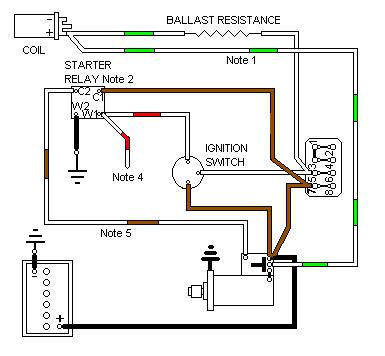
The system works in normal running by feeding ignition voltage to the coil through a ballast resistance concealed in the wiring harness, such that half the voltage is dropped across the ballast resistance and half across the coil. The coils on this system have half the primary resistance of 12v ignition systems - about 1.5 ohms as opposed to about 3 ohms, and are known as 6v coils.
 For starting there is an additional contact on the starter solenoid which is connected direct to the coil +ve. When the solenoid operates as well as powering the starter, it also feeds battery voltage out on this additional contact. With a decent battery you should get 10v while cranking, which boost the coil voltage from the normal 6v running level to 10v during cranking, which gives a much fatter spark. This boost voltage is disconnected as soon as you release the key and stop cranking, if you ran with this voltage on a 6v coil you would overheat it and rapidly burn out the points.
 It seems many geared and 'hi-torque' starters supplied for the MGB still don't have the extra contact on the solenoid which boosts coil voltage during cranking, meaning you either have to dispense with the coil boost feature or replicate it with an alternative or additional relay, or possible a diode if you know what you are doing! Click the thumbnail for three options.
 A couple of people have asked why the bypass circuit doesn't come from the existing contact on the starter relay and the answer is that Messers Ohm, Volt and Amp won't allow it! With the coil +ve wired to the solenoid contact on the relay you create a network of resistances instead of two simple series circuits and they interact with each other to affect the voltage that is available to the coil, reducing it from 6v to about 1.5v which isn't enough for ignition. A secondary effect is that the current through the ballast resistance would increase from about 4 amps to 7 amps almost doubling the heat that it would have to dissipate, and a tertiary effect is that the solenoid would have some current passing through it all the time.
I recently started getting hot-starting problems on the V8, first wondering if it was a batch of dodgy fuel, but when it happened again two or three tankfuls later I wondered whether the coil boost circuit was operating. I connected an earth to the coil -ve effectively shorting out the points, and connected a volt-meter between the coil +ve and earth. When turning on the ignition I saw 6v which was what I expected. However when turning the key to crank, instead of seeing about 10v, the voltage dropped to 5v i.e. half the cranking voltage, so the coil boost circuit wasn't working.
I got under the car and found the coil boost wire was broken between where it came out of the harness and where it went to the spade on the solenoid. This wiring was damaged when I got the car, there is supposed to be a short sub-harness on the starter and a 2-way connector joining it to the main harness, but this was missing and a dodgy join made instead. I'm not sure why it needs this as both solenoid spades are accessible even with the heat-shield in place. When I replaced the starter in 1999 I repaired it as best I could - I had to change the spade as originally it was a small spade to distinguish it from the standardised solenoid operate spade, but it seems that rebuilt starters have two standard spades. However since then the insulation had hardened and cracked in a couple of places and allowed engine movement to flex the conductors which fractured them.
I made a better repair, removing the heat-shield and convoluted sheathing that covered the battery cable plus the two wires. I sleeved all the wire that came out of the harness with two layers of heat-shrink for strength, and soldering the end of that to the tail from the starter, putting two layers of heat-shrink over the join as well. Tested before refitting the convoluted sheathing ... and still no boost! This time I put the meter right on the solenoid spade with the wiring removed, and still no boost, so there is a problem with the solenoid. The question then was, whether to remove the starter and investigate it, or use one of my alternatives until the engine comes out for a replacement clutch or whatever. Having replaced the starter previously I know I could get at everything relatively easily, so opted to take the starter out, which only took a few minutes.
 The V8 has a curious arrangement of a stud under the toe-board with the battery cable attached on the top, then a few inches of battery cable from the bottom of the stud to the starter. This together with the sub-harness containing the solenoid operate and boost wires means the starter can be removed and refitted with these three still attached to it - why, I don't know. Maybe it is so you can fit the heat-shield before the starter, which is a bit of a fiddle, although I have been able to remove and replace it with the starter in-situ.
With the starter on the bench a couple of Allen screws removed and a nut terminating the starter feed to the second stud slackened the solenoid comes away. There are two Phillips screws holding the 'plastic' end-cap that carries the two studs and the two spades to the end of the solenoid, but there are wires from the solenoid that come through the cap and have to be unsoldered from the operate terminal and the starter stud, and fortunately my iron is up to the job. Flicking molten solder off, then levering up the ends of the wires, allows the end-cap to be removed.
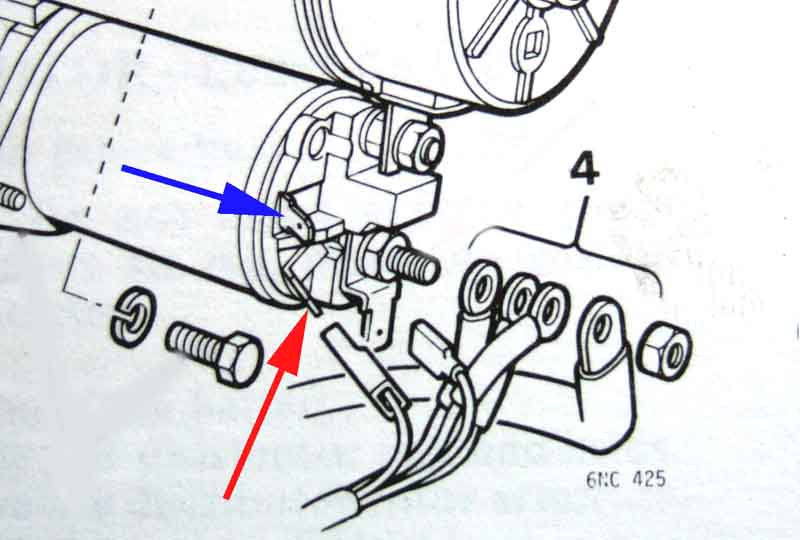
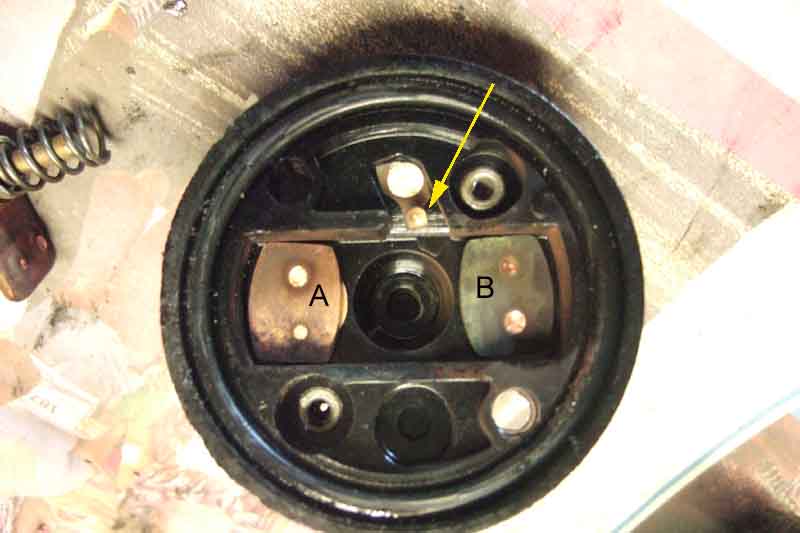 I can immediately see what the problem is! There is a large copper bar that bridges the two studs when the solenoid operates, and the boost terminal has a small copper contact that sits between the two studs and should be contacted by the copper bar at the same time. However, the contact is bent back, so the copper bar will never touch it. This lies under the copper bar, so it is impossible that my dismantling has damaged it in any way, it must have been like that from the beginning. It obviously was never tested, and although I tested the starter before fitting I only checked that the pinion moved forward and spun. I didn't check the boost contact - "Of course that will work ..." yeah right.
So I straightened the boost contact, and adjusted it such that the copper bar touched that before it reached the two studs. Refitted the end-cap but didn't solder the wires yet, and with a continuity meter checked that when the copper bar was moved manually by pushing a bar down the middle of the solenoid the boost contact and the two studs were all connected together. Re-soldered the wires, and fitted the solenoid to the motor. Another test this time with 12v between the battery cable stud and the solenoid body, then bridge the battery cable stud to the operate spade, first to check the pinion comes forward and spins, and secondly to check that voltage appears at the boost contact - all good.
Refit the starter to the engine, attach the battery cable and the two wires but leave the sheathing and the heat-shield for the time being, and redo the original test i.e. monitoring the coil voltage before and during cranking - success! Refit the sheathing and the heat-shield, test again - still good.
So the question is, will this overcome the hot-starting problem, which in any case is still down to unknown causes, as there obviously has been no coil boost function for 14 years. But the hot starting has only been an issue for two or three months, and seems to be associated with hot weather.
October 2018: It seems to have gone as suddenly as it came, nothing since the summer of 2014, including in the very hot weather we have experienced this year. There have been several complaints of 'vaporisation' or 'vapour lock' in various fora and Enjoying MG, with those reporting it claiming it is common. Not only has it not happened to me, but on various runs in hot weather this year I've not come across any stranded MGBs - including organised runs with dozens of MGBs and Midgets taking part! If you get the problem, then there is a fault on your car that can be fixed without resorting to modifications. The one possibility I will acknowledge is that excessive fuel height in float chambers can expand when turning off a hot engine, and rise enough to run out of the jet into the inlet manifold, resulting in a rich mixture which DOES affect hot starts. That can be caused by incorrect float height, and for those that experience it during a long idle it may even be the float valves are not fully closing off when they should, and letting in more fuel that is being used at idle (see this test). That will gradually raise the fuel level in the jet, with liquid fuel eventually running in to the inlet.
 Within the last few years 'geared' starters have become available for the MGB as an aftermarket item. These simultaneously reduce the current drain on the engine and spin the engine faster - I've seen claims of double the cranking torque for nearly half the current drain - which both aid starting and increase battery life, they are also smaller, lighter and quieter! In fact the solenoids on these are usually larger than the actual motor, and it is the solenoid that is inline with the pinion and not the motor. There are a number of basic types of starter from different manufacturers, with a variety of different adapter plates to mate them to the MGB bell-housing. Some come with a captive bolt ready to go into the bell-housing as one of them is shrouded by the motor. Others are assembled differently and both bolt holes are accessible. Some have a slotted top hole which makes it easier fit the motor - you start the bolt first hook the motor onto it, then while that takes the weight of the motor you can start the second bolt. Others require you to support the weight of the motor whilst trying to get one of the bolts started. They are available to replace both inertia and pre-engaged starters, because although the inertia starter pulls the pinion into engagement with the back of the flywheel and the pre-engaged (including these geared starters) push it into engagement from the front, the earlier flywheel has the teeth cut properly on both faces of the flywheel so will accept either type.
September 2021:
 A New Kid in Town (to me) is an 'epicyclic' starter which is like a conventional starter in that the motor is in line with the pinion and the solenoid is on the side unlike other geared starters which are the other way round. But that is because there is an epicylic gearbox between the motor and the pinion, like the overdrive, whereas the other geared starters only have a single idler gear between the two shafts. Very light at 5.2lb, but also very expensive at over Ł400 i.e. about six-times more than a modern 'lightweight' conventional starter. 'Lightweight' is by comparison to the original MGB starter which are still available but at twice the price of the modern lightweight they can only be of interest to 'purists'. Very confusing information in the MGOC ad for the Powerlite starter as well as on the Powerlite site itself:
- The difference between inertia and pre-engaged starters for the 4-cylinder MGB is that the former have 9 teeth on the pinion and the latter 10 teeth (V8 pre-engaged have 9 teeth).
- With the change from Mk1 to Mk2 the starter changed from inertia to pre-engaged, the electrics changed from positive earth to negative earth, and the gearbox, flywheel and engine back-plate changed which impacts the starter.
- MGOC states 'dual polarity' but MGB starters have always been 'dual polarity'.
- MGOC states they are for 1968 and later.
- Powerlite's RAC531 says "to replace the original 5" inertia type ... will fit ... MGB (early inertia type only) ... Negative earth applications only ... 9 teeth." The implication being that this can only be used on converted Mk1 cars, and probably only those with the original style of engine back-plate and gearbox. Which is odd as the picture shows a flying lead for the coil boost wire which is only on RB cars.
- Using Powerlite's model selector they say they have nothing for the MK2 and later MGB, but if you search on 'microstart' they list the RAC530 for 1968 to 1980 which has the correct 10 teeth, but apparently no coil boost wire for RBs.
- Powerlite don't appear to have a version for the MGB GT V8.
An early example I tried on the V8 was very poorly manufactured in that the adapter plate was only held to the motor by three self-tapping screws and some super-glue! Needless to say it broke free within a few days, so look for some substantial bolts connecting the plate to the motor. While it was on though it was remarkably quiet, so much so that the first time I turned the starter I though the motor was just spinning without being engaged with the flywheel.
Price: Geared starters are the most efficient but whether it is worth paying the very large premium on them is debatable. At the time of updating (July 2024):
- MGOC have a reconditioned OE at Ł135 outright, a light-weight GXE4441 at Ł70, a geared at Ł225, and a Powerlite micro-starter at Ł375.
- Motaclan/Leacy seem to have a rebuilt OE at Ł101 plus surcharge on the old unit and a light-weight at Ł82.
- Brown & Gammons don't seem to do the OE anymore, have a 'pre-engaged' at Ł90 (presumably a light-weight), and what they describe as a 'competition' (which in the photo is identical to the light-weight but the technical document describes as geared and hi-torque) at Ł222 which is slightly heavier than the only alternative.
- Moss Europe have reduced their prices with a higher-efficiency, lighter-weight alternative at Ł113 which appears to have the coil boost contact for rubber bumper cars, an OE at Ł170 plus surcharge of Ł48 pending return of the old unit, and a geared (described as hi torque) at Ł258 reduced to Ł232.
- Powerlite seem only to have a geared at Ł273, not the previously listed inertia or micro-starter types.
September 2021:
 Mark Robinson shopped around for a geared starter in America and got one for the same price in dollars as we would pay in pounds, so a bargain. However when mounted using the slotted hole at the bottom which aids fitting, that puts the motor below the solenoid and its connections for the battery cable and operate wire are above the motor and can only be accessed from above. Moss Europe shows the slotted hole on the other side of the solenoid to the motor, which puts the motor above the solenoid, and makes the connections more accessible from below. Another issue is that the battery cable connector is bent at a right-angle originally, but will have to be straightened to fit this starter. So with that and the positioning Mark has made up a short stub between the car's battery cable and brown wires, and the solenoid stud.
February 2017: I've just had occasion to replace the starter motor on my ZS 180. It's immediately apparent that the new one is much quieter and cranks noticeably faster than the old one. When I first had the car I felt that cranking it sounded much like my MGBs, i.e. significantly noisier than other 'modern' cars heard round and about. It's almost as quiet as a geared starter, but not quite. The motor is externally identical to the modern light-weight versions from the likes of Moss etc., so I'd have no problems about using this type on my MGBs in place of an OE.
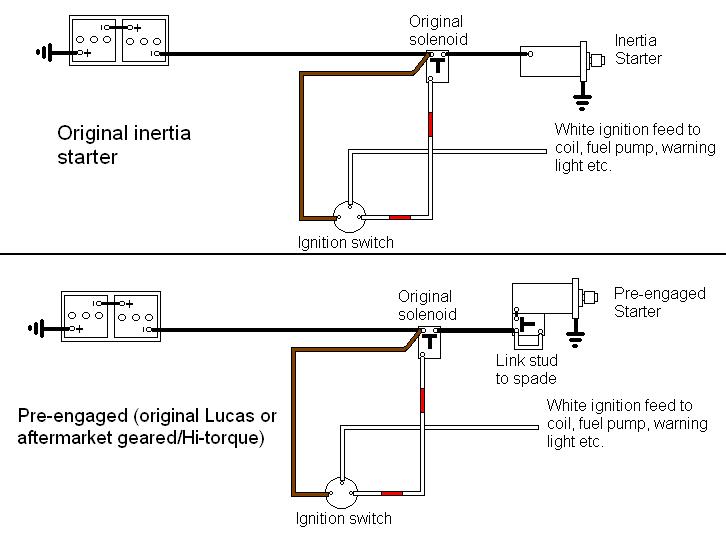
Changing an inertia starter to a pre-engaged: Updated April 2012
When fitting a later engine to a Mk1 car, or fitting a pre-engaged (any type) starter to a Mk1 engine, there are several possible ways of integrating the new pre-engaged starter with the original wiring:
Jump-Starting: Updated December 2011
Starter Pack
Battery Cable Post in the Engine Compartment
Never, ever, follow the advice given by a certain contributor to the MGOC magazine and 'clip the ends of the leads together'. It's true there was a drawing showing one lead clipped to the insulation of the other, but the following month it was obvious someone had taken the advice literally and connected the two clips together, destroying a battery. The person involved was very lucky the battery didn't blow up in her face. The contributor than had the unbelievable arrogance to imply that at least she will have learned a lesson!
Quite apart from the extreme hazard if the advice is misunderstood as in this case, even clipping one end to the insulation of the other is bad advice. The clips have teeth which will bite into the insulation and quite possibly damage it, and why have to cope with two leads at a time instead of just one? You only have two hands, but three ends. So if you clip the two free ends onto one battery or the other, the clipped-together ends will be dangling somewhere, and one of them at least will be live at some point. Far safer to separate the leads if possible and deal with one at a time as below. All the leads I have looked at appear to have two separate cables. If yours have the two cables tied together in some way, such that you can't completely separate the cables, then you should still deal with one polarity of cable at a time, then deal with the other. You will have to watch where the two free ends are dangling, as well as what you are doing with the ends you are dealing with, but at least the dangling bits should be short and they won't be live at any time.
Jump-starting, or 'boosting' is the act of using another battery - a donor - temporarily hooked up to a car - the recipient - to start it typically when its own battery is flat, the donor battery often being in another vehicle. Great care must be taken when connecting the donor battery, if it is connected incorrectly explosions can occur at worst or electronic components like the alternator destroyed. That said there are a number of myths and legends surrounding jump-starting to be ignored. One is that the arc generated when connecting jump-leads will destroy the diodes in the alternator of the recipient. It won't as long as you connect the two the right way round! The second is that having the donor engine running while cranking the recipient will burn-out the donor alternator. It shouldn't, all alternators have over-current protection built in.
You can get expensive heavy copper professional leads and cheaper aluminium home-use leads. The former are much more robust, can carry much higher currents and have safety-insulated clips, but the results of connecting them the wrong way round will be much more spectacular! The hobbyists leads have a certain amount of 'fail-safe' in that they cannot carry such high currents so are less likely to result in battery damage if connected incorrectly, but the connections between cables and croc-clips are a bit iffy (they will get quite warm in use) and the clips are usually uninsulated. You will not get as much cranking voltage with the hobbyists leads as with the professional but in my experience it should be more than enough to get the recipient started (6-cylinder BMWs excepted ...).
Either vehicle can be of either polarity (i.e. either positive or negative earth), but no matter what the polarity of either vehicle the connections are always positive to positive and negative to negative. You must confirm the polarity of both cars before you start. Never assume that colour-coded cables or plastic covers on the battery terminals are a reliable indication of polarity, look for '+' and '-' symbols on the battery case, or coloured rings round the posts. If you cannot see them check with a voltmeter. A voltmeter can also confirm which is the live terminal and which is the earth/body terminal, and even a newly flat battery should have enough voltage in it to indicate polarity. The MGB changed from positive earth to negative earth in 1967, other classic cars may be different, probably all modern cars are negative earth. If the recipient has not run for a long time and the battery has been out of the car in the mean time make sure the battery has been reconnected correctly. The positive and negative battery posts and clamps are of different sizes, but it is possible to force bolt-up clamps (not the 'helmet' variety) onto the wrong terminals given enough brute force and ignorance.
When connecting different polarity cars together never let metal parts of the cars come into contact with each other or this will short out one of the batteries and cause a very high current to flow, but then we wouldn't let out cars come into contact with anything else anyway, would we? And even on same-polarity cars the potential difference between them can be enough to cause damage to the surfaces in contact. Because MGB starter motor and battery cable are pretty well hidden the usual way of jumping to or from is direct to the batteries even though they are also relatively inaccessible. Note that on a V8 you might be able to use the toe-board stud but I have never done this, and with uninsulated clips the risk of the clip coming into contact with the chassis rail is quite high. If either car has twin 6v batteries you must take careful note of which are the +ve and -ve terminals of the two batteries taken as a single unit and not connect anything to the interconnecting cable that goes between the two.
Connect both ends of one cable first, then connect the second cable. If you connect both cables to one battery first you might inadvertently bring the free ends of the jump-leads together which will generate a big spark off a fully charged battery.
You can connect the two batteries together using the jump-leads direct on all four battery terminals, but the risk with this is that if you have got the connections the wrong way round one of the batteries may explode as you are leaning over it. For that reason it may be better to make the last connection to some sturdy chunk of earthed metal like the block. Easy enough on most cars other than an MGB as the battery is usually in the engine compartment, but a bit more difficult when two MGBs are involved. Personally I always tap the last croc-clip on very briefly first to see how much of a spark I get. Connecting a fully charged battery to a flat one will always generate a small spark but the spark from having the batteries the wrong way round is much bigger!
I've just come across these Kangaroo Safety Jump Leads from Airflow which should help guard against sparks and incorrect connection. They are in two halves, with an interconnecting plug. To use them you part the plug, put the two clips of one half on one battery, then the two clips of the other half on the other battery. Then you look at the LEDs in each half of the interconnecting plug which will indicate whether you have the clips on correctly. If you do, push the two halves of the interconnecting plug together. Could be useful on MGs with two black leads at the battery/ies and no polarity marking symbols or colours.
I always leave the engine of the donor vehicle running while cranking the other car. This ensures the donor battery is at its maximum voltage beforehand, recharges it during the brief pauses in cranking the recipient, and if one persists in cranking a car that just won't start it avoids flattening the donor battery as well.
Rather than cranking the recipient you can leave the jump-leads connected for some minutes allowing the alternator of the donor to charge the recipients battery, disconnect the jump-leads then try starting as normal.
Equal care needs to be taken when disconnecting leads, that they don't hit earthed or painted parts, or short together. Some advice says if a modern car is involved at one end or the other when the jumped engine is running the headlights, heated rear window and heater fan should be turned on full to minimise any voltage surges that might damage electronic units. Additionally some suppliers of electronic ignition systems for classic cars say they should not be jump-started at all or it may damage the module.
Starter Packs Added February 2014
There are various types of these containing a full-size battery, with mains-powered charger, and often a compressor, from Ł50 upwards. However these are pretty bulky and one wouldn't normally carry them round.
July 2019: I've had my jump leads for probably getting-on for 50 years and having been bought in my impecunious youth they were cheap ones with aluminium conductors and the clamps crimped on. Never terribly effective, and the last time I used them five years ago I had to wiggle the conductors in the clamps to get them to work. Now one of Bee's batteries suddenly failed and all the wiggling and additional crimping couldn't get enough power out of another battery, so Something Has To Be Done. In any event jump leads need a donor car next door, but we do a lot of touring on our own in some pretty remote locations. Capacitor packs need a donor close enough by to charge it up, which leaves lithium jump packs as the only way to be truly self-sufficient. True they have to be topped up every year or so, but that's not difficult. Looking around there are several different capacities but with three cars I need one capable of powering the biggest - Vee, so 3.5 litres minimum, and if you have a diesel in your fleet that reduces the maximum engine size a given pack will power. Halfords do a Noco GB20 for 4 litres (which is the minimum size from that manufacturer although the instructions say not suitable for diesel) at Ł79 click and collect. I could get it for a bit less mail-order, or alternative products cheaper still, but as it is an unknown quantity to me I want to be able to get a refund with no hassle. It comes half-powered, and took about four hours with a USB connector plugged into my desktop computer front panel to get fully charged. USB sources less than 2.1A will limit the current and so extend the charging time. No direct mains connection but USB mains plugs are available for a few pounds, as are car accessory socket adapters, although note that something described as '5W' is only a 1A source. I then note that the information says 'only suitable for single batteries', but two 6v batteries in series are exactly the same as a single 12v - as long as you connect the jump pack correctly, but that applies to any boost starting and charging method.
Although by now the replacement batteries had arrived I left the old ones in Bee so I could test the jump pack. Followed the instructions and all seemed when I connected it and switched it on, so went for a start. It cranked well enough and started OK but I must say I was expecting faster cranking with 400Amps, as it was it was slower than the batteries used to be before they croaked. As this was 1800cc I wondered what it would be like on the 2.5 V6, and the 3.5 V8. So I took the earth cables off Vee's battery, and put both of my old jump leads in series between the earth cable and the earth post to simulate a flat battery. Tried to start (without the jump pack!) and barely a groan from the starter. Connected the jump pack (to the CABLES, not the battery!), switched on, and cranked again (cold engine parked overnight) and it spun the engine like billy-oh - noticeable faster than Bee. So that's OK. Did the same with the ZS with the same result, so for some reason it finds Bee harder to turn than the other two. Vee is low compression compared to Bee, but the ZS is higher at 10.25:1 Could be the starter circuit of course - poor connections, but with the new batteries in they whizzed the engine round - also cold and no choke. It's high summer of course so thinner oil even when 'cold', may be slower in the deep mid-winter, and I have to remember to take it with me whichever car we are using. Subsequently towards the end of the summer when the ZS battery had gone down through lack of use it only took moments to get it going. Needless to say I carry it in whichever car I'm in at the time!
March 2019: When I first wrote this section I had just been made aware of this 'Startmonkey 400' from British Motor Heritage. Claiming to start any car or van and delivering up to 400 amps, with enough capacity for 15 to 20 starts of 6 to 8 seconds each. Small enough to keep in the car, and rechargeable from either the cars electrics or mains. Expensive at Ł200 though. Now there are many different brands all significantly cheaper, some of them at a quarter of the price at around Ł50. You do need to charge them periodically to make sure they are ready for use - not much point in spending that much, and carrying it around, only to discover it hadn't got enough oomph when you needed it away from a mains socket. Several of them are capable of being charged from the car's accessories socket as well as the mains, so I don't see why you couldn't keep it connected all the time in the car i.e. fully charged at all times. However if your accessories socket is 'live' all the time as on MGBs from 1972 and some earlier you would need to be sure that the jump pack wouldn't discharge back into the cars electrics and flatten itself. If it is only live when the ignition switch is in the accessories or run position as it seems modern cars generally are you should be fine. Personally I shall stick with my jump leads (replaced with a jump-pack) and mobile phone. Some of the jump packs include a phone recharger, but the first thing I get on the rare occasions I change my phone is a charger that plugs into the lighter socket, and these are usually just a few pounds. Your battery would have to be completely dead, and your phone battery flat, to strand you then.
There are also loads of capacitor-based jump packs around, see this Google search. These are not intended to hold a charge long-term and be ready for use immediately, but if you have a 'donor' car nearby they charge in a minute or so then can be transferred to the car with the flat battery. A sort-of half-way house between a battery pack and jump leads - doesn't need regular charging like a battery pack, but doesn't need to be right next to a donor car like jump leads and doesn't have the hazards of incorrect connection either. But it does need a donor to be nearby and accessible, so even by that the self-contained battery type are better, and some of them are cheaper too.
There are gizmos around that plug into both cars cigar lighters and transfer a charge between them without using jump-leads at all, a LED indicating when the recipient has enough charge to try starting it. I don't know whether these can cope with either polarity or can only be used when both cars are negative earth. I also don't know how long they would take to put sufficient charge back into the recipient to allow it to start. When collecting my son's BMW with a near completely flat battery I couldn't even get that to start with jump leads and a donor vehicle, even with the donor engine running, and having left it charging like that for half an hour. In the end I had to call out the AA for their starter pack.
Finally, if a normally easy starter suddenly refuses to start one day there is little point in cranking it until you flatten the battery. If it doesn't start given double the normal cranking time then you should be checking the ignition and fuel supply. If it is a hard starter anyway, well, if it is an MGB there is something wrong that you should have seen to a long time ago, you are knackering your batteries out of laziness.
References:
Lighter-socket jump-leads
AA recommendations.
Halfords recommendations.
UK Health and Safety Executive recommendations (pages 5 and 6, begins at para 24).
Battery Cable Post in the Engine Compartment June 2020: Given the faff of getting to the batteries in an MGB I've long pondered having a battery cable post in the engine compartment, for connecting a jump pack should it be required. I know some marques have this as standard, and it's 'just' a matter of getting a suitable post somewhere in the engine compartment and a cable down to the starter (or the connection point under the floor on the V8). After coming to the end of working for a month or so painting at a pal's place and the prospect of not having enough to do in the Covid lockdown, I started looking seriously.
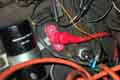 First question is where to mount the post - not much point in buying the makings until that is decided, not least without knowing how much cable will be needed. I don't like drilling holes in bodywork, but on Bee there is a convenient space just aft of the coil, and the clamp bolt can be used to mount a bracket for the post.
Next what post to use. I Googled various terms looking for one with a cap that would insulate the terminal when not in use, then flip back to connect the jump pack, but the only ones I could find were through-panel and hugely expensive. Eventually I settled for a surface-mount 8mm post with small base as taking up the least space but big enough for starting current - 8mm is close to the battery cable post on the starter. I need something to insulate the post when not being used, and they have various 'boots' that slide onto the cable and fit over the termination. An enquiry comes back with red push-on cover 35mm cable size max, so order both at the very reasonable price of Ł5 plus Ł4 P&P, and they arrive in a few days.
Next a bracket - I used a bit of 5mm aluminium off-cut and made a stepped T-shaped bracket to fit the base of the post, and go under the coil clamp bolt. The step holds the nuts that attach the post to the bracket away from the wing. Measuring from there down to the starter with enough slack to make a couple of right-angle bends comes to about 450mm.
Unfortunately 12v Planet only have battery cable by the metre i.e. unterminated, so more searching comes up with SplitCharge who have no less than 19 combinations of colour, current capacity, terminal sizes and lengths. 110 amp should be fine for such a short distance, 8mm terminals each end, at Ł4.41 including P&P, which also arrives in a few days.
My initial thought was to route the cable down with the others against the firewall then go forwards to the starter along with the brown wires. But that brought it very close to sundry pipes and the clutch slave, unless it had been quite a bit longer. At the starter end it was better if the cable went straight down to the terminal, and I could have got away with a shorter cable. So I end up with six of one and half a dozen of the other where the cable goes back towards the firewall, then angles forwards and down to the solenoid terminal. Engine rocking has to be considered and proximity to the chassis rail and solenoid, but I have some split corrugated sheathing which slides over the cable to protect it at that end.
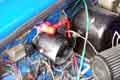 Subsequently I fit one to Vee as well, piggy-backing the post bracket on the alarm siren bracket.
Conversions
Heat Shield
I have had two separate bouts of solenoid chattering on the V8 a couple of years apart. Both initially were only when the engine was hot, although eventually it was doing it on cold starts as well. In both cases improving bad connections in the brown - starter relay - solenoid circuit cured the problems (for two years in the first case) but eventually I did have to go for starter replacement. I suspect the starter was on the way out all along, the bad connections were just making it worse.
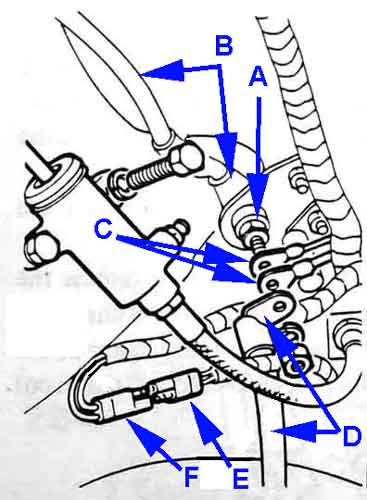
To my surprise I was able to replace the starter without removing either the tubular manifold or down pipe on the right-hand side, but I did have to remove the rack in order to get sufficient movement with a spanner on the top nut. Subsequently (I tried an alternative starter for a while but went back to the OE item) I used a pair of 3/8" extensions and a universal joint to get to the top bolt between two of the pipes on the manifold, meaning I didn't even have to remove the rack. The situation with the original cast-iron manifolds may be different.
Replacements: The alternative I mention was one of the 'gear reduction' starters beginning to crop up all over the place. They are much smaller and lighter, in fact the solenoid is bigger than the motor, and bigger than the on the original starter so should be more robust, it being the solenoid that usually fails on V8 starters. The first time I tried it I thought it was just spinning and not turning the engine over as there was no rocking of the engine and no grinding, just a steady hum, but then it fired up. Because of the gear reduction the motor has a lot more torque, hence the smaller size, and spins faster and so take a lot less current which should take a lot less out of the battery at each start. However the connections were in a different place meaning I had to connect the cables before I could fit it which meant lying on my back under the car holding the motor up in the air with one hand, while I attached the cables with the other. There is also no boost contact for the coil on rubber bumper cars and all V8s on the ones I have seen. This last could be simulated with a relay, but with the lower drain on the battery it may not need it. They are about 50% dearer in price though. The problem with mine was that the motor assembly was attached to the adapted plate with just a couple of self-tappers, and needless to say these came loose after just a few days. On another occasion, and with beefier mountings, I could well be tempted to fit one. Be aware that there are after-market starters available described as 'hi-torque' - not all of these are geared, Caveat Emptor. May 2019: It seems only two types of replacement are available for the factory V8 - the original style and geared. Prices are very variable, Clive Wheatley has the original 3M100 type at Ł120 exchange and the geared type at Ł252. SC Parts has the original at Ł230 plus a Ł264 core charge until you return the original, and the geared at Ł264.
Conversions: I've seen a couple of comments now about the starter motor fouling things when a Rover V8 from another application is used for a conversion. On at least one of these the solenoid is on the side of the motor when installed which will definitely foul the chassis rail. It needs to be below as per the original, but to get an original you are faced with finding one from somewhere, maybe to use as an exchange, or fork out nearly Ł500 as above. In which case it would be preferable for several reasons to get a geared for half that. These geared starters are basically a standard motor on an adapter plate orientated to suit the application, and SC Parts has just such an adapter plate meaning you have the potential of getting a motor elsewhere and modifying it accordingly.